You never forget your first.
Whether it's your first car, or your first significant other, or your first day of college, they say you never forget your first. That's not always true, of course, but I do remember my first: Softlanding Linux Systems, one of the earliest GNU/Linux distributions, and progenitor of the Slackware distribution. It came on a few dozen floppy images, and took forever to install.
Jump into the Astonishing GNU/Linux Time Machine, and via the magic of qemu and iBiblio, you too can experience the earliest days of GNU/Linux. It'll only take an hour. I'll have you back by supper.
Before we go, inspect your equipment
Everything I do here assumes you have installed qemu in the canonical fashion for your distribution. I also assume you are relatively comfortable using a terminal. So, launch a terminal, and see if you have qemu installed by issuing this command:
~$ which qemu
/usr/bin/qemu
~$
Keep in mind the '~$' (dollar sign) is my terminal's prompt. Your prompt may be different. You only type the 'which qemu' part. If qemu exists, you will get back the path to qemu, as in the example. If you don't get back a path, that means qemu is probably not installed, and you must install it before proceeding.
That's it. Once you are sure qemu is available, we can continue. Please watch your step as you board the time machine. After we depart, there may be some turbulence, or you may experience disorientation. This is completely normal.
Choose your destination
SLS was originally released in September of 1992. Version 1.02 was released in April 1993. This is the version I first downloaded and used, and learned how to love computers again. Based on the 0.99p6 Linux kernel, it came with 1 boot floppy image, and 29 directories that were sized to be copied to floppy disks. A DOS utility called "rawrite" was used to create the boot floppy.
Fortunately, thanks to the wonders of modern technology, we don't have to sit through the grueling floppy shuffle. Please don't be disappointed.
One of the great GNU/Linux sites back in the day was Sunsite, at ftp.sunsite.unc.edu. Much later, it was renamed "iBiblio." That site still contains a wealth of historical information. For instance, it stores a bunch of historic GNU/Linux distributions for your enjoyment.
So let's enjoy ourselves.
Although there is an SLS 1.03 directory on iBiblio, the a4 disk seems to be incomplete. That leaves us with the 1.05 distribution, released in April 1994, which ran on a Linux 1.0 kernel. However, even though it's not quite as entertaining as running the 0.99 series, it's still quite a step back in time. So, let's create a work directory, and download a slice of history.
~$ mkdir history
~$ cd history
~/history$ wget -rc -nH --cut-dirs=5 -P install  \
              ftp://ibiblio.org/pub/historic-linux/distributions/sls/1.05
My prompt specifies I'm in the history directory. Again, you will probably have a different prompt. Also, note the '\' backslash at the end of the line. That's a signal that the line doesn't really end. For posting purposes, I broke the line in two. You could quite easily write the entire line as, "wget -rc -nH --cut-dirs=5 -P install ftp://ibiblio.org/pub/historic-linux/distributions/sls/1.05" and it'd work just fine.
If this step is successful, you'll see a lot of stuff go by as wget downloads the entire contents of the SLS 1.05 directory. The contents will end up in the ~/history/install directory, which is just where we want it. The download will take about 15 minutes on a fast connection, and much longer on a 2400 baud modem.
Once the download is complete, copy the boot image to a safe place. We need to do this, as the SLS installer will overwrite our boot floppy, which just happens to be the install boot image. So, issue this command:
~/history$ cp install/a1.3 sls-boot
This creates a copy of the boot image into the current directory. If you peek inside the 'install' directory, you'll notice another file named a1.5. This is exactly like the a1.3 image, only it's for a 5-1/4" floppy. The a1.3 is for a 3.5" floppy. We will, of course, work with the cutting-edge 3.5" technology.
We have one last step before engaging the time machine. We need a fake hard drive as an install target. We create the image thusly:
~/history$ qemu-img create sls-1.05.img 200M
Journey with me into the past
Assuming everything went as expected, you now have the install sources, and the install target. Now you can finally fire up the time machine:
~/history$ qemu -hda sls-1.05.img -hdb fat:. -fda sls-boot -boot a
There you have it! GNU/Linux in all it's 1.0 kernel goodness. Welcome to spring of 1994. Inhale deeply. Do you smell the hope, the promise, the possibility?
Now it's time to install the system on your fake hard drive. We have started qemu with a blank drive image as hda, the current directory (which contains the SLS install files) as hdb, and our copy of the SLS boot image as the floppy disk. Our first task is to partition hda.
At the prompt, login as "root" and run this command:
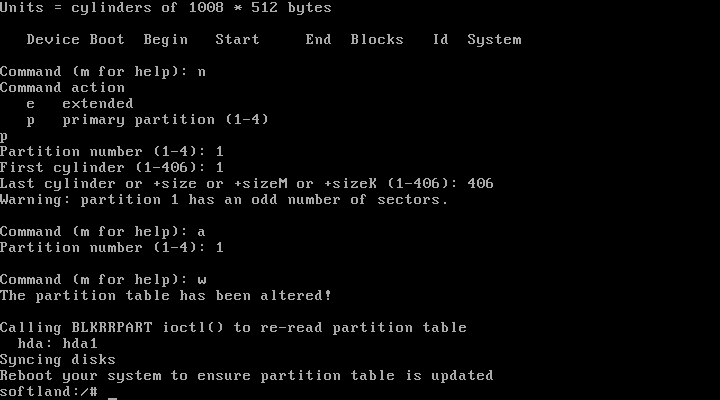
softland:/# fdisk /dev/hda
You'll want to create a primary partition and make it bootable. At the prompt, enter "n" (without the quotes) for a new partition. It'll be a primary partition, so enter "p" when it asks. We want partition number 1. The first cylinder is 1; the last cylinder is the maximum number allowed (mine was 406). Once back to the "Command (m for help):" prompt, type "a" to make the new partition active. Remember, the partition number was 1. Finally, enter the "w" command to write the partition table to disk.
Once back at the root prompt, type "exit" to leave the root shell. You'll be asked to log in again. This time, log in as "install".
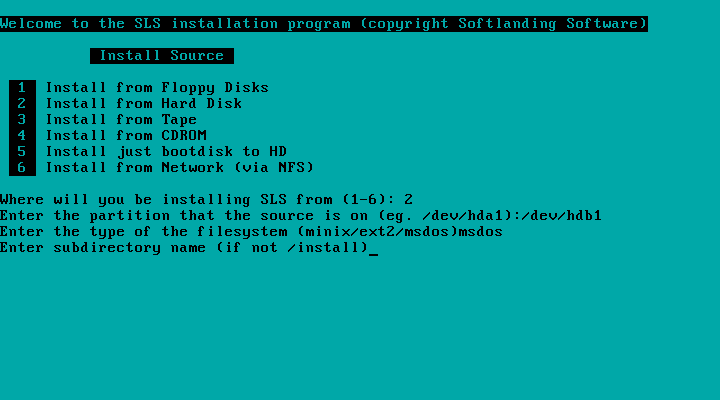
From the menu, choose option 2, "Install from Hard Disk." You are installing from /dev/hdb1, of type "msdos." When it asks for the subdirectory name, just hit the enter key.
Now it's time to specify the install partition. Select the "Setup Linux Partitions" option, number 1. Specify the /dev/hda1 partition for use as root. The install program will warn you that all data will be lost. Hit the enter key to proceed. The install program will create an e2fs filesystem.
Now (finally!) it's time to install. Select the "Done" option, number 7. Tell it you want to install the entire distribution, option 4. Then, sit back and be amazed at how quickly an entire GNU/Linux distribution installs itself in 1994.
You still have to answer some questions. Do so to the best of your ability. Don't worry: at this point, there's little that can happen that isn't easily recovered.
One last thing: once your SLS installation reboots, you'll want to login as root (no password required), and re-install lilo, like this:
1:sls:/$ liloconfig
Choose option "2" to install lilo with GNU/Linux as the only operating system.
That is the SLS 1.05 installation process, in a nutshell. Now that the system is installed on your disk image, you can boot directly into SLS like this:
~/history$ qemu sls-1.05.img
Welcome back to 2007
That's it for our quick excursion back to 1994. If you're feeling adventurous, there are other old GNU/Linux distributions waiting to come back to life. Download Yggdrasil or MCC, or even pre-historic versions of Red Hat or Debian.
I hope you've enjoyed this little tour into the past. Perhaps you've learned something of where it all started, perhaps become a little more understanding of us cantankerous old-timers. You'd be bitter too, if you had to create and swap out 30 3.5" floppies just to install an operating system.
You youngsters today, you don't know how good you've got it.