Most modern GNU/Linux distributions are secure with their default minimal installs, whether desktop or server, while some distributions are designed specifically with security in mind. However, any GNU/Linux distribution that needs services available to other users or systems will need either enhanced or configurable security. There are other situations in which added security is beneficial; for example, a large environment, while secure to the outside world, would be enhanced with additional security measures in place.
Network design
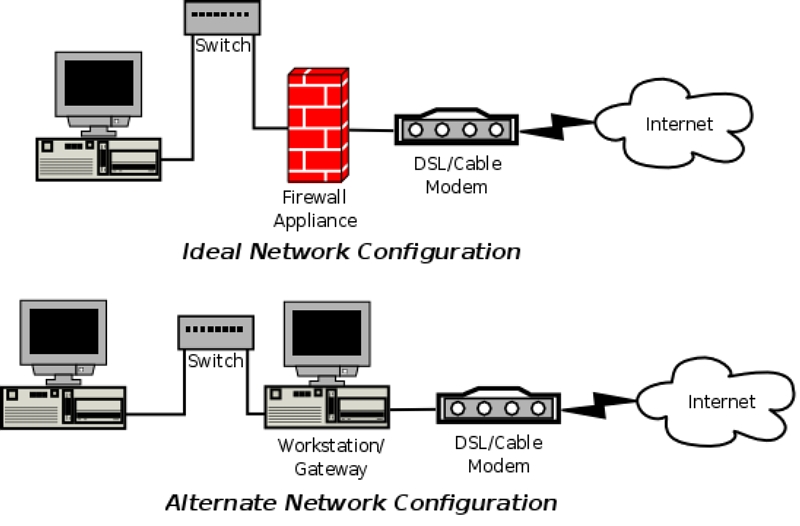
There are typically only a few types of networks in smaller environments. A single computer that communicates with the internet via a single cable modem or DSL line, or a single internet connection that is shared between multiple computers are two examples (figure 1). Ideally, the internet connection is protected with a standalone firewall: either a firewall appliance or dedicated GNU/Linux firewall such as IPCop. Due to cost, location or space concerns the ideal is not always possible and the firewall must be on a single workstation or multiple purpose workstation that acts as a gateway for the other systems. In a larger environment with multiple operating systems, some insecure by default, a personal firewall enhances security, especially if a workstation contains sensitive information.
iptables is a tool—included as a standard part of GNU/Linux distributions—which is used to configure GNU/Linux firewalls. iptables can be configured manually, or with firewall configuration tools like Shorewall, Firestarter and various GUI front ends that are bundled with GNU/Linux distributions. These tools make configuring firewalls much simpler than the manual command line procedures, while giving you less granularity—a feature that may not be typically needed with less complex configurations.
Firestarter
According to the the Firestarter web site, “Firestarter is an Open Source visual firewall program”. Primarily, Firestarter is a GUI front end for iptables, that removes the complexity of setting up a simple firewall for workstations, laptops, and servers. Even though the web site indicates Firestarter could be used to configure a gateway or dedicated firewall, I would be hesitant to use a computer with a desktop environment in this manner. It would be preferable, and more secure, to use a firewall geared distribution for a standalone firewall. Additional features of Firestarter are: a configuration wizard, a real-time event monitor, an internet connection sharing configuration, a DHCP server configuration, and inbound and outbound access policies.
Installation
Software installation with most modern GNU/Linux distributions has become a nearly trivial task. As I still prefer the feedback of text based installs and the ease of not having to navigate through too many menus, installation of Firestarter is straightforward from the command line. On an Ubuntu system, access the terminal application through the desktop menu system, Applications→Accessories→Terminal. At the terminal prompt type sudo apt-get install firestarter; at the password prompt, enter your password. Note that APT will suggest an additional package, dhcp3-server, which would be used on a gateway system to provide DHCP services as well as the firewall. A similarly simple installation on a Fedora system uses the yum package manager, as root enter yum install firestarter.
You can also install Firestarter from the GUI; in Ubuntu, for example, run System→Administration→Symaptic Package Manager, and simply look for “Firestarter” in the search form. Keep in mind that the repository “Universe” needs to be enabled.
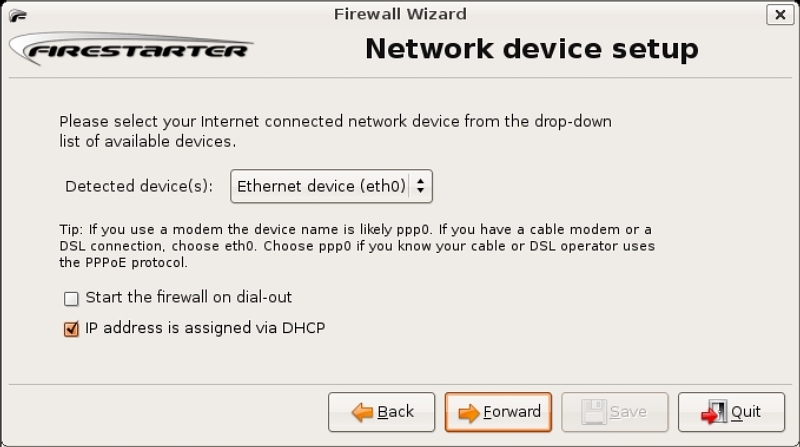
Once the installation is complete, from the desktop menu select System→Administration→Firestarter. The first time Firestarter is started, the configuration wizard is run. Since the firewall will be run as a privileged user, i.e. root, you will be prompted for your password. The configuration wizard takes you through a simple process to configure a basic firewall. You are first greeted with a welcome screen: click on the “Forward” button. The “Network Device Setup” dialog box displays the detected network devices and there and two check boxes (figure 2). The first check box is to start the firewall on dial-out; in other words, it will start the firewall while using the dial-up network connection. The second check box is to allow a system to receive an IP address through a DHCP server, for example through an ISP cable modem or DSL line, or the company DHCP server. Select the internet side network device from the drop down box; if you have only a single network device, as in this example, use the default eth0 device and click on the “Forward” button.
Configuration options
The “Internet Connection Sharing” dialog box allows you to enable connection sharing, using the system as a gateway. If there is a second network device, it will be selected here as the local network side of the gateway. The checkbox in the dialog also allows you to enable a DHCP server on the local network. Since, in this example, there is only one network device, use the defaults and press the “Forward” button. The final dialog box, “Ready to start your firewall”, allows you to save the configuration and start the firewall; since this is what you want to do, click on the “Save” button (figure 3). This completes the initial configuration and the Firestarter Status Page displays (figure 4).

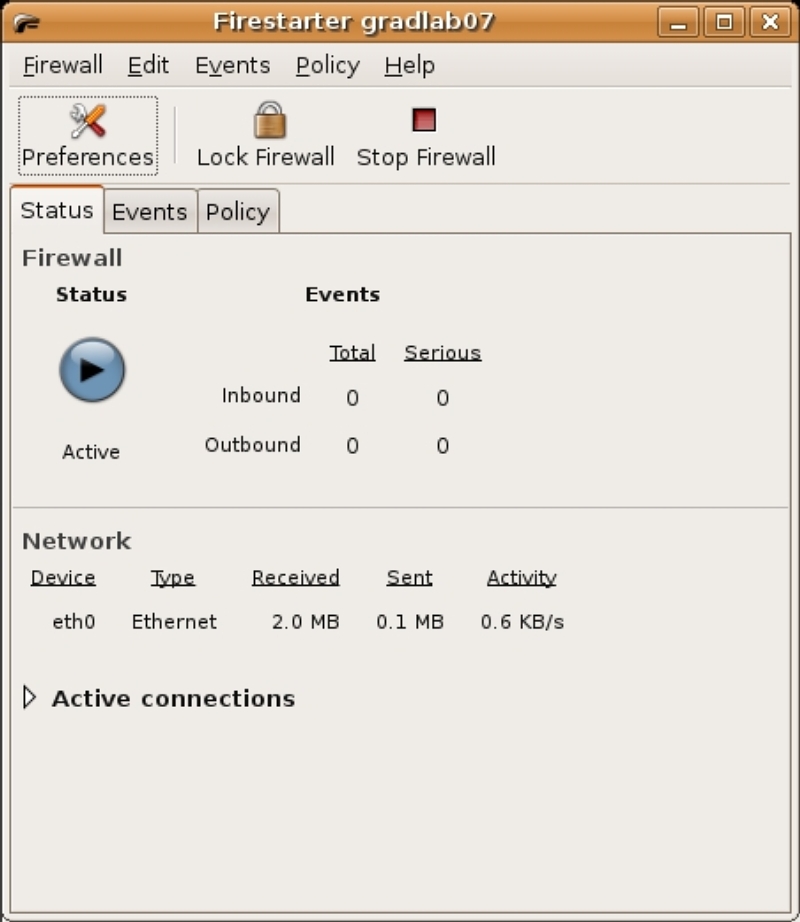
The first basic preference that should be set is the “Minimize to tray on window close” preference. This will display an icon in the system tray that will indicate the status of the Firestarter firewall, either running, stopped or locked. Locking the firewall disallows all incoming and outgoing network connections. To change the settings, in the Status Page menu select Edit→Preferences or click on the “Preferences” button. On the Interface section of the preferences dialog, enable the “Minimize to tray on windows close” check box, then click on the “Accept” button.
Viewing events
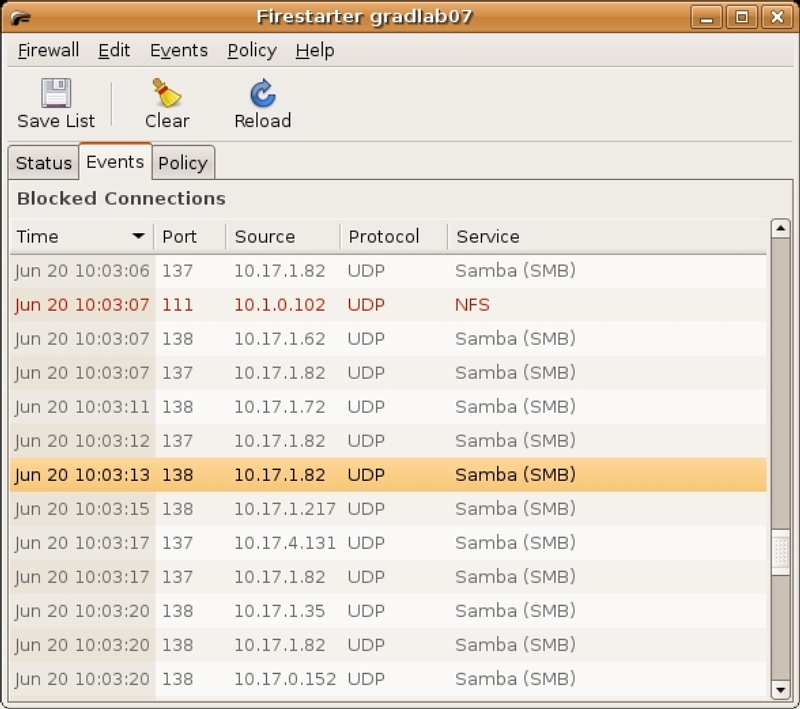
Possibly one of the nicest features of Firestarter is the ability to view real time events via the Events Page. To view these events click on the “Events” tab on the Status Page (figure 5). By default, five (time, port, source, protocol and service) of eleven columns are displayed in the event view. The columns are customizable under the “Show Column” section of the “Events” menu item. Events are color coded by severity:
- gray for harmless (e.g. broadcasts)
- black events are for regular connection attempts to a random port
- red for possible attempts to non-public services
In the figure, the red highlighted event is a probably harmless NFS event on the local network. There are also several gray SMB events from Windows workstations on the network. The number of events displayed can be reduced by setting the “Skipping redundant entries” and “Skip entries where the destination is not the firewall” preferences.
Allowing access
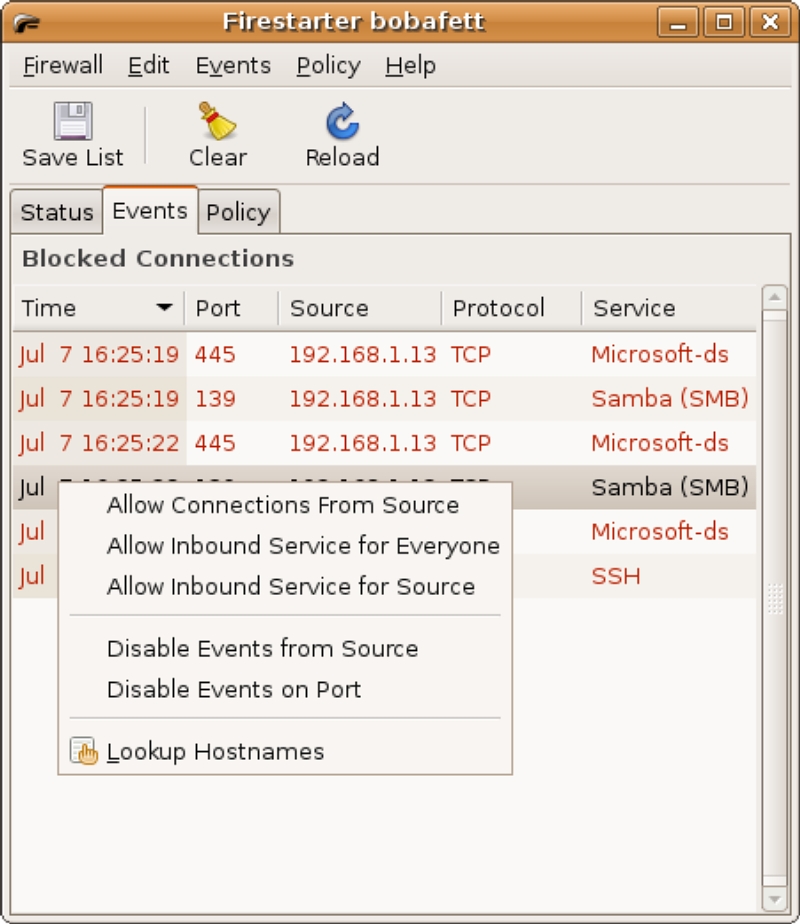
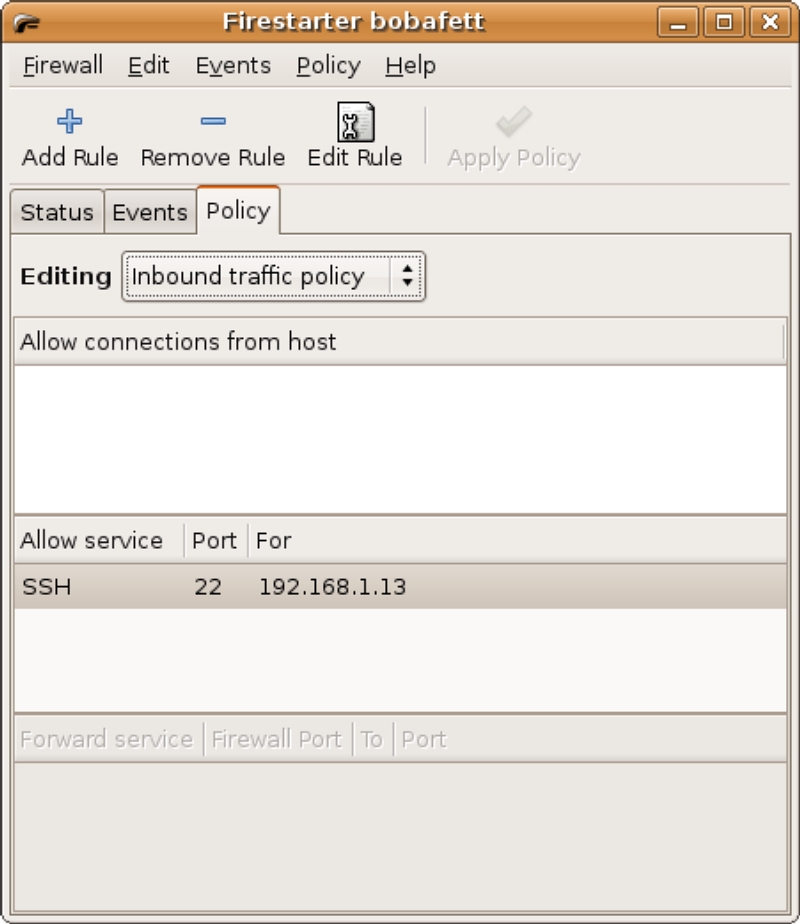
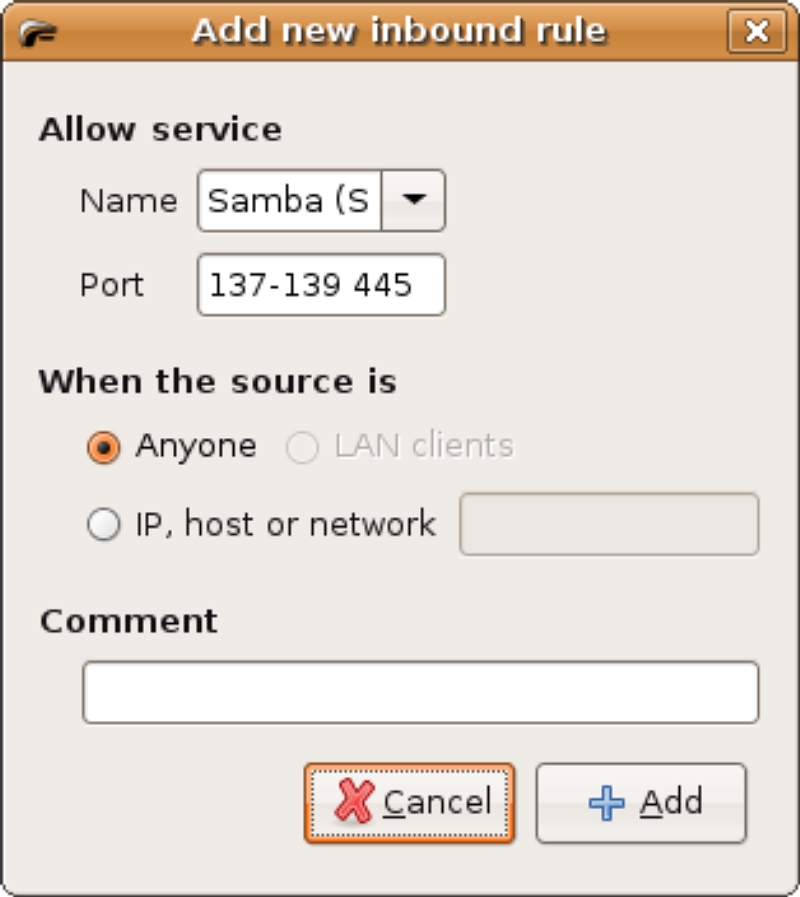
Allowing access to the firewalled system is done in two ways: either through the Policy Page or via the Events Page. In figure 6, there are two types of events displayed, SMB and SSH connection attempts. To allow secure shell connections from a particular host attempting the SSH connection, select then right-click on the event and select “Allow inbound service for source”. This creates a policy rule in Firestarter to allow SSH connections only from the source machine; this can be verified in the Policy Page (figure 7). Since SMB (the Windows file sharing service) uses several ports, it is easier to create a rule in the Policy Page to allow SMB access. In the Policy Page, click the “Allow service” section; then click on the “Add Rule” icon. In the “Add new inbound rule” dialog box (figure 8), select “Samba (SMB)” from the drop-down box and leave the default “Anyone” radio button selected; then click on the “Add” button to dismiss the dialog. Finally, click the “Apply Policy” button to immediately activate the rule.
The Policy Page also allows enabling full access from specific machines or subnets. A couple of examples where this feature can be used is allowing full access from a workstation that needs access for administration, or allowing access for a particular group of machines on the same subnet. It is more secure, however, to allow only services needed to specific machines, rather than opening full access to groups of machines.
Configuring a gateway
Setting up the firewall as a gateway system requires a few preparation steps prior to configuration.
The internet network and local network devices must be identified and configured with the Network Configuration Tool or other preferred configuration method. For example, eth0 for the internet side configured with DHCP and eth1 for the local network configured with a static IP address. The DHCP server service should also be installed (for example by running sudo apt-get install dhcp3-server or by using Synaptic), and started.
The configuration wizard... again
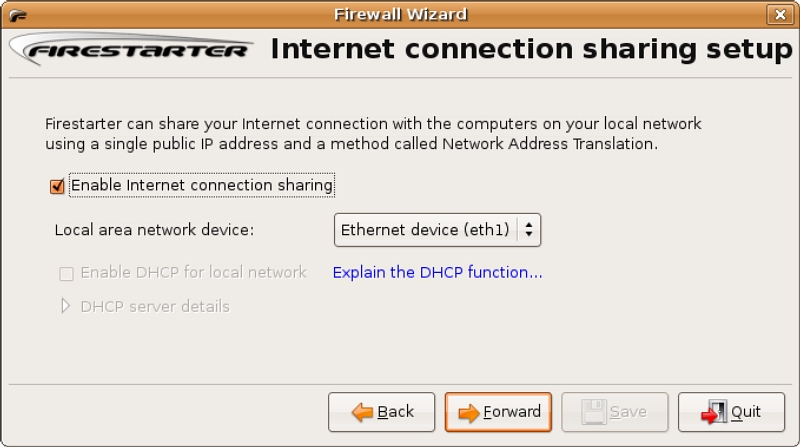
Once the network devices are set and the DHCP server is running, the Configuration Wizard can be run. The Configuration Wizard, once again, is run the first time Firestarter is started. The wizard can also be run from the Status Page menu, Firewall,→Run Wizard. Proceed through the wizard as in the previous example. At the “Internet connection sharing setup” dialog box, select the second network device (figure 9), in the example eth1, then complete the wizard as before. DHCP will be configured later through the Firestarter preferences.
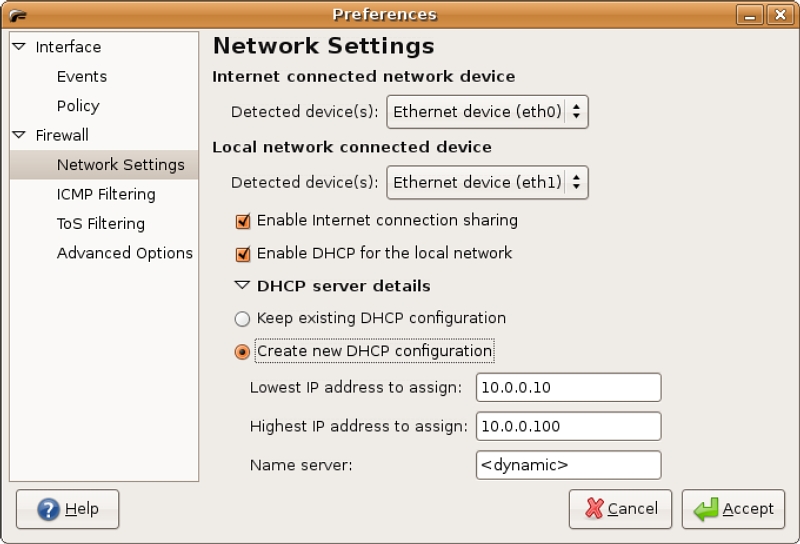
DHCP is configured in the Preferences dialog box, under the Firewall section select Network Settings (figure 10). Here the settings of the internet and local network devices can be specified. Both the “Enable Internet connection sharing” and “Enable DHCP for local network” check boxes are selected. The “Create new DHCP configuration” radio button is selected and the DHCP range this server will provide is set. A list of domain name servers can be set in the “Name server:” text box; either the IP addresses or domain names delimited by commas are acceptable. There is a special entry that can be set, dynamic, used when the firewall system gets its DNS server list from a DHCP server, i.e. set by the ISP or by the company DHCP server.
Forwarding and blocking
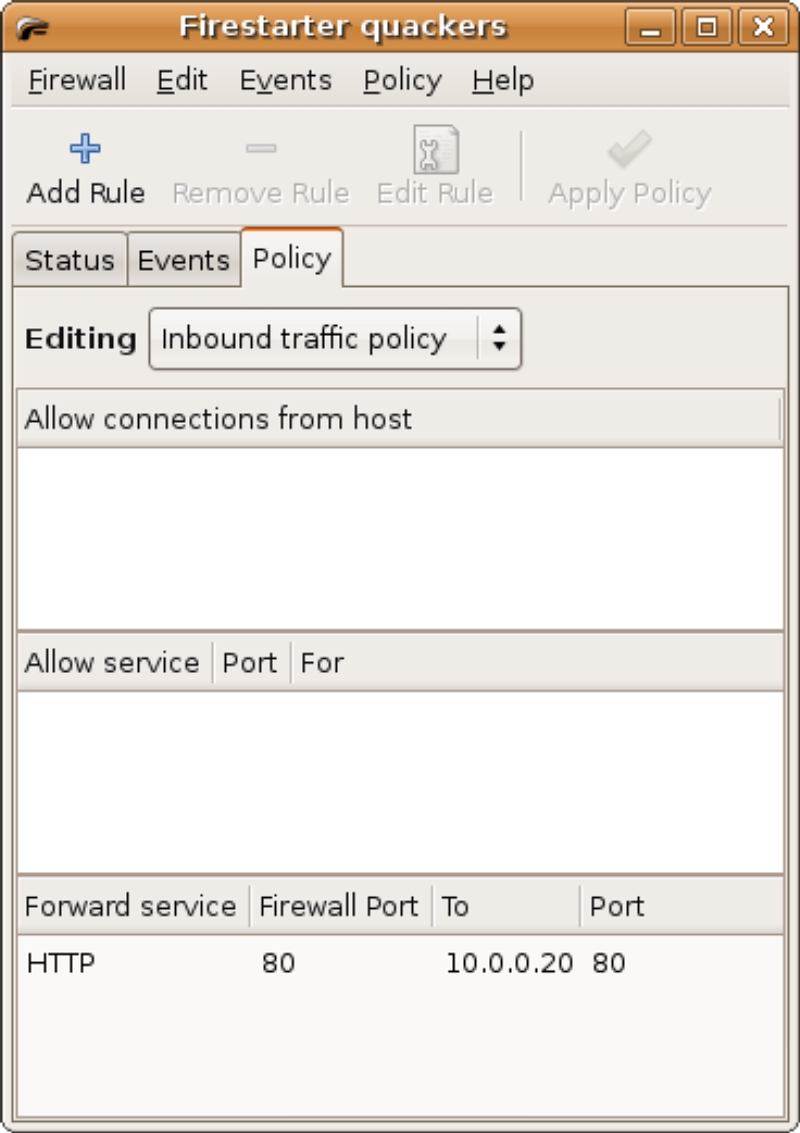
In the gateway scenario, there is an additional feature available. Since all systems on the local network side of the firewall all share the same IP address through Network Address Translation (NAT), forwarding can direct services to specific machines. In the Policy Page, an additional section for forwarding services is displayed (figure 11). A web server can be setup on the local network side of the firewall and all web related network traffic can be redirected from the firewall to the web server.
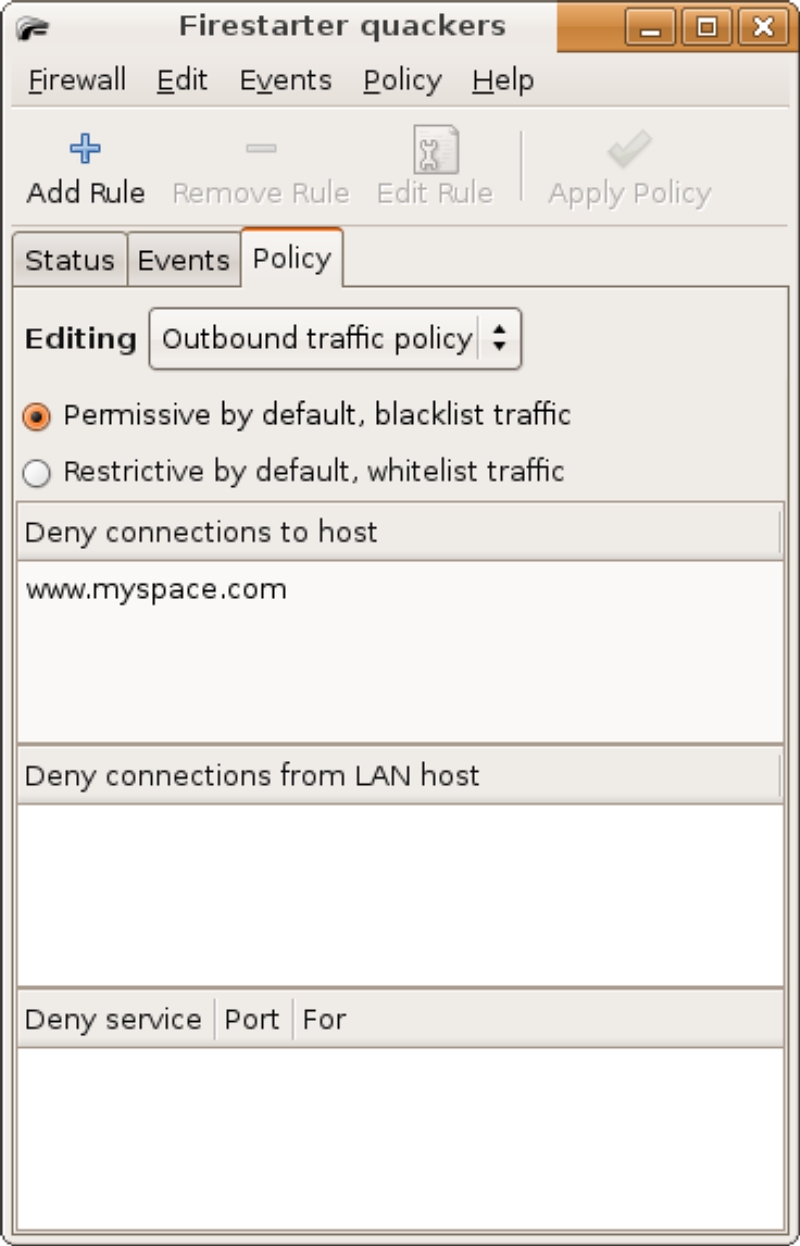
Another feature is to block access to outside services or hosts to the local network. This is accomplished in the Policy Page, Outbound traffic policy (figure 12). A list of denied hosts can be added. A better way to accomplish this would be with a content filter on a dedicated firewall or web proxy. This is a simple way though for basic host blocking.
Conclusion
Firestarter is an easy to use graphical interface for configuring a simple personal firewall or gateway system. The Firestarter web site has additional information and current documentation, though development has seemed to come to a halt. Despite the status of development, the mailing list is still active and Firestarter is still being included in the latest GNU/Linux distributions.