I recently went looking for a way to rotate JPG images from within Nautilus, and found a nice way to do this and more. It’s not difficult to customize the right-click popup menu in Nautilus to perform custom actions on files. Here are some instructions and scripts to get you started.
This article has downloads!
I often have vertically oriented camera pictures that I want to rotate from within the file manager. Windows Explorer has a nice feature where you can multi-select pictures in thumbnail mode, right-click to get a popup menu (also known as the context menu), and pick clockwise or counter-clockwise rotation. This is a lossless transformation, as opposed to what you’ll likely get if you open up an image in your favorite graphics program, rotate it, and resave. That method is also cumbersome if you’re like me and just wanting to bulk rotate your images after you pull them in from your camera.
This is one of the many things I’ve been gradually learning while replacing my previous Windows capabilities, and as usually happens when I find a solution in GNU/Linux, I was pleased at the elegant building block approach of *nix systems. I found that I have the power of bash at hand from within Nautilus, with scripts that further take advantage of some nifty utilities I’ll cover below.
I found that I have the power of bash at hand from within Nautilus, with scripts that further take advantage of some nifty utilities
It’s true that many import programs will rotate your images automatically as they are pulled from the camera, but not all of them will, and you won’t always be able to use the importer of your choice. It’s also possible your camera doesn’t store the proper Exif metadata in the image file, leaving your super funky-cool import program helpless. So I think we can all agree that this is something you must have for ease of photo management.
I’ll look specifically at image file operations to demonstrate how Nautilus can be extended. I’ll cover on JPG files which are practically the universal format in digital cameras (at least those used by us common folk) and use Exif data that allows us to do several neat things.
After working through this tutorial, you should be able to right click on your images in Nautilus and have menu options as shown in figure 1.
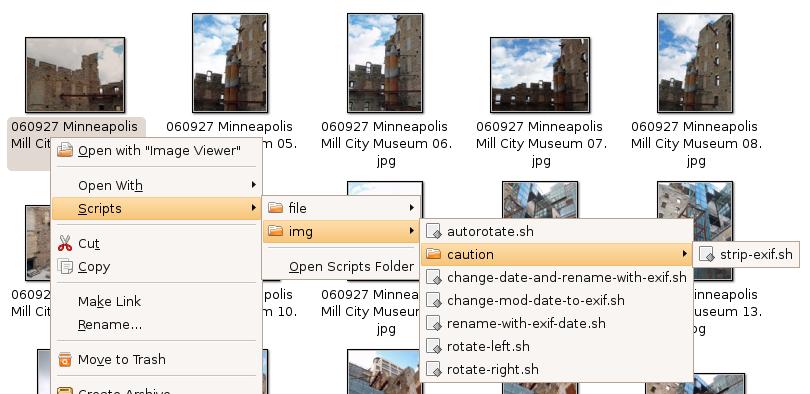
This corresponds to the hierarchy in your home directory:
~/.gnome2/nautilus-scripts/img/

        autorotate.sh

        change-date-and-rename-with-exif.sh

        change-mod-date-to-exif.sh

        rename-with-exif-date.sh

        rotate-left.sh

        rotate-right.sh

        caution/strip-exif.sh
Preliminaries
The public domain code for these scripts appears below. You can also grab downloads.tgz (see the download icon at the beginning of this article) and extract it to your nautilus-scripts directory: ~/.gnome2/nautilus-scripts$ tar -xvf downloads.tgz
The GNOME page for extending Nautilus is a good place to start. It mentions that you can also use the File→Scripts menu to run your scripts, and from either there or the right click context menu, you can select the “Open Scripts Folder” item to open up the directory in Nautilus. If you don’t have any scripts installed, you won’t get these menu options. Make sure the scripts you create are executable.
Possible Gotcha
I initially couldn’t get my scripts menu to appear when I put the scripts in the root of nautilus-scripts, and thought they needed to go in subdirectories. But when I checked again while writing this, it worked fine that way.
Then after removing and restoring files to my preferred hierarchy, I couldn’t get my scripts to appear in the menu again, even after closing and reopening Nautilus. I had to force a reload of the directories in Nautilus to see everything in the menu again, using the little blue circular arrow in the toolbar. Maybe this had something to do with my original problem.
In any case, if things don’t appear as expected, make sure to reload the nautilus-scripts directory. (Also available in menu View→Reload and with keyboard shortcut CTRL + R.)
There is one more thing to do before you start looking at the scripts. You will need the jpegtran utility from the Independent JPEG Group and jhead, by Matthias Wandel. Both are small and robust free software programs. jhead is public domain, and jpegtran has its own license that appears to be fully free.
The good news is that you probably already have jpegtran, and jhead is readily available. In my machines running Ubuntu 7.04 (Feisty Fawn) and Fedora FC5, jpegtran was included in the default installation. I installed jhead in Ubuntu with sudo apt-get install jhead and as root in Fedora with yum install jhead.
For experimentation purposes, I recommend using a temporary directory with copies of some pictures. You most likely do not want to use your regular picture directories while initially working with these scripts, since the operations are not undoable.
For experimentation purposes, I recommend using a temporary directory with copies of some pictures
One of the things I’ll show you is how to create an “autorotate” script that takes advantage of Exif orientation data. If you’ve previously rotated your pictures, this flag may be cleared. You can use monkey.jpg to, um, monkey around with (figure 2).

Now, finally, the scripts!
rotate-right.sh (clockwise)
#!/bin/bash

while [[ -n "$1" ]]; do

    #if a file and not a dir

    if [[ -f "$1" ]]; then

        #by default jpegtran copies only

        # some Exif data; specify "all"

        jpegtran -rotate 90 -copy all \

            -outfile "$1" "$1"


        #clear rotation/orientation tag

        # so that some viewers (e.g. Eye

        # of GNOME) won't be fooled

        jhead -norot "$1"

    fi

    shift

done
Once you have this script in place, you might first want to open up a terminal window and run it from the command line first to verify that it works as expected:
~/.gnome2/nautilus-scripts/img/rotate-right.sh ~/tmp/monkey.jpg
One reason is that when you run things from Nautilus’s script menu, you won’t get any feedback if there are errors. The scripts just silently fail. For example, if your scripts aren’t executable, it will look like your script did nothing.
Here’s what the script does:
- Processes all the files supplied on the command line in a loop. (If called from Nautilus, it will pass all the file names as arguments to the script.)
- While there are files, and if the file is in fact a file and not a directory, it will call jpegtran to rotate the image 90 degrees. By making the outfile have the same name as the input file, it’s just going to replace it.
- After rotating the image, it calls jhead to clear out the orientation flag in the Exif metadata. As commented in the script, if you don’t fix the rotation tag, programs like Eye of GNOME (the default GNOME viewer) will be confused and rotate the image because it is smart enough to read the Exif data and try to orient the picture better for your viewing pleasure.
It’s that easy. For the counterclockwise rotate-left.sh script, replace -rotate 90 with -rotate 270.
autorotate.sh
Next up is even better. I used to spend a lot of time in Windows Explorer picking through a big directory of thumbnail images to find the ones that had been shot vertically and multiselect them in order to rotate. This was a tedious job; it’s not always obvious from the thumbnail what the orientation is, and in the process of scrolling the viewport, you may accidentally unselect files or select a lot of horizontal pics.
If your camera stores the orientation Exif data in the file (like my Canon does, for example), you can select all the files and use jhead’s autorotate feature which will only rotate the vertical pictures. (I’ve found in practice that it’s not 100% guaranteed, maybe because the camera sometimes doesn’t detect the orientation correctly?)
#!/bin/bash

while [[ -n "$1" ]]; do

    if [[ -f "$1" ]]; then

        jhead -autorot "$1"

    elif [[ -d "$1" ]]; then

        #iname -- case insensitive

        find "$1" -iname "*\.jpg" \

            -exec jhead -autorot {} \;

    fi

    shift

done
For this script, I’ve made it so you can select a directory also, since it’s more likely you’d want to perform this on entire directories at a time. I’ve noticed if you right click on a directory in the left “tree pane” of Nautilus, you won’t get the scripts menu, but it is available in the File→Scripts menu. The scripts menu is also available if you right click on a directory in the right pane of Nautilus. Here is what the script does:
- As in the “manual” rotate scripts, it will process all the arguments (files and/or dirs) passed to the program in a loop.
- If a file (
-f), it will simply pass it tojhead -autorot. - If a directory (
-d), it will run thefindcommand on that dir, looking case insensitively for*.jpgfiles, and on each one found, it will calljhead -autorot. - jhead will clear the orientation flag as part of that operation, and that’s all it takes.
Those were the main features I had started out looking for (well, I hadn’t bargained on getting auto rotate!), but after finding this stuff I had to keep noodling around to see what jhead and jpegtran could do:
change-mod-date-to-exif.sh
#!/bin/bash

while [[ -n "$1" ]]; do

    #if a file and not a dir

    if [[ -f "$1" ]]; then

        jhead -ft "$1"

    fi

    shift

done
If you copy files directly from a USB card reader (or from some cameras that let you read them via USB as a mass storage device, like my old Olympus but unlike my new Canon), the modified date is preserved for the files on your computer. I liked this feature because I would then use a Visual Basic program that used the modified dates to rename the files with a timestamp. My picture files mostly start with YYMMDD_HHMMSS. I like that it keeps things in sequence and uniquely identifies them. (I also go through and add identifying text to that datetime prefix.)
When I tried the import this program into GNOME, I was disappointed to learn that it updated the modified time on the file as it copied files to my desktop machine. Well, now you’ll have the power to correct that with change-mod-date-to-exif.sh. If your camera’s clock is set correctly, you probably have the date that each picture was taken stored in the Exif data. Jhead will update the last modified time in the file system to match.
rename-with-exif-date.sh
Even better, that crusty old VB program can be thrown out (sure, it runs under Wine, but it’s indentured VB for chrissake) and use jhead to directly rename the file with the Exif date:
#!/bin/bash

while [[ -n "$1" ]]; do

    #if a file and not a dir

    if [[ -f "$1" ]]; then

        jhead -nf%y%m%d_%H%M%S "$1"

    fi

    shift

done
This script uses another jhead option to rename the file with a YYMMDD_HHMMSS timestamp. I only made this one operate on files, but it could easily be modified to work on directories also, similar to autorotate.sh.
Shown in the image above and included in the downloadable .tgz file is another script, change-date-and-rename-with-exif.sh, that simply calls the other two scripts so you can change the file modified date and rename with a timestamp in one step.
strip-exif.sh
And last, carefully:
#!/bin/bash

while [[ -n "$1" ]]; do

    #if a file and not a dir

    if [[ -f "$1" ]]; then

        jhead -purejpg "$1"

    fi

    shift

done
I put this one in a directory named caution (under the nautilus-scripts/img directory) in order to reduce the chance of clicking on it by accident. It will strip out all the Exif data from a picture, which in most cases you probably don’t want to do. I use this one for some pictures that go up on my web site, with the intent of keeping bandwidth usage and page loading times down. For example, monkey.jpg is 51KB with Exif data, and 44KB without. Not a big deal for pictures stored on your hard drive, especially as pictures commonly go over 1MB now, but it could help in the unlikely (for me!) event of a slashdotting or digging.