Today, everyone uses a different instant messenger. Your boss may use Lotus Sametime, your colleague AIM, your friend Google Talk, and your kid Yahoo! Messenger. However, these all take up hard drive space, RAM, and CPU usage. In addition, many of these are proprietary and Windows-only (two big minuses for GNU/Linux users). Luckily, the free software world has several alternatives that enable users to chat with users of all of these programs (and many more). For KDE users, the answer is Kopete.
Note: This is part 3 of an instant messenger series. Part 1 deals with the history of instant messenger clients and protocols. Part 2 talks about the Pidgin instant messenger for GNOME.
History of Kopete
If ICQ hadn’t blocked Licq around Christmas in 2001, Kopete probably wouldn’t have been born. At that time, ICQ had changed their protocol, causing the popular ICQ clone Licq to stop functioning. Since he didn’t want to wait for Licq to fix its problem, Duncan Mac-Vicar Prett began coding a KDE ICQ client. Several weeks later, Prett changed the focus of Kopete to a multi-protocol client and added support for the AIM and MSN protocols. Four months later, emoticons and IRC support were added. Jabber and a better MSN protocol were then released. By 2005, the metacontact, a better IRC protocol, and a Yahoo! protocol had been added. In March of that year, Kopete became a part of the official KDE 3.4 release.
Installation
Kopete is available to virtually all GNU/Linux distributions. If your operating system uses KDE 3.4 or higher, Kopete is probably installed already. If not, it will most likely be available through the default package manager. If you need to build it from source, read the build tips and install tips from the Kopete site.
Kopete is also available for Macintosh OS X 10.4 (Tiger) if you use fink. Read more at the Kopete fink page. Eventually, Kopete may become available for Macintosh and Windows users without fink (probably when KDE 4 comes out with support for these platforms). In the meantime, use the fink version or the native Mac app Adium.
How to set up accounts
Once you have installed Kopete, you want to use it to chat with your friends. Here’s a step-by-step guide on how to configure it.
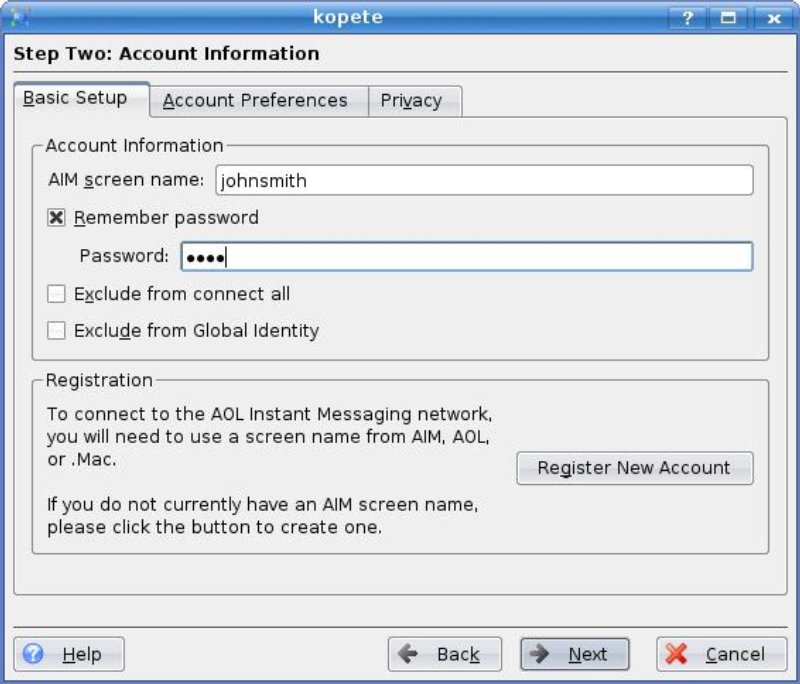
Setting up an AIM account
All you need for Kopete to connect to the most popular IM network in the US is an AIM account (get one here). After that’s settled, open the accounts window by going to Settings→Configure. Under the Accounts section, click the New... button to add an account. Select AIM, and continue. Enter in your screen name, password (optional), and other preferences (you may need to be connected in order to edit these). Then, hit Next. At the last screen, hit Finish. All of your AIM contacts should show up.
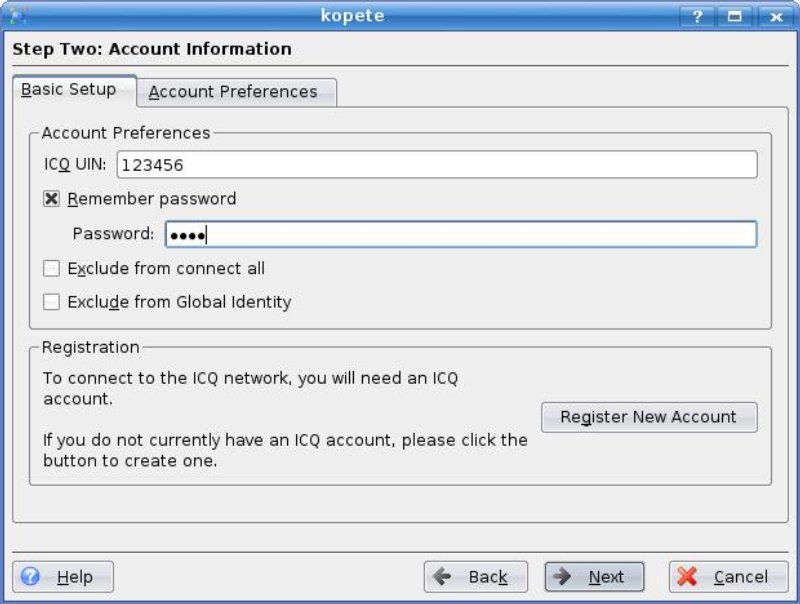
Setting up an ICQ account
Kopete started out as an ICQ client, so of course they have an option to connect to it. All you need is an ICQ # (available here). First, open the accounts window by going to Settings→Configure. Under the Accounts section, click the New... button to add an account. Select ICQ, and continue. Enter in your ICQ #, password (optional), and other preferences (you may need to be connected in order to edit these). Then, hit Next. At the last screen, hit Finish. All of your ICQ contacts should show up.
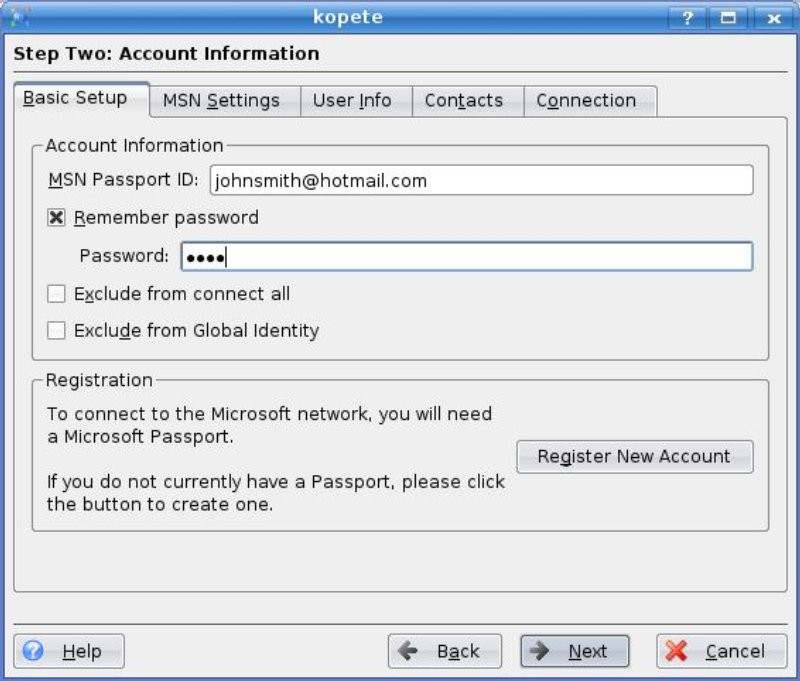
Setting up an MSN (Windows Live) account
We probably all know a lot of people who use the hated Windows Live Messenger (formerly known as MSN Messenger). Luckily, you don’t have to be running Microsoft software to chat with them. Kopete makes it easy to connect to your Windows Live account (available here. First, open the accounts window by going to Settings→Configure. Under the Accounts section, click the New... button to add an account. Select MSN Messenger, and continue. Enter in your MSN Passport ID, password (optional), and other preferences (you may need to be connected in order to edit these). Then, hit Next. At the last screen, hit Finish. All of your Windows Live contacts should show up.
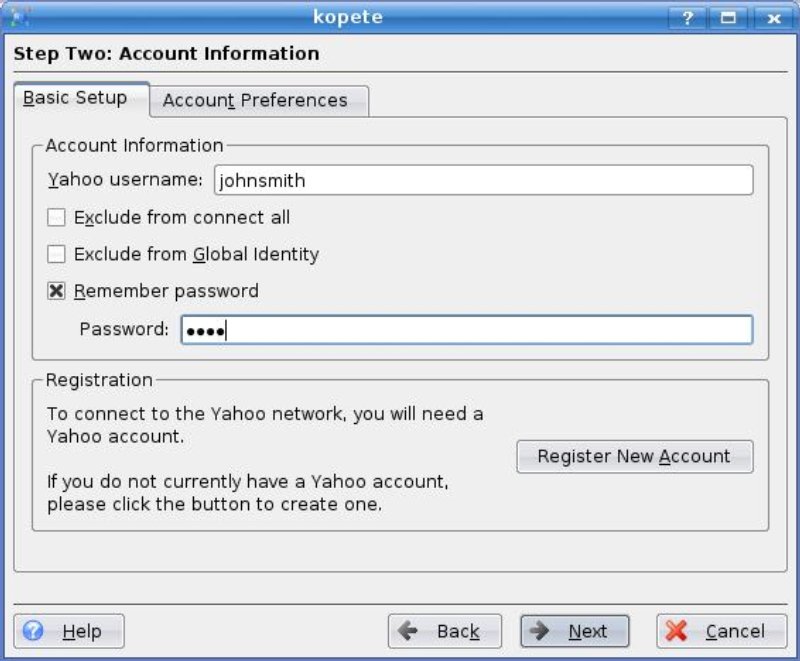
Setting up a Yahoo! Messenger account
Like Yahoo! Messenger, but feel reluctant to download the 1.x version for GNU/Linux? If you have a Yahoo ID (available here), Kopete will do it for you. First, open the accounts window by going to Settings→Configure. Under the Accounts section, click the New... button to add an account. Select Yahoo, and continue. Enter in your screen name, password (optional), and other preferences (you may need to be connected in order to edit these). Then, hit Next. At the last screen, hit Finish. All of your Yahoo! Messenger contacts should show up.
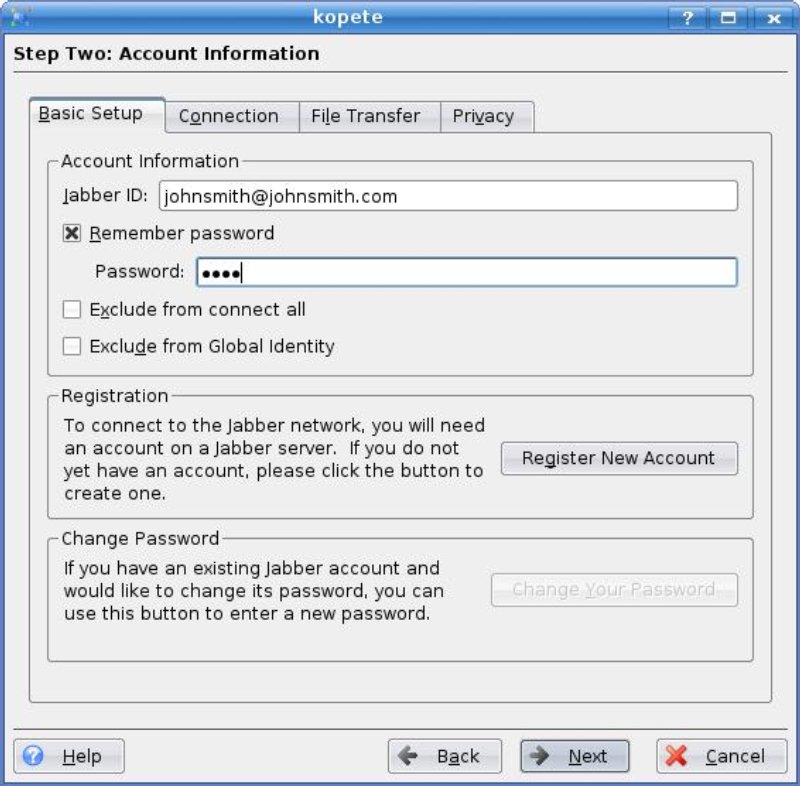
Setting up a Jabber account
Jabber is the only mainline protocol that is free software. And of course, Kopete lets you connect to your account easily (if you don’t have one, Kopete will help you register one). First, open the accounts window by going to Settings→Configure. Under the Accounts section, click the New... button to add an account. Select Jabber, and continue. If you don’t have a Jabber screen name, choose Register New Account, and hit the Choose... button to find a server (if you don’t like or trust any of them, KDETalk is the official KDE server). Enter in your ID and password, and hit register. Then, close and enter in any addition preferences. If you’ve already registered, enter in your screen name, password (optional), and other preferences (you may need to be connected in order to edit these). Then, hit Next. At the last screen, hit Finish. All of your Jabber contacts should show up.
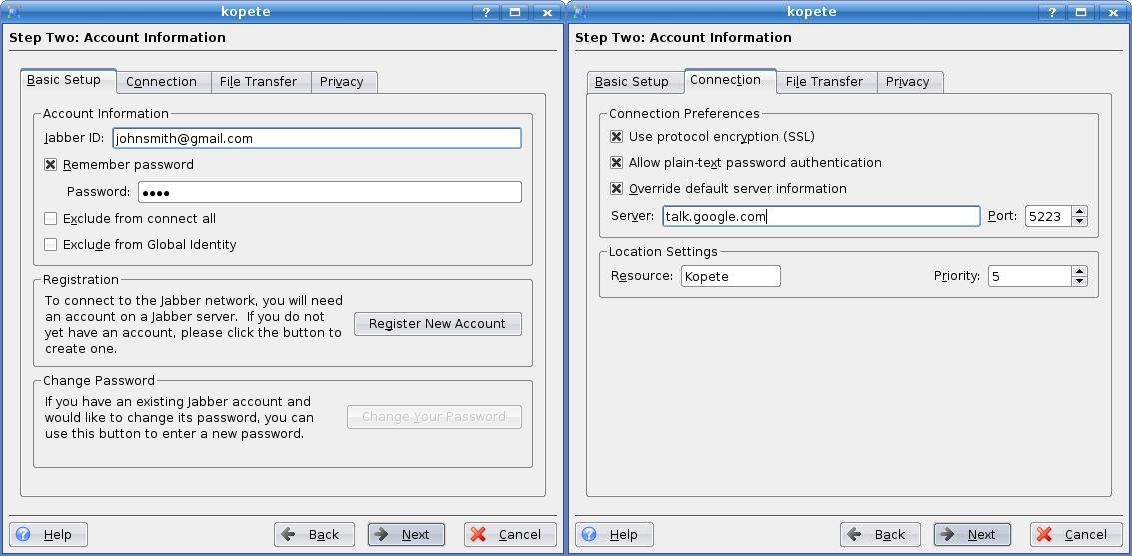
Setting up a Google Talk account
Google’s a great company. They make great products, and they use standards. Unfortunately, they don’t always make it easy for 3rd-party software. Google Talk is a great example. Connecting to it in Kopete isn’t intuitive, though it is doable. First, open the accounts window by going to Settings→Configure. Under the Accounts section, click the New... button to add an account. Select Jabber, and continue. Your ID is your email address (e.g. andrewmin@gmail.com or andrew@min.com if you use Google Apps). Go to the Connection tab, check Use protocol encryption (SSL), Allow plain-text password authentication, and Override default server information, enter talk.google.com as the server, and put 5223 as the server port. Change any additional preferences you want. Then, hit Next. At the last screen, hit Finish. All of your Google Talk contacts should show up. Read more at the Google Talk Help Center.
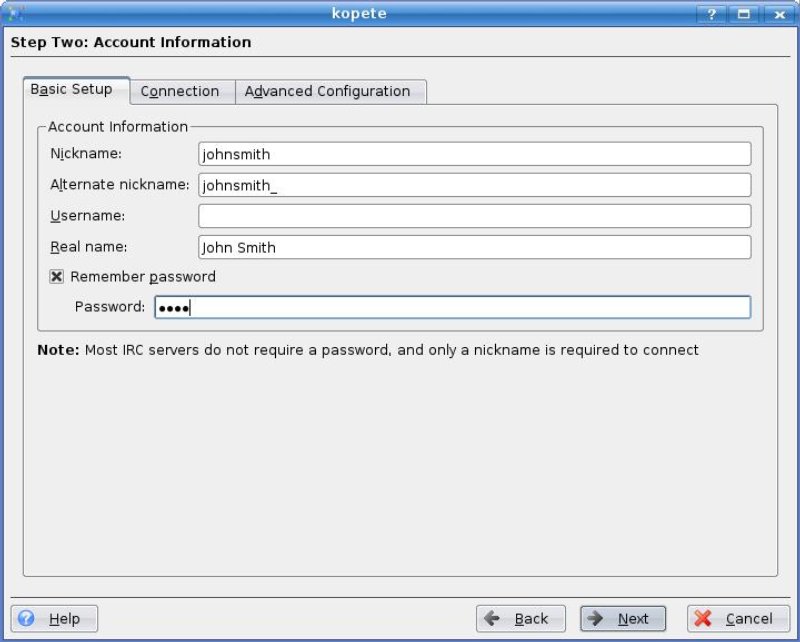
Setting up an IRC account
IRC is especially popular among the tech support geeks, and Kopete makes it easy to connect to it. Open the accounts window by going to Settings→Configure. Under the Accounts section, click the New... button to add an account. Select IRC and add your nickname, username, and password (if you have one). Then, go to the Connection tab and choose your network (or add one if it isn’t listed).
If you don’t already have an IRC account, it’s easy to get one. Just make up a nickname, and connect with it. Then follow your server’s instructions on setting up a new account.
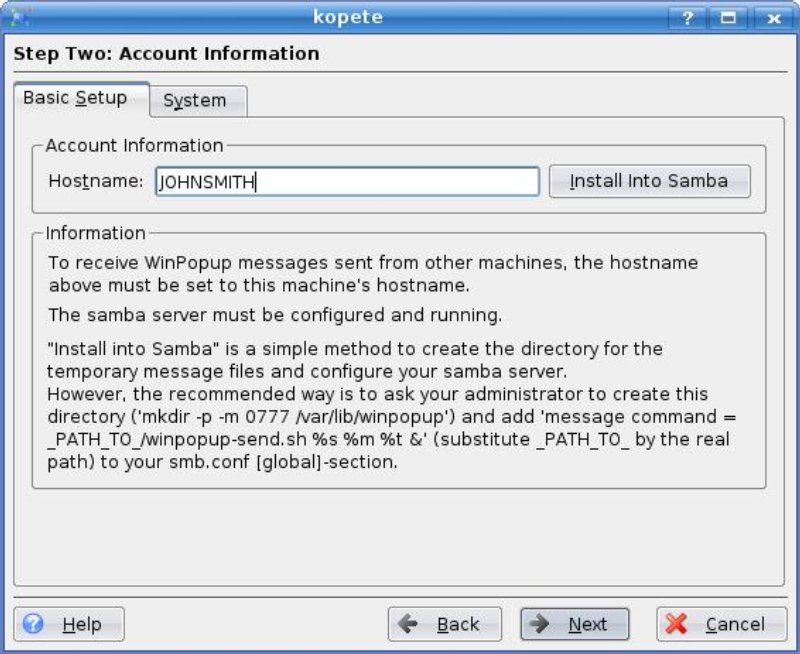
Setting up a WinPopup account
WinPopup is an old LAN messaging service that was never included in WinNT-based OSes. However, many people still use it on 98 or ME. To set up Kopete to connect to WinPopup, you need Samba installed. Then, open the accounts window by going to Settings→Configure. Under the Accounts section, click the New... button to add an account. Select WinPopup, and continue. Enter in your Hostname, and choose Install Into Samba. Then, hit Next. At the last screen, hit Finish. All of your WinPopup contacts should show up.
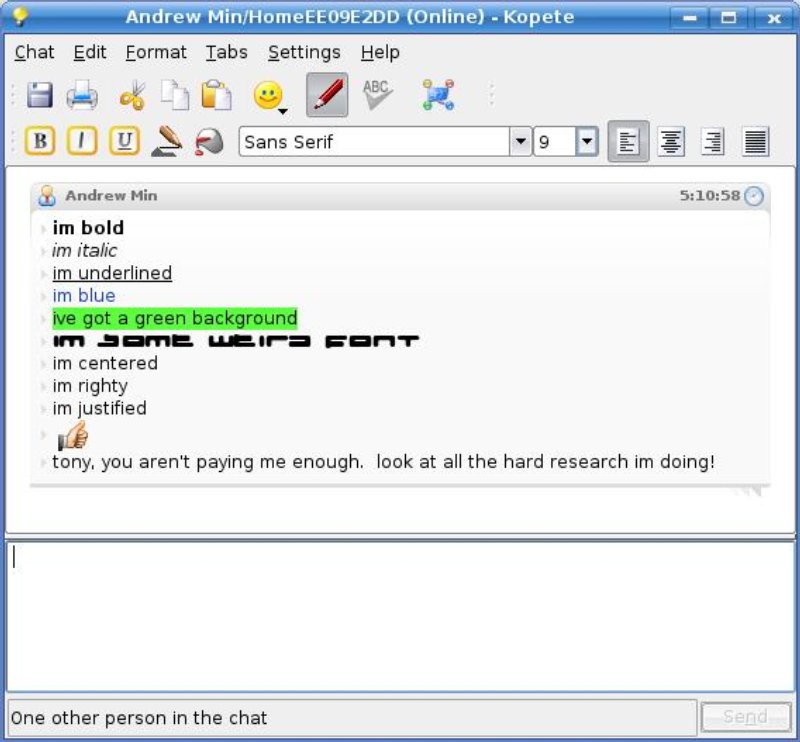
Basic usage
To start using Kopete, just double-click on a contact. A conversation window will pop up. Type in your text and hit enter. Additionally, you can add all sorts of formatting (see figure 9).
Chats
Group chats are a ton of fun (especially if you use IRC, which is exclusively for chats). It’s a great way to get tech support, hang out with friends, or do some collaboration. To set it up, right click on your account icon in the bottom right corner and click Join Groupchat... Enter all the necessary information and hit Join. Note: this may not work some protocols, such as Google Talk.
Metacontact
The metacontact is one of Kopete’s most unique features. Basically, it’s one contact for multiple accounts. For example, I have a friend named Tim who has a Jabber account, an AIM account, and a Yahoo! Messenger account. Wouldn’t it be easier to just put all three into one contact? That’s what the metacontact does. Just right-click on a buddy (say the Jabber account tim@tim.com), select the buddy’s account at the bottom of the drop-down list, and click Change Meta Contact... Select Create a new metacontact for this contact. Rename the metacontact to something more memorable than tim@tim.com (e.g. Tim), and then add the rest of your contacts. You will then be prompted whether to delete the old contact or not.
Global identity
It’s a real pain when you need to update your profile information for AIM, ICQ, MSN, Yahoo!, Jabber, and IRC one at a time. Why can’t you just do it all at once? That’s what the developers thought when they added Global Identity to Kopete. Just go to Settings→Configure, select Identity, and check Enable global identity. You can then change your name, photo, and address book info (using KAddressBook).
Extending Kopete
Kopete throws in a lot of features (like most KDE apps, giving the reputation for including everything except the kitchen sink). However, there is always something left out. That’s why Kopete has support for extensibility. You can create protocol plugins, add new emoticons, or skin Kopete with themes.
Emoticons
Emoticons are an integral part of chatting. You can’t have an IM conversation without a :-), :-(, or even a ;-). However, the default Kopete emoticons aren’t my favorites. Luckily, Kopete lets you change them with ease. Just go to Settings→Configure, choose Appearance, and go to the Emoticons tab. You can choose from a list of pre-installed emoticons or install your own from KDE-Look’s Emoticons section.
Chat skins
I love the default Kopete chat interface, but it can get old after a while. To change that, go to Settings→Configure, choose Appearance, and go to the chat window tab. You now have a list of styles to change to (Clean, Clear, Gaim, Hacker, Konqi, Kopete, or Retropete). You can also install new ones by hitting Get New... or by going to the KDE-Look.org Kopete Style section.
What to look forward to in future versions
Kopete has a lot of things coming soon. Full voice and video support will be added (including Google Talk support, currently not available in the default install), along with better protocol support and more cool features.