Ogg Vorbis and Ogg FLAC (the Ogg stream version of the Free Lossless Audio Codec) are popular free-licensed and patent-free codecs for handling sound. These are the formats I'll be using in a complex Ogg Theora video file that I am creating as part of my "Lib-Ray" experiment in creating an alternative format for distributing high definition video. In order to do this, I'll need to solve several technical challenges using the FLAC command line tools, Audacity, and VLC, which I'll demonstrate here.
Making Movies with Free Software
This article is part of an on-going series on the challenges I've faced in producing two free-licensed movies, Marya Morevna, through the Morevna Project and Lunatics, which we are working on as Anansi Spaceworks.
I recently started working on an alternative way to package HD video for distribution – a need I suggested in my recent piece on the Blu-Ray Blues. I decided to use the Blender Foundation's Open Movie, "Sintel" as a prototype for this, because all of the necessary files are available.
Audio
The audio for this project is in two formats: FLAC (Free Lossless Audio Codex) and Vorbis (which uses lossy compression and is much smaller). I use the higher-fidelity FLAC tracks to provide the main 5.1 surround and stereo tracks, as well as the "music and effects only" track (which could be used as the basis for a new dub version).
However, the FLAC files for the 5.1 surround soundtrack are separate, and I need to have a single multi-channel FLAC file in order to combine it properly with my Theora video for playback.
For awhile, I was stumped, but I recently discovered that Audacity, as of version 1.3.3 (I am using 1.3.12), can export data to multi-channel formats
Tricky. FLAC doesn't have a huge collection of command line tools and neither flac nor metaflac can do anything like this. For awhile, I was stumped, but I recently discovered that Audacity, as of version 1.3.3 (I am using 1.3.12), can export data to multi-channel formats. Well, that certainly made things easier.
Here's how to do it.
Get the Soundtrack FLAC files
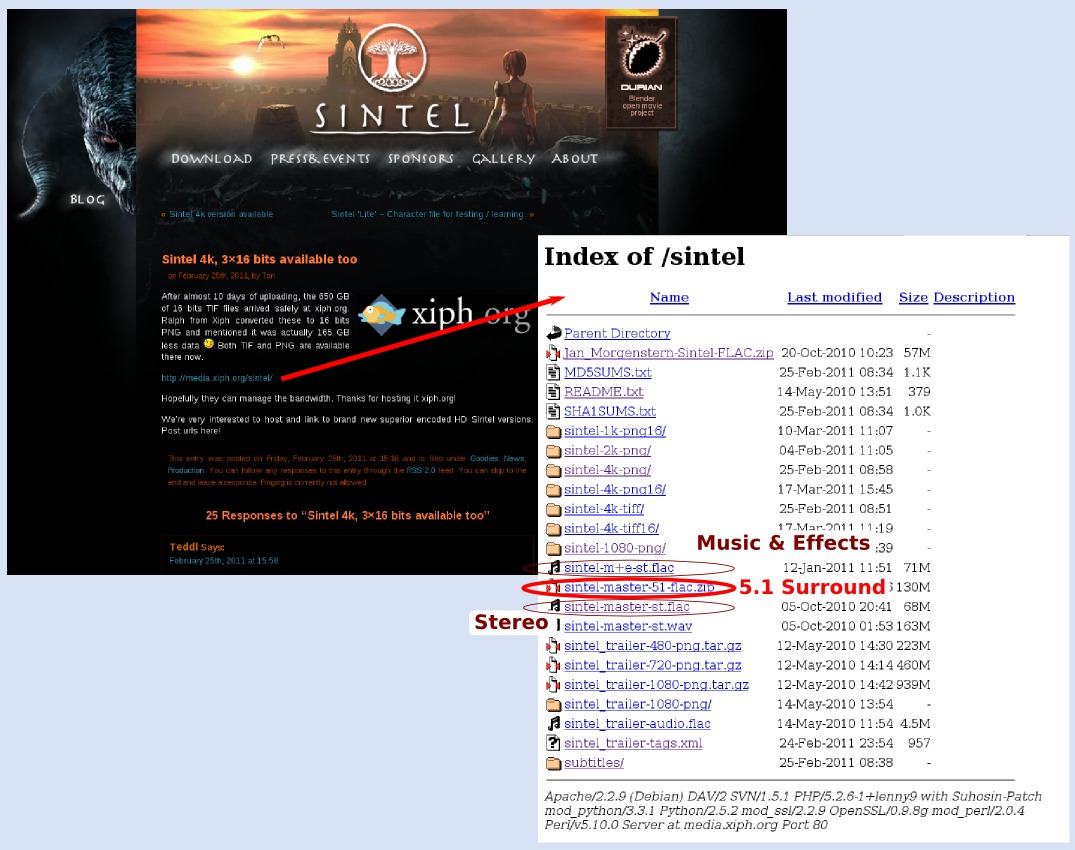
First I get the source files from the Blender Foundation's Durian project. These are available for download from a Xiph.org download server. The file I want is sintel-master-51-flac.zip, which is a zip file containing the five separate channels of the soundtrack in separate single-channel FLAC files.
While I'm at it, I'll also get the original "Stereo" soundtrack as well. This is a single FLAC file with the two stereo channels multiplexed. There's also a music and effects only track (appropriate for dubbing).
Naturally, I expand the zip file to access the contents:
$ mkdir Soundtrack
$ cd Soundtrack
Soundtrack$ unzip ../sintel-master-51-flac.zip
Archive:  ../sintel-master-51-flac.zip
   creating: sintel-master-51-flac/
  inflating: sintel-master-51-flac/sintel-master-51-c.flac
   creating: __MACOSX/
   creating: __MACOSX/sintel-master-51-flac/
  inflating: __MACOSX/sintel-master-51-flac/._sintel-master-51-c.flac
  inflating: sintel-master-51-flac/sintel-master-51-l.flac
  inflating: __MACOSX/sintel-master-51-flac/._sintel-master-51-l.flac
  inflating: sintel-master-51-flac/sintel-master-51-lfe.flac
  inflating: __MACOSX/sintel-master-51-flac/._sintel-master-51-lfe.flac
  inflating: sintel-master-51-flac/sintel-master-51-ls.flac
  inflating: __MACOSX/sintel-master-51-flac/._sintel-master-51-ls.flac
  inflating: sintel-master-51-flac/sintel-master-51-r.flac
  inflating: __MACOSX/sintel-master-51-flac/._sintel-master-51-r.flac
  inflating: sintel-master-51-flac/sintel-master-51-rs.flac
  inflating: __MACOSX/sintel-master-51-flac/._sintel-master-51-rs.flac
Soundtrack$ ls
__MACOSX  sintel-master-51-flac
Soundtrack$ cd sintel-master-51-flac
Soundtrack/sintel-master-51-flac$ ls
sintel-master-51-c.flac  sintel-master-51-lfe.flac  sintel-master-51-l.flac  sintel-master-51-ls.flac  sintel-master-51-r.flac  sintel-master-51-rs.flac
Soundtrack/sintel-master-51-flac$
Load into Audacity
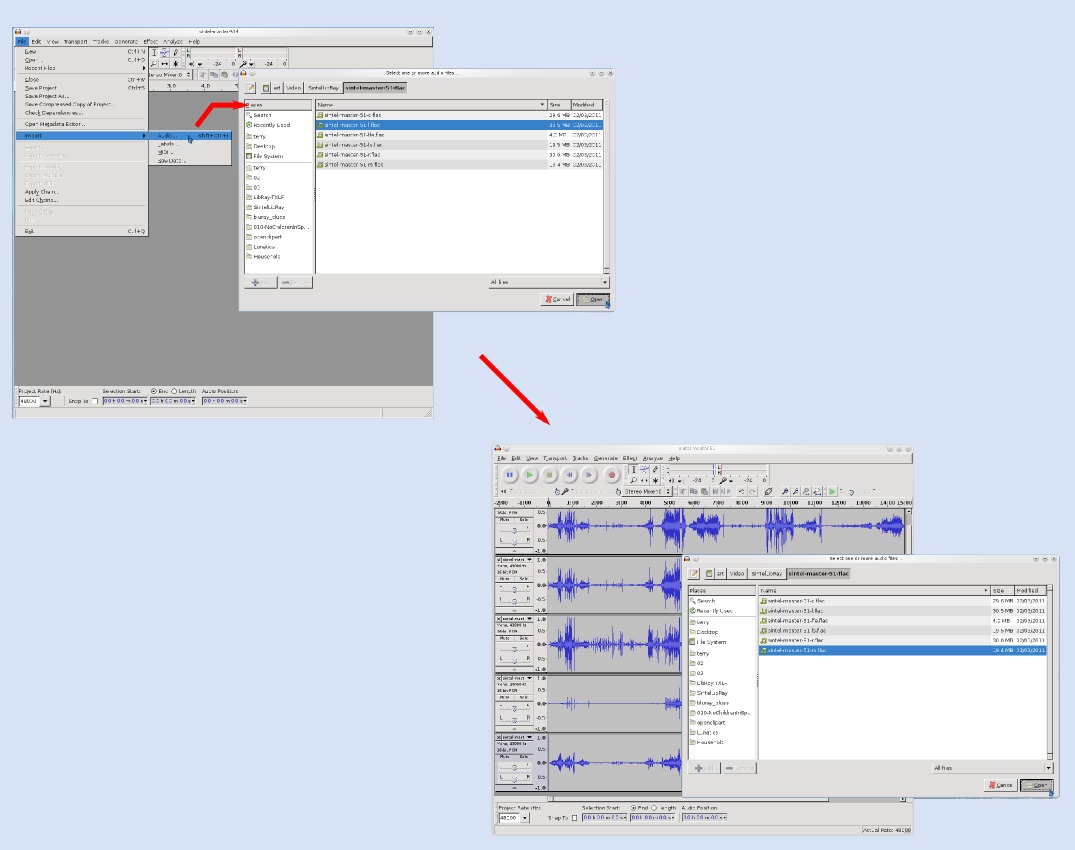
Now I launch audacity, and load each of the surround sound channels into a separate track. To do this, I select File→Import, and then select the file "sintel-master-51-l.flac", and that file is loaded into a track in Audacity. I then repeat this for the others, until I have all of them loaded (Figure 2).
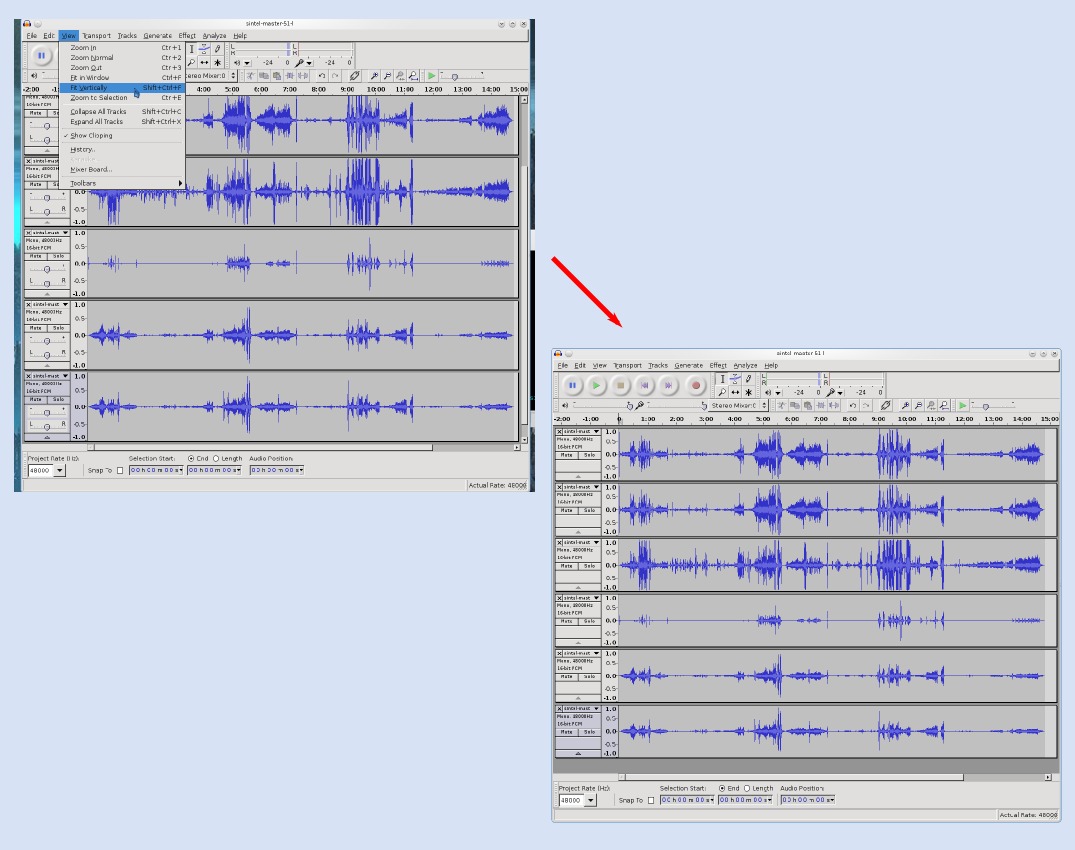
Just to keep from having to scroll, I use View→Fit Vertically to compress all of the tracks into the visible window (Figure 3).
You'll notice that the track names are taken from the file names, and they're hard to read because the information that distinguished them is outside the window. I fix this by selecting the pull-down tab on each track, selecting "Name..." and altering it to something shorter to identify each channel (Figure 4). These labels are for me, they don't mean anything to Audacity.

At this point, I've loaded and labeled all my channels, so I now need to export them as a multi-channel FLAC.
Set Audacity to support multi-channel export
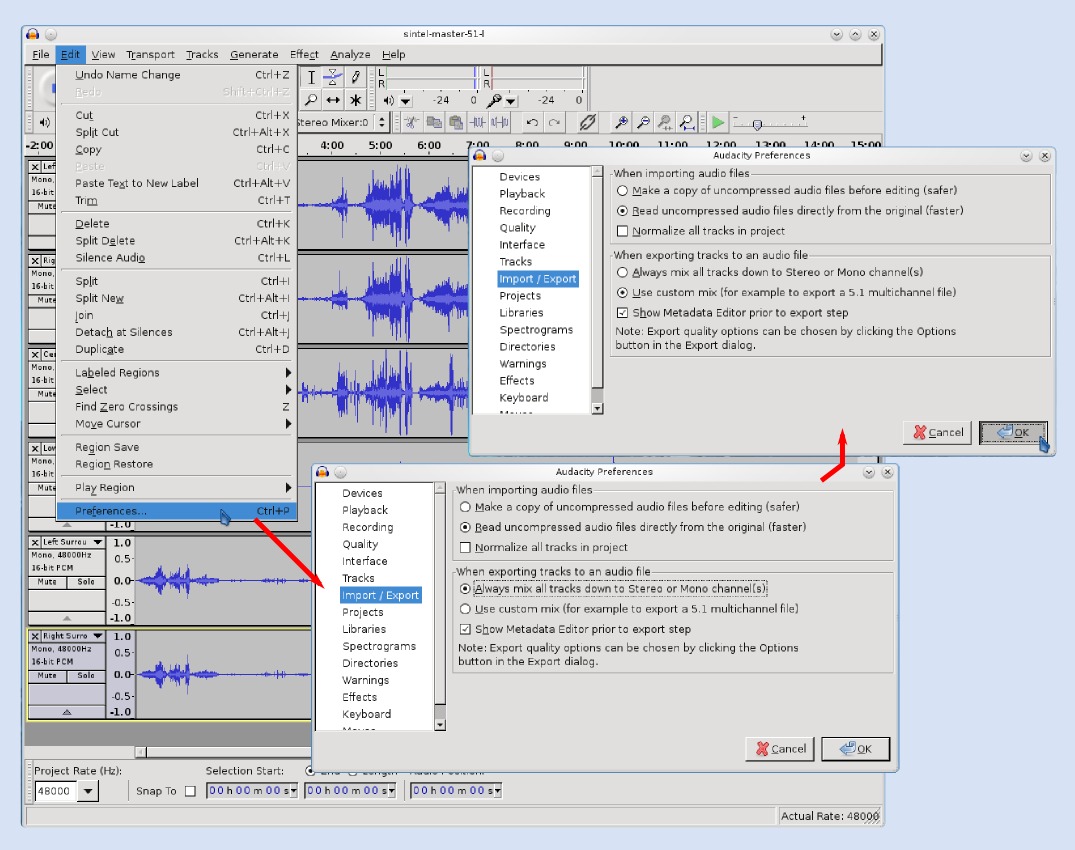
First, I have to make sure that Audacity is in the right mode to export multi-channel files. For this, I need to select Edit→Preferences and examine the "Export" tab. Here, I will need to make sure that the radio button for "Use Custom Mix" is set (Figure 5).
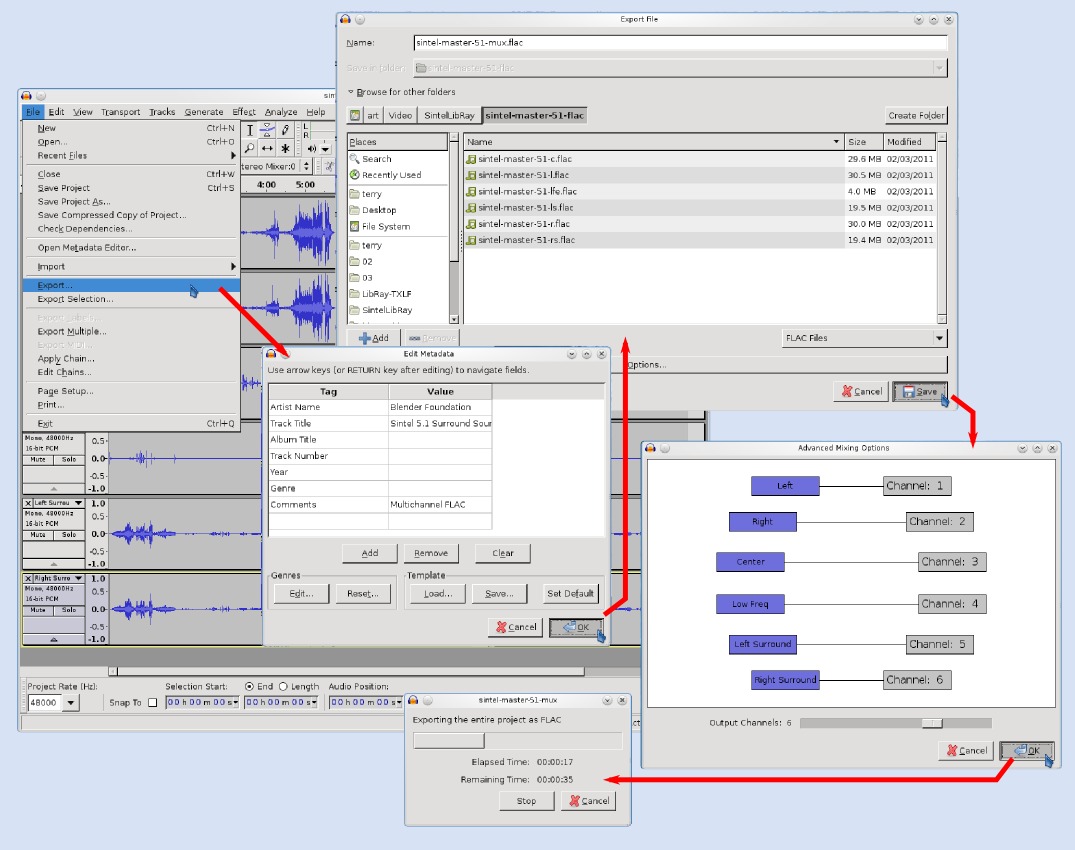
Export the file
Now I select File→Export to export the file. I will need to set a filename, optionally enter some metadata to include in the file, and finally I will be given a network diagram window that allows me to set which track will be stored in which numbered channel in the file (Figure 5). You'll note I used the abbreviation "MUX" which stands for "multiplexed" to indicate that all six audio tracks will be encoded in this file.
The convention for multichannel sound in FLAC files is documented in the FLAC format specification, and in the case of 5.1 surround sound it is: Left, Right, Center, LFE, Left Surround, Right Surround
The convention for multichannel sound in FLAC files is documented in the FLAC format specification, and in the case of 5.1 surround sound it is: Left, Right, Center, LFE, Left Surround, Right Surround. Of course, this is the order I loaded the files in, so the default mapping is correct as shown in Figure 5. But of course, I check this against the names I've given for each track to make sure that the order is indeed correct.
Then I click "Save", and I wait for the export to finish. After a few moments, the file will be saved to disk.
And that's it!
Testing
Out of curiousity, I tried re-loading the "MUX" file back into a new Audacity session. The behavior is pretty much what you would expect – the file is divided up into separate tracks, which are represented in Audacity as mono tracks. The track names are derived from the file name, with a number appended to indicate the numerical channel they represent. Thus the "Left" channel is number one (i.e. it is labeled "sintel-master-51-mux 1"), and the "LFE" channel is number four ("sintel-master-51-mux 4").
Loading this file with VLC (VideonLAN Client), I can play it back as expected.
Converting to Ogg stream formats
Now I have the 5.1 Surround sound track correctly encoded into a single multichannel FLAC file. I also have the "Stereo" and the "Music and Sound Effects Only" (also stereo) versions of the soundtrack.
However, I still need to convert these "native FLAC" files into "Ogg FLAC" files, which I can do with the flac command line utility:
$ flac sintel-master-51-MUX.flac --ogg -o sintel-master-51-MUX.oga

flac 1.2.1, Copyright (C) 2000,2001,2002,2003,2004,2005,2006,2007  Josh Coalson
flac comes with ABSOLUTELY NO WARRANTY.  This is free software, and you are
welcome to redistribute it under certain conditions.  Type `flac' for details.

sintel-master-51-MUX.flac: wrote 165552085 bytes, ratio=0.999
$
$ flac sintel-master-STEREO.flac --ogg -o sintel-master-STEREO.oga

flac 1.2.1, Copyright (C) 2000,2001,2002,2003,2004,2005,2006,2007  Josh Coalson
flac comes with ABSOLUTELY NO WARRANTY.  This is free software, and you are
welcome to redistribute it under certain conditions.  Type `flac' for details.

sintel-master-STEREO.flac: wrote 71535004 bytes, ratio=1.000
$
$ flac sintel-music+effects-STEREO.flac --ogg -o sintel-music+effects-STEREO.oga

flac 1.2.1, Copyright (C) 2000,2001,2002,2003,2004,2005,2006,2007  Josh Coalson
flac comes with ABSOLUTELY NO WARRANTY.  This is free software, and you are
welcome to redistribute it under certain conditions.  Type `flac' for details.

sintel-music+effects-STEREO.flac: wrote 74268073 bytes, ratio=1.000
$
Ripping commentary tracks to Ogg Vorbis with VLC
For the commentaries, I use Vorbis – it's much more compact and the quality is not critical so long as we can understand what is being said.
I used VLC to rip the commentary tracks from the DVD version of Sintel, converting these to Ogg Vorbis streams, since I'm not aware of any online sources for them. Of course, I need to make a copy of the DVD onto my hard drive (I actually did this some time back, but this is how to do it, using the dvdbackup utility from the Debian package of the same name):
$ dvdbackup -i /dev/dvd1 -M
The -M stands for "mirror" and will just make a complete copy of the DVD contents. The -i tells where to find the DVD (on my system the DVD drive shows up as /dev/dvd1 which is a little unusual – it's usually /dev/dvd).
Then I use VLC to rip the sound tracks from the VTS_01_0.VOB file in the DVD. This is the version of the video with the commentary tracks – eight of them, to be exact. To do this, I launch the graphical VLC application, and I select Media→Convert/Save.... This will open a dialog window. Push the "Add" button to add the VOB file we need.
To define the audio track that we are going convert, we need to click the "Show More Option" box, and a set of additional fields will show up underneath. In the edit options field, we need to enter ":audio-track=0" as shown to record the first track (the numbering starts from zero).
Then click on "Convert/Save…" and the dialog window will change to allow you to enter values for the output. Choose the file to write to. Then use the drop down menu to select "Audio - Vorbis (OGG)" as the output codec. Finally, click the "Start" button to begin ripping the track. Figure 7 shows the entire process.
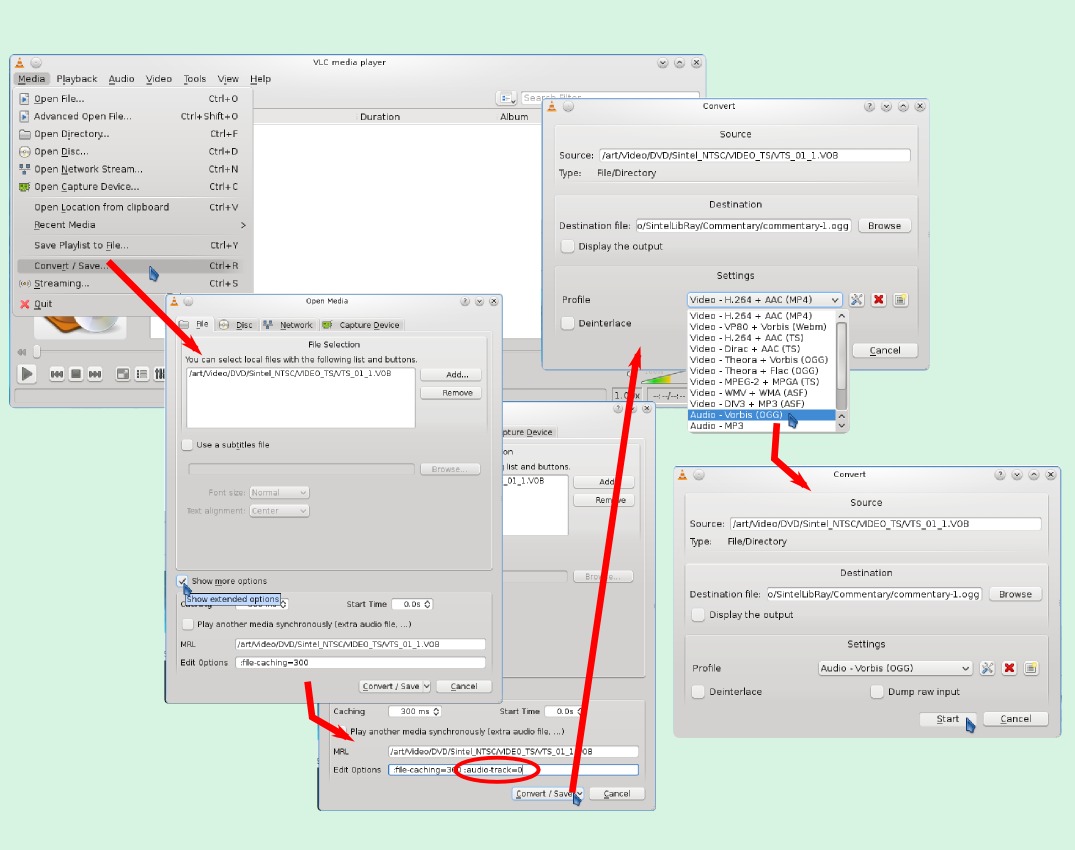
The slider in the VLC window will show the progress of the conversion. Once it's done, you'll repeat the process with ":audio-track=1" and continue until you get to ":audio-track=7" which is the last one available.
And that's it – we now have all of the audio tracks we need for our Ogg Theora video. In my next few columns, I'll construct the video, create subtitles, and assemble the result into a single multimedia file.
Licensing Notice
This work may be distributed under the terms of the Creative Commons Attribution-ShareAlike License, version 3.0, with attribution to "Terry Hancock, first published in Free Software Magazine". Illustrations and modifications to illustrations are under the same license and attribution, except as noted in their captions (all images in this article are CC By-SA 3.0 compatible).