Today, everyone uses a different instant messenger. Your boss may use Lotus Sametime, your colleague AIM, your friend Google Talk, and your kid Yahoo! Messenger. However, these all take up hard drive space, RAM, and CPU usage. In addition, many of these are proprietary and Windows-only (two big minuses for GNU/Linux users). Luckily, the free software world has an alternative that enables users to chat with users of all of these programs (and many more). It is called Pidgin.
Note: This is part 2 of an instant messenger series. Part 1 deals with the history of instant messenger clients and protocols.
History of Pidgin
Before I get started explaining how to use Pidgin, I had better spend a little time to explaining what Pidgin actually is. According to the Pidgin site:
Pidgin is a multi-protocol Instant Messaging client that allows you to use all of your IM accounts at once.
To be more specific, it can connect to AIM, Bonjour, Gadu-Gadu, Google Talk, Groupwise, ICQ, IRC, MSN, QQ, SILC, SIMPLE, Sametime, XMPP (the core technology of Jabber), Yahoo!, and Zephyr.
Originally, Pidgin started out as an AIM clone known as GAIM (an acronym for GTK+ AIM, later changed to simply “Gaim” to avoid naming disputes with AOL). Then, it started to add more protocol support by reverse-engineering proprietary protocols (and adding open protocols such as IRC or XMPP). Soon, it began to pick up steam. The well-known free software repository Sourceforge.net named it Project of the Month for November 1998. Adam Iser created a fork of Gaim known as Adium which allowed Macintosh users to use Gaim without X11. John T. Haller created a portable “launcher” called Portable Gaim (later renamed to Gaim Portable), which allowed users to take Gaim on their USB drive.
In 2007, Sean Egan (the head of the project) announced that his team would rename their project “Pidgin” to avoid more legal disputes with AIM (the new name is a reference to the term “pidgin”, which describes communication between people who do not share a common language. It may also be a joke related to Gaim, since pigeons are game birds).
Installation
On Windows, installing Pidgin is easy. Just download it from the Windows download page and run the installer. Note: The GTK+ package bundled with Pidgin on Windows can sometimes cause problems with the GIMP image editor. The solution is to uninstall both Pidgin and GIMP, install the latest GTK+ build from the official site, and then reinstall Pidgin and GIMP.
Macintosh users aren’t encouraged to download Pidgin at all. Instead, the developers recommend Adium, an OS X fork. If you don’t like Adium, you can install an old 1.5 build of Gaim via fink.
Pidgin offers repositories for Fedora Core, CentOS, and Red Hat Enterprise Linux (find them at the download page). In addition, several GNU/Linux distributions such as Gentoo offer Pidgin in their official repositories (search for pidgin in your package manager). Unfortunately, many GNU/Linux distributions don’t have it so easy. At the time of this writing, the latest version of Pidgin (2.0.1) wasn’t available in many official repositories (though the older Gaim 1.5 is mostly available). Debian offers an unstable version from their repository. Ubuntu Feisty users don’t have an official package (only users of the upcoming Gutsy 7.10 do, available here). The reason is that the metapackage ubuntu-desktop in Feisty and early versions requires the package gaim. If you don’t want to wait for Gutsy, you can mess around with some unofficial packages from GetDeb or ubuntu.pl, you can compile it from source, or you can just use the old Gaim 1.5 package pre-installed on Ubuntu (all the tutorials below will probably work with 1.5, but the screens will be different and some things will be renamed). Note that the ubuntu.pl Pidgin package conflicts with Gaim, causing Gaim to be removed and ubuntu-desktop along with it (though according to this comment or this one there are ways to keep ubuntu-desktop). The GetDeb package does not conflict with Gaim, so Gaim will stay installed (as will ubuntu-desktop). Just make sure you run Pidgin, not Gaim.
How to set up accounts
Pidgin is a great program, but it isn’t all that easy to use. The average user can be easily scared away by the fact that it isn’t intuitive when it comes to setting up accounts. The following are instructions on how to set up accounts for eight of the most popular protocols.
Setting up an AIM account
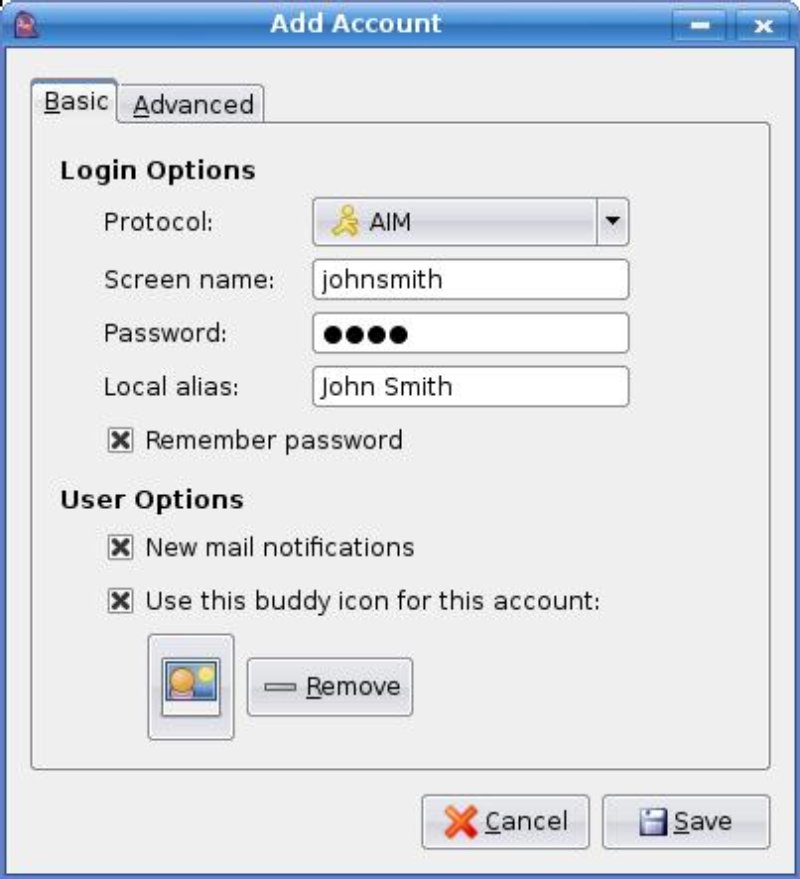
Like it or not, AIM is the most popular instant messenger on the planet (53 million users and counting). Unfortunately, AIM is full of bloatware, adware, and even spyware. That’s why many users opt for Pidgin instead. First, you’ll need an AIM or AOL screen name. If you don’t have one, register one here. Then, open Pidgin and go to Accounts→Add Edit. In the Accounts window, click the Add button. Make sure the protocol is AIM and type in your AIM or AOL screen name (e.g. johnsmith). You can also add things such as mail notification, password saving (you must type your password in the password field and check password saving), buddy icons, the local alias (the name that will show up on the network, e.g. John Smith), and proxies (under the Advanced tab). To finish, click the save button.
Setting up an ICQ account
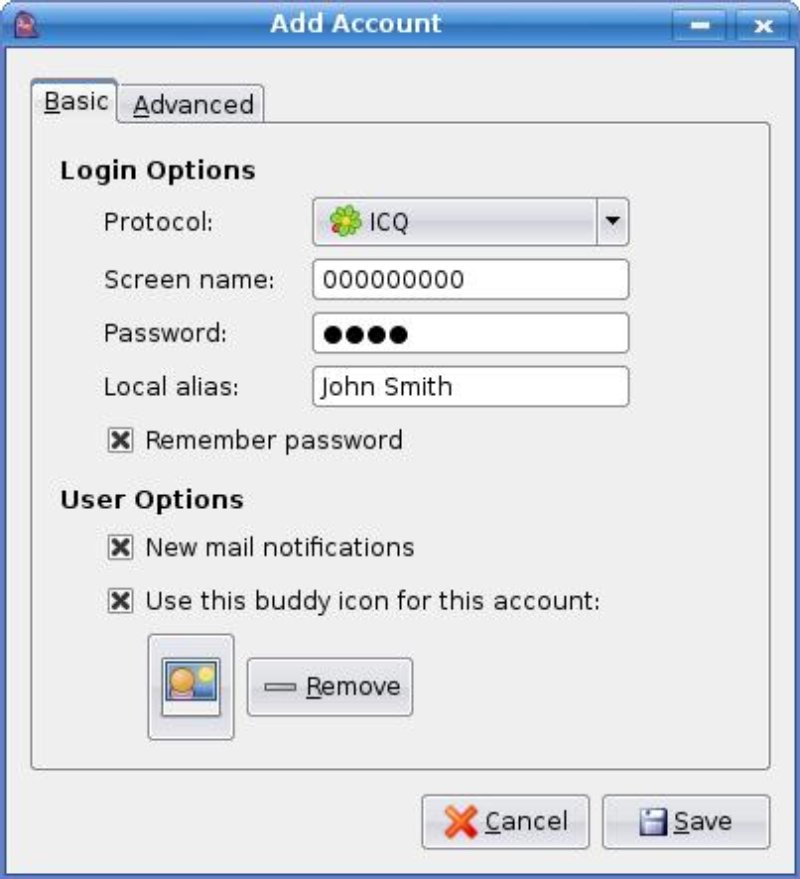
ICQ is the oldest instant messenger around. But like AIM, it’s bloated and full of ads. Luckily, Pidgin makes it easy to connect to your ICQ buddies. Before you do so, however, you’ll need an ICQ number (available here). Then, open Pidgin and click on Accounts→Add Edit. In the Accounts window, click the Add button. Change the protocol to ICQ and type in your ICQ number (e.g. 000000000) for your screen name. You can also add things such as mail notification, password saving (you must type your password in the password field and check password saving), buddy icons, the local alias (the name that will show up on the network, e.g. John Smith), and proxies (under the Advanced tab). To finish, click the save button.
Setting up an MSN (Windows Live) account
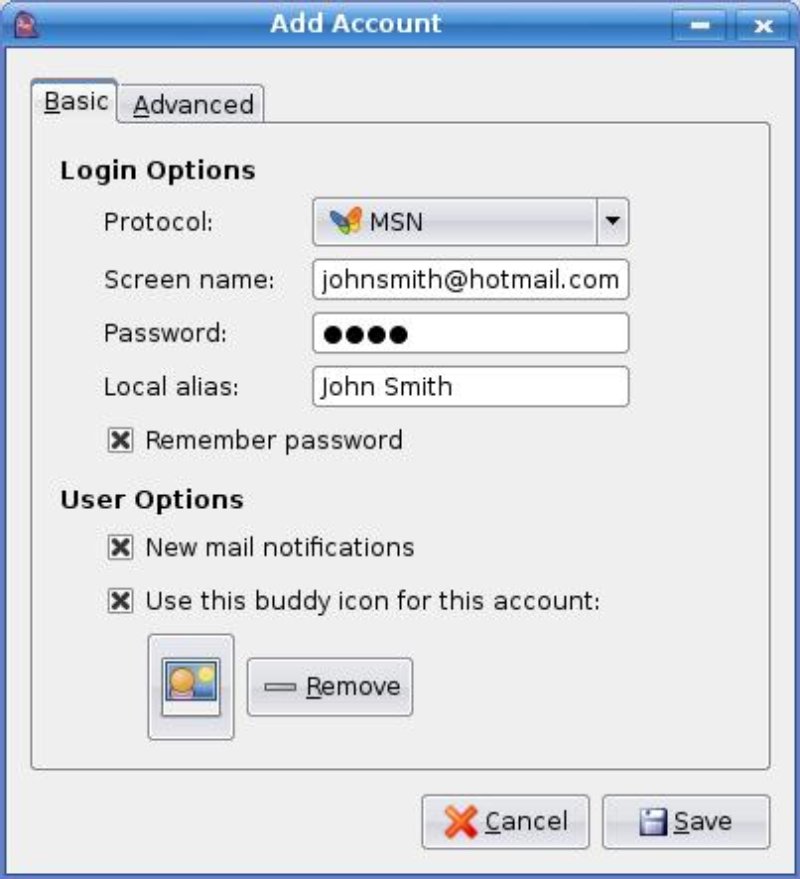
I don’t particularly like Microsoft. However, there are a lot of people who disagree, at least as far as the instant messaging market is concerned. Just look at Windows Live Messenger: it claims 27.2 million active users. I personally know lots of people who use it. Luckily, I don’t have to actually install a Microsoft product to communicate with them. I just need Pidgin and a Windows Live ID (if you don’t have one, you can sign up for one here). Open Pidgin and go to Accounts→Add Edit. In the Accounts window, click the Add button. Change the protocol to MSN and type in your Windows Live ID email (e.g. johnsmith@hotmail.com) for your screen name. You can also add features such as mail notification, password saving (you must type your password in the password field and check password saving), buddy icons, the local alias (the name that will show up on the network, e.g. John Smith), and proxies (under the Advanced tab). To finish, click the save button.
Setting up a Yahoo! Messenger account
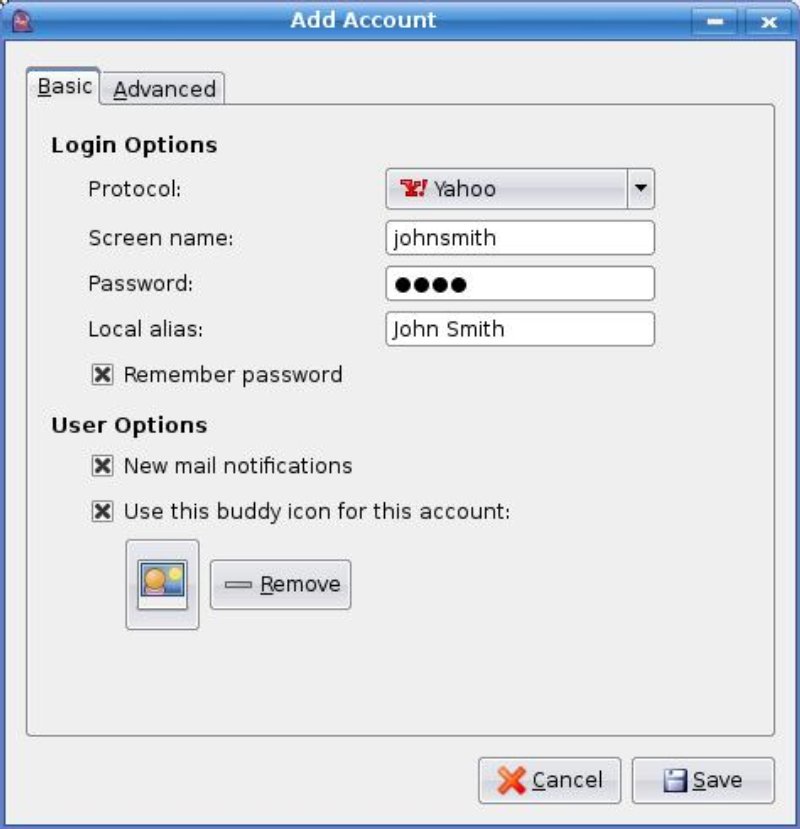
After Microsoft, Yahoo! is my least favorite company. But there are a lot of Yahoo! Messenger users that I know. Luckily, I don’t have to install Yahoo! Messenger to stay in touch with them. All I need is Pidgin and a Yahoo ID (available here). Open Pidgin and go to Accounts→Add Edit. In the Accounts window, click the Add button. Change the protocol to Yahoo and type in your Yahoo ID (e.g. johnsmith) for your screen name. You can also add things such as mail notification, password saving (you must type your password in the password field and check password saving), buddy icons, the local alias (the name that will show up on the network, e.g. John Smith), proxies, Yahoo! Japan, and an option to automatically refuse conference and chat room invitations (the last four options are under the Advanced tab). To finish, click the save button.
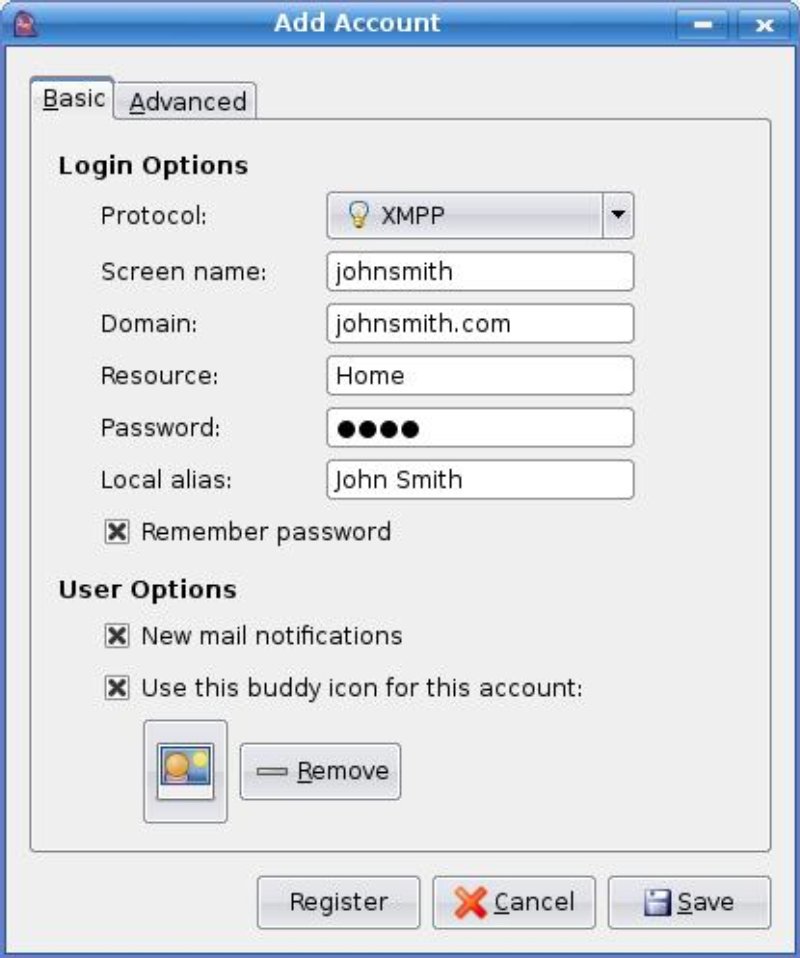
Setting up an XMPP (Jabber) account
XMPP (the core technology in Jabber) is probably my favorite protocol. It’s open and extremely popular, and Pidgin provides support for it (though many features, like transports, are disabled). Open Pidgin and go to Accounts→Add Edit. In the Accounts window, click the Add button. Change the protocol to XMPP, type in your XMPP screen name (e.g. johnsmith, if you don’t have one make one up), and type in your domain (e.g. johnsmith.com, if you don’t have one visit here for a list of ones to choose from). You can also add things such as mail notification, password saving (you must type your password in the password field and check password saving), buddy icons, the local alias (the name that will show up on the network, e.g. John Smith), the resource, proxies, old SSL, plaintext authentication, authentication over unencrypted streams, and connect port and server (the last four under the Advanced tab). To finish, click the save button (if you already have a screen name) or the register button (if you don’t already have a screen name).
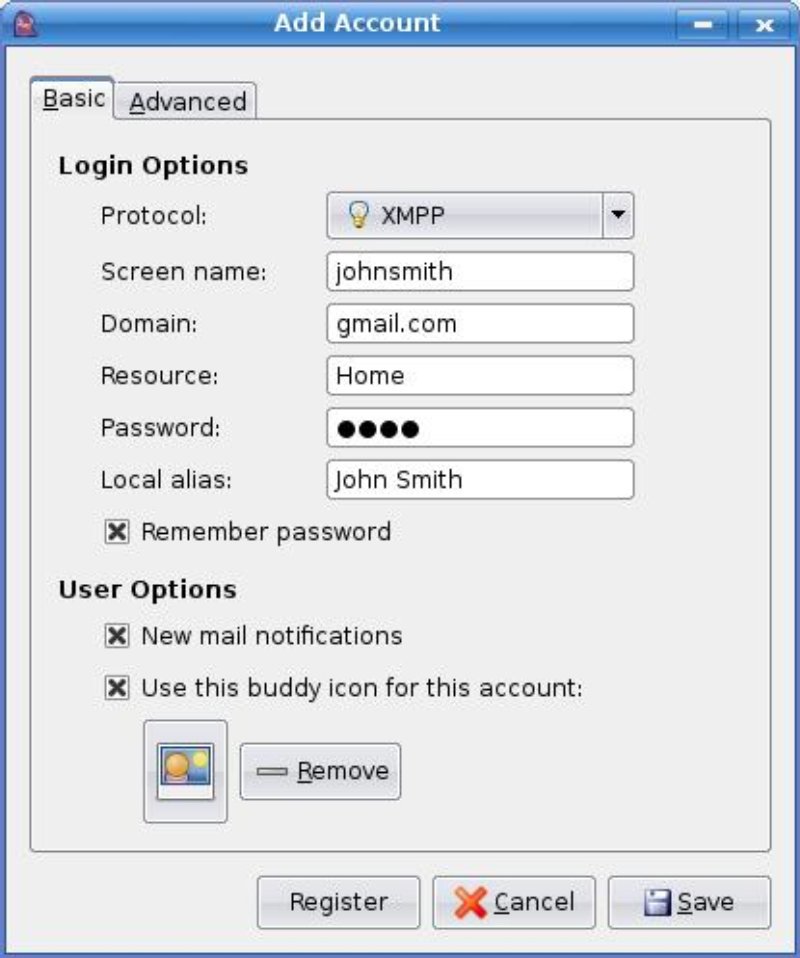
Setting up a Google Talk account for Gmail
Google is one of my favorite companies. Part of the reason is that they use standards. Instant messaging is no exception. Their Google Talk server uses XMPP as its protocol. However, connecting to the Google Talk server from a third-party client isn’t as easy as connecting to most other XMPP servers. To connect, you’ll need a Google Account (get one here). Then, open Pidgin and go to Accounts→Add Edit. In the Accounts window, click the Add button. Change the protocol to XMPP, type in your Google Accounts screen name (e.g. johnsmith, NOT johnsmith@gmail.com) for your screen name, and type in gmail.com (or googlemail.com for googlemail.com users) for your domain (if you’re signing in with a Google Account that’s not linked to any Google email service, enter gmail.com). Then, go to the Advanced tab, set Connect port to 5222 and Connect server to talk.google.com. You can also add things such as mail notification, password saving (you must type your password into the password field and check password saving), buddy icons, the local alias (the name that will show up on the network, e.g. John Smith), and proxies (under the Advanced tab) To finish, click the save button.
If you use Google Apps for Domain, read this article for how to set up Pidgin with your server.
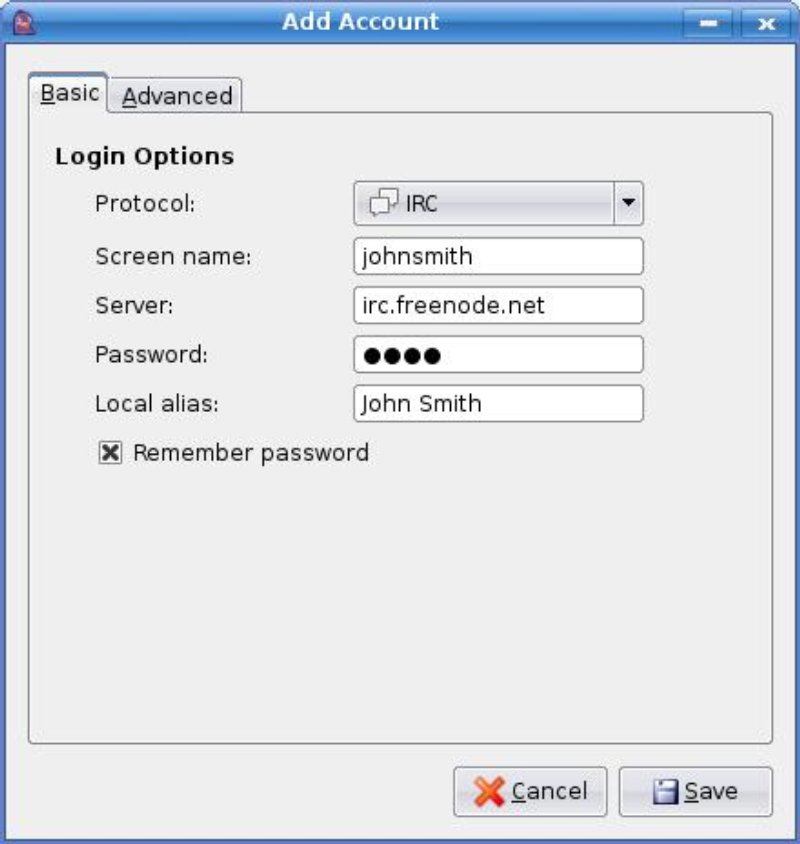
Setting up an IRC account
For those who like providing (or receiving) amateur tech support, Pidgin offers a way to connect to IRC chat rooms. Unfortunately, it isn’t as fully featured as real IRC clients. Still, it’s a veritable option for those who don’t want to run multiple programs at the same time. To set it up, open Pidgin and go to Accounts→Add Edit. In the Accounts window, click the Add button. Change the protocol to IRC and enter in the server you are trying to connect to (e.g. irc.freenode.net). If you have a screen name, type it (e.g. johnsmith) in the screen name field. If not, you can just make up your own screen name for now. You can also save the password (you must type your password in the password field and check password saving), enter the local alias (the name that will show up on the network, e.g. John Smith), change the port, use SSL, change authentication name, password, disconnect ghosts, operator passwords, and use proxies (the last seven under the Advanced tab). Then, hit Save.
If you haven’t done so already, you should probably register your username (otherwise, someone could steal it). Doing so varies from server to server. Here’s how to do it on Freenode, one of the biggest IRC servers. Click on Buddies→New Instant Message, choose the IRC account you want to register, and make the buddy you are messaging nickserv. The first message should be register your-password (replacing your-password with a password, e.g. thisisapassword). To send, hit the Enter key. If you want to add an email, type another message reading set hide email on, then set email your-email-address (replacing your-email-address with your email, e.g. johnsmith@johnsmith.com). To remember the password, go to the IRC account again (Accounts→Add Edit Accounts, select the IRC account, and hit Modify), and type in your password.
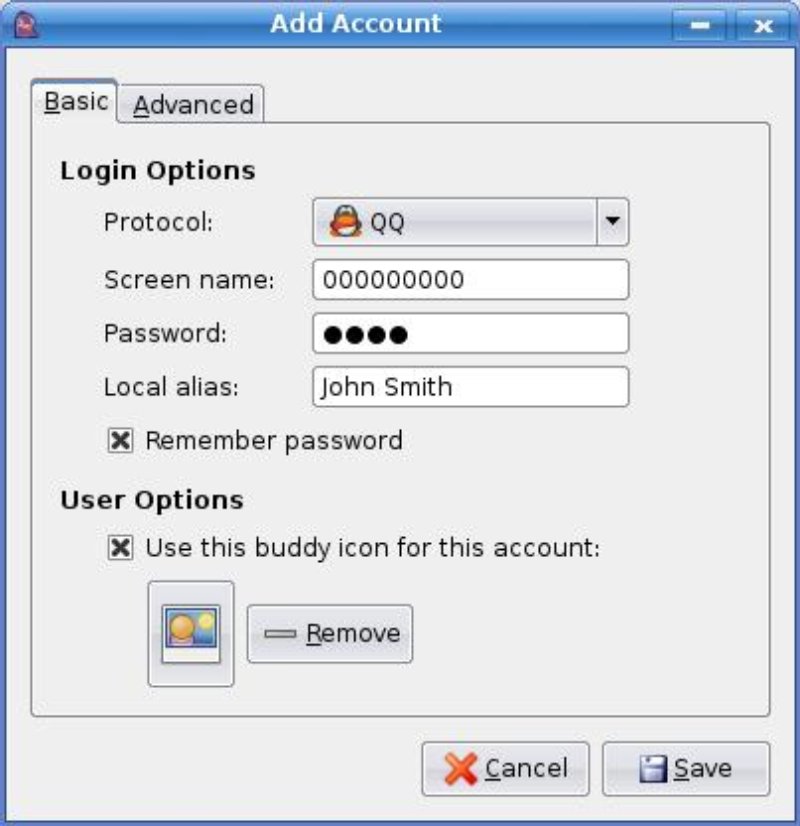
Setting up a QQ account
Tencent QQ (also known as simply QQ) is one of the most popular instant messengers in China and South Africa. Like ICQ, QQ gives you a number, not a username. Unfortunately, to get the username you need to download the Windows-only QQ client (the official site in Chinese is here, the English version based out of South Africa is here). The problem is, QQ is labeled by some companies as having spyware (see McAfee’s report on qq.com). Once you have registered, Pidgin makes it easy to connect to QQ. Open Pidgin and go to Accounts→Add Edit. In the Accounts window, click the Add button. Change the protocol to QQ and type in your QQ # (e.g. 000000000) for your screen name. You can also add things such as password saving (you must type your password in the password field and check password saving), buddy icons, proxies, log-in in TCP, log-in hidden (all three under the Advanced tab), and the local alias (the name that will show up on the network, e.g. John Smith). To finish, click the save button.
Basic usage
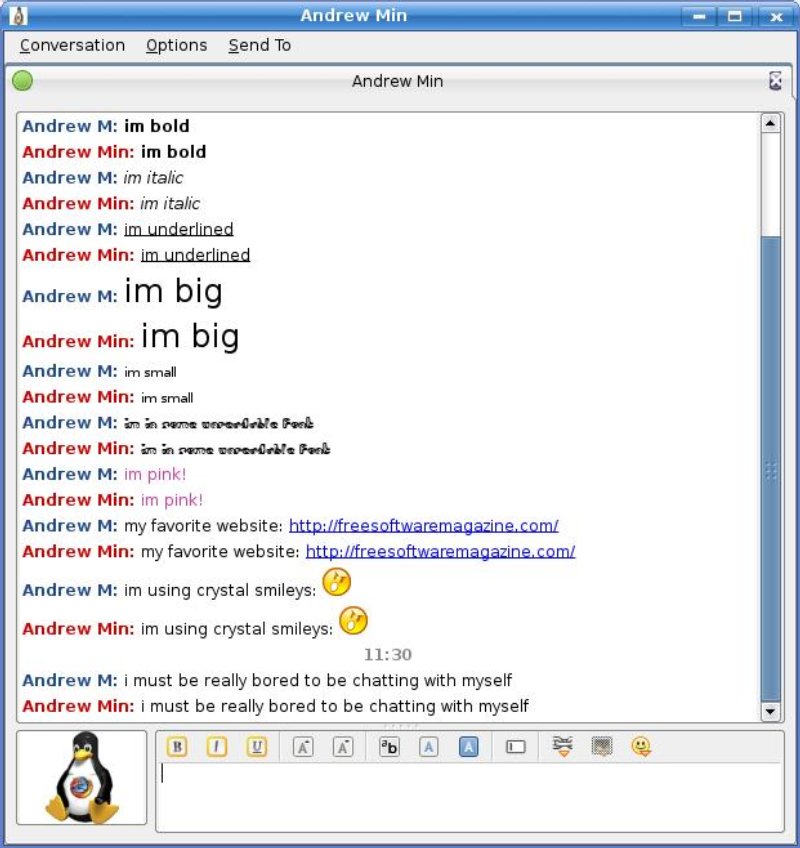
Now that you’ve logged into your accounts, you’ll want to be able to message your friends. You should see all the buddies you have previously added from the other instant messengers you have used. To message, just double-click on a name, and it will pop up an instant message screen as shown in figure 9. You could also just do Buddies→New Instant Message, and type in the name of a buddy.
The instant messaging window has quite a few formatting options. You can add bold, italic, and underline formatting, raise and lower font sizes, change the font, change the colors, insert links, insert images, and insert emoticons (also known as smileys). See figure 9 for some examples. To send the message, hit the Enter key.
In addition to making your messages look better (or worse), Pidgin has a handy find feature to search the conversation, a log viewer, a feature to save the conversation to an HTML file, and a file transfer protocol (only in certain protocols), and do much more.
But what if you haven’t added a buddy yet? Does that mean you have to open up the official client, add the buddy, then go back to Pidgin? Of course not (though, if you really want to do that, you’re welcome to). All you do is go to Buddies→Add Buddy, fill in the required fields, choose which account to add the buddy to, and hit Add.
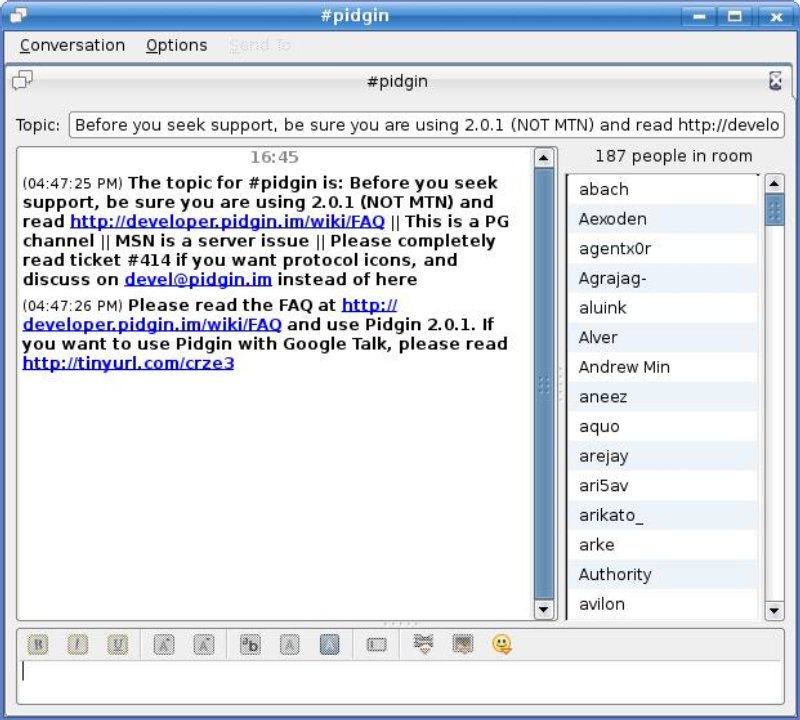
Instant messaging to individual users might be fun, but group chats are even more fun—especially for IRC, whose main focus is on group chats. It is now time to learn how to join chat rooms. It’s simple: just go to Buddies→Join a Chat, select the account that is going to connect to the chat room, and enter any additional information that is required. Then, hit Join. A window will pop up similar to the one in figure 10.
Many users enjoy going to certain IRC chat rooms every day. For instance, I personally like hanging out in the #kubuntu channel at irc.freenode.net. I also like hanging out in certain AIM chat rooms with some of my friends. However, entering the room name over and over again can be a little tedious. Luckily, Pidgin offers a way to bookmark chats. Just go to Buddies→Add Chat, enter the information about the room, and hit Add. A new “buddy” should appear on your list. Double-clicking on it will take you to the chat room it represents.
When you only have a few buddies, managing your buddy list is easier than starting a GNOME vs. KDE flame war. But as your list gets bigger (I currently have 100+), it gets impossible to manage your buddies. The solution? Groups. Just click Buddies→Add Group, type in a name for the group, and click Add. You can then drag and drop buddies (or IRC chats) into the group.
Starting to get spam from a particular person? There’s a great way to stop that: just use Pidgin’s block feature. If that person is on your buddy list, right-click on the person, and click Block. You can also start a conversation, then go to Conversation→Block in the messaging window.
Sometimes, you need to know exactly when a person comes online. Pidgin provides a unique way to do this. It is called “buddy pounces” (no, they did not copy this from AIM’s “Buddy Alerts”. It was the other way around). Go to Tools→Buddy Pounces, and click Add. Type in the account you will be using and the name of the buddy. Then, choose when the pounce will happen. You could do it when the buddy signs on, signs off, sends a message, goes away, returns from away, becomes idle, is no longer idle, starts typing, pauses when typing, or stops typing. Finally, choose what you want to do. You could automatically send a message, pop up a notification, play a sound, or even execute a command (for example, open Firefox). There are many uses for this: everything from annoying your friend to remotely controlling your computer (for example, if you receive a message from yourself saying “play bonjovi”, XMMS could start playing You Give Love A Bad Name).
Extending Pidgin
You can now chat with your friends, and use some of the more advanced features that make Pidgin so much better than competitors. But Pidgin is capable of so much more! The key to it is its extensibility.
Plugins
One of the coolest things about Pidgin is that it has an API. Like the Mozilla programmers, the Pidgin developers have created a way for third party programmers to create plugins. And the community has responded by creating tons of plugins. Quite a few useful ones, like Timestamping, come pre-installed in Pidgin. To view them, go to Tools→Plugins.
One of the most popular 3rd-party Pidgin plugins is called Guifications. It is a wonderful plugin that displays “toaster” popups to notify when a buddy comes online, offline, chats, or starts typing, similar to what AIM, Windows Live Messenger, and Yahoo! Messenger offer. Windows users have an installer, while GNU/Linux users have to compile from source (Ubuntu users have a pre-built, unofficial binary from GetDeb here). Don’t like the default Guifications theme? Third-party themes are available here (you extract them into ~/.purple/guifications/themes/). To run a theme, open the Plugins window, select Guifications, click Configure, click on the Themes tab, and check the theme(s) you want.
Another popular plugin is Off-the-Record Messaging. This allows for encryption from prying eyes trying to tap into your conversations. OTR has installers for Fedora, Mandriva, and Windows (there is also an Ubuntu binary in the repositories called pidgin-otr. However, it requires Gutsy).
Another popular addon is the Purple Plugin Pack. It’s not just one plugin. It is 42 plugins all wrapped into one package. The plugins range from useful plugins (like an IRC helper) to completely useless ones (like a dice roller). There is a Windows installer, or you can compile it from source (for Ubuntu users, there is an unofficial binary here).
Smiley themes
Another cool feature Pidgin has is that it lets you change the default emoticons set (called smiley themes). Just open Pidgin, go to Tools→Preferences, and click on Smiley Themes. Then, drop the smiley set that you want to install into the smiley themes window. Select the theme you want to use, then close the window. My personal favorite is Crystal Emoticons, but there are many more available (a good place to look is Gnome-Look.org).

Skins
One of my biggest disappointments with Pidgin is that there is no API for skinning it (that is, changing the way it looks). Luckily, that has not stopped several ambitious artists. At Gnome-Look.org, developers have hacked together several themes for Pidgin. The instructions will vary, but for most of them you extract the files into /usr/share/pixmaps/pidgin (overwriting the existing files) and then restart Pidgin. Some examples of Pidgin skins include Human (Ubuntu users will especially like this), Pidgin_neu, Pidgin_osX (perfect for integration with Baghira), and Pango_Pidgin.
What to look forward to in future versions
Pidgin is a wonderful program with many features. And more are coming, including voice/video support, better MSN support, .NET plugins, MySpaceIM support, remote logging, virtual classrooms for teachers, and much more. To see all the planned features, check out the Pidgin trac.
Links
- Pidgin homepage
- Developer home
- Developer blogs
- Wikipedia article
- Using Pidgin from a USB drive
- Adium (Mac OS X fork)
- PhoneGaim (Gaim + SIP calling) (source available at download page)