Running a free software project can be a rewarding experience if you begin with your eyes open. In my personal experience, starting a free software project with only a head-on view of a few existing free software projects is not really enough. Some basic background information can really help get you started in the right direction.
(Note: using software project management will definitely help too!)
Historical perspective
In 2001, I was working on the eDirectory development team at Novell. We needed to add service advertising functionality to the next version of eDirectory and we chose to go with OpenSLP—a free software implementation of the IETF Service Location Protocol. My manager asked me to write a patch for OpenSLP to add DHCP support—a feature that was slated for some future release of OpenSLP. As I was working with the OpenSLP project administrator on integrating this feature, he asked me to become a developer on the OpenSLP project, and I accepted. To shorten what could be a really long story, I eventually found myself running the project—simply because everyone else dropped out.
I’d downloaded, compiled and executed various free software projects in the past, and like many people who have reached this level, I thought I was pretty hot stuff. I didn’t have a clue; but I learned. Because of my new position of responsibility (and luckily, it wasn’t a very popular project), over the next 5 years, I gradually learned about everything from package creation and maintenance to mailing lists, forums, and web site management. This article is an attempt to ease the burden of discovery for programmers new to the free software world. I hope I succeed—to some degree at least—because running a free software project properly is a rather intense and detail-oriented process.
To run a free software project, you have to be the proverbial Jack-Of-All-Trades. Before we get started, I’d like to make a special note of one excellent resource for information similar to that found in this article: Karl Fogel’s free online book entitled, “Producing Open Source Software”.
Project setup
Setting up a project is actually rather trivial—well, the initial portion of the setup, anyway. However, you soon find that you’ve started a small snowball down a long hill. But let’s just start at the beginning. First you need to find a free software hosting service that you like. Here is a short list of popular services:
- http://www.sourceforge.net
- http://code.google.com
- http://dotsrc.org
- http://developer.berlios.de
- http://www.freepository.com
- http://gforge.org
- http://icculus.org
- http://savannah.gnu.org
- http://www.seul.org
- http://www.bountysource.com
I’ve listed these services in no particular order—with one exception: SourceForge.net is generally considered to be the definitive standard. Hosting over 120,000 free software projects, it offers a very extensive feature set to free software project administrators. I’ve heard it said that SourceForge is the largest repository of “dead” projects on the internet. However, it should be noted that to gain such notoriety SourceForge must, in fact, be a very popular free software hosting service. Otherwise, the main difference between these services is the feature sets offered. You will simply have to play with a few in order to determine which features you want to provide with your project. After reading the remainder of this article, you will be in a better position to judge the relative value of the various features offered by these services.
SourceForge.net is generally considered to be the definitive standard
In addition to this abbreviated list of general purpose public services, there are also several services hosted by various companies such as Novell, Microsoft, Sun, HP, IBM, etc, which provide free software hosting portals. Generally, these services are more closely affiliated with corporate goals and are intended to host projects that highlight technology specific to the host company. However, most of these services will allow any type of project to be hosted (as long as it’s not derogatory or derisive of the company providing the services, of course).
Some services have very specific goals in mind, and in fact, enforce these goals with very specific rules and regulations. The Eclipse project (which is sponsored and administered by IBM), for instance, wants to host projects that extend or otherwise enhance the Eclipse development environment framework. For this reason, since Eclipse is written in Java, nearly all of the code hosted at eclipse.org is written in Java. Prospective Eclipse projects are also scrutinized closely for relevance to the Eclipse framework, and every Eclipse project must use a free software license that was designed specifically for Eclipse.
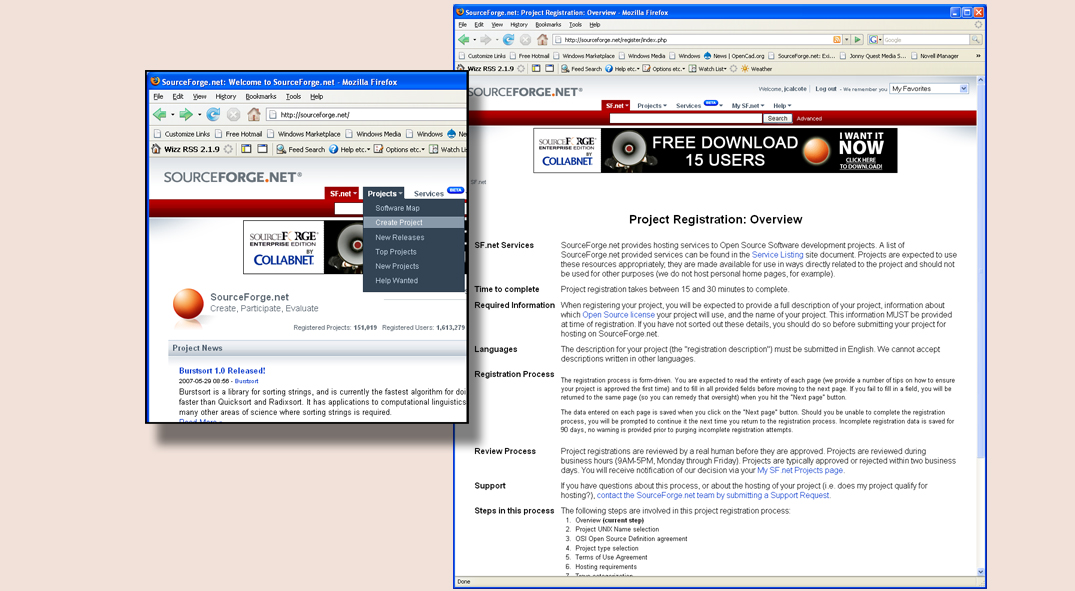
Once you’ve chosen a hosting service, you will then have to go through the process of setting up your project by entering some initial information into a web form. Generally, the hosting service will ask a number of questions about the nature of your project, and details such as a short (file system compatible) name for the project, a longer name, and a short description. The service may also ask you what you believe the value of your project is to the free software community. I’ve set up several projects in this manner, and never had one rejected, so I’m inclined to believe that the process is a bit of a formality. Another piece of information that is usually requested at this time is the free software license that you wish to use for your project.
Choosing a free software license
To properly choose a free software license, you should be familiar with the general features of each type of license available. I strongly recommend that you read the overview information on each of the major free software licenses available at OpenSource.org. The concept of the free software license was originally invented by the Free Software Foundation under the guidance of Richard Stallman. Often these licenses were referred to as copyleft, implying “copyright with a twist”. Indeed, the rationale behind every free software license is fundamentally to keep the software freely available to the public. They effectively prohibit people or companies from stealing it and claiming it as proprietary, while at the same time allowing them to use it for their own purposes.
Each major type of free software license has features that make it either better or worse for a given purpose. For example, the GNU General Public License is a very good general purpose free software license, providing an airtight legal right to the general public to use any GPL licensed software freely and without charge. However, it comes with the often rather painful caveat that any software that consumes GPL software in any way must also be made freely available—in source code form—to the general public. This feature is sometimes labeled “viral” by software companies considering using some free software within their proprietary software products. They simply can’t use GPL software for this purpose because it forces them legally to give away their intellectual property.
On the other end of the spectrum, the MIT license is generally considered to be a very good free software license for projects that simply want to remain free, without imposing any significant restrictions on consumption. Basically, consumers must include the license in their proprietary offerings in a manner that allows the license to be publicly viewed, either at installation time, or in an “about” dialog of some sort, thereby giving credit to the providers of the free software that is being consumed.
So, if MIT is such a good license, then why not use it for everything? Ironically, the MIT license is often a little too loose for proprietary software companies wishing to release portions of their code base. Sometimes proprietary software companies would like to make code available to the “little guy” for free, but establish a dual license agreement with larger customers wishing to make more proprietary use of their free software offerings. I say this is ironic because there’s little doubt that Richard Stallman never intended GPL to have this effect on software. His goals were very idealistic—by forcing consumers of GPL software to also make their consuming software GPL, he clearly hoped to eventually make all software free.
Choosing the wrong license can be very detrimental to your project
The following are a few of the more popular free software licenses documented at OpenSource.org, listed in order from least restrictive to most restrictive: MIT, BSD, LGPL, and GPL. Since the Free Software Foundation first created the GPL, dozens of types of free software licenses have been crafted (mostly by corporate legal staff). Read the literature and try to understand the high-level goals of each, and then carefully choose the one that is best suited to your project’s goals and target audience, because choosing the wrong license can be very detrimental to your project.
Categorizing your project
Once you’ve chosen a service to host your project, and you’ve spent the requisite effort creating your project and choosing a free software license, you will then need to make a number of administrative decisions. After you’ve submitted your request to set up a new project, you will probably have to wait a day or two for a human to review your request and grant approval. You’ll generally be notified by email when this occurs.
The next step is to choose your project site options. In order to be clear about this process, I’m going to focus on just one of the sites listed above—SourceForge.net—simply because it’s the one most familiar to me. These options may include trove categorization, mailing lists and chat rooms, RSS feeds, technical forums, bug and feature trackers, documentation, source code repository, web services, and compile farm services to name just a few.
Trove is a tagging mechanism that allows your project to be categorized with similar projects. People looking for a particular type of project may search using the categories provided by the service to find the types of projects they are interested in. Projects are categorized using a dozen different criteria, and it’s important that you carefully select the trove categories you really want to associate with your project. This is one of the most often overlooked features of a free software project hosting service. By properly categorizing your project, you make it easier for the right people to locate your project.
Using mailing lists
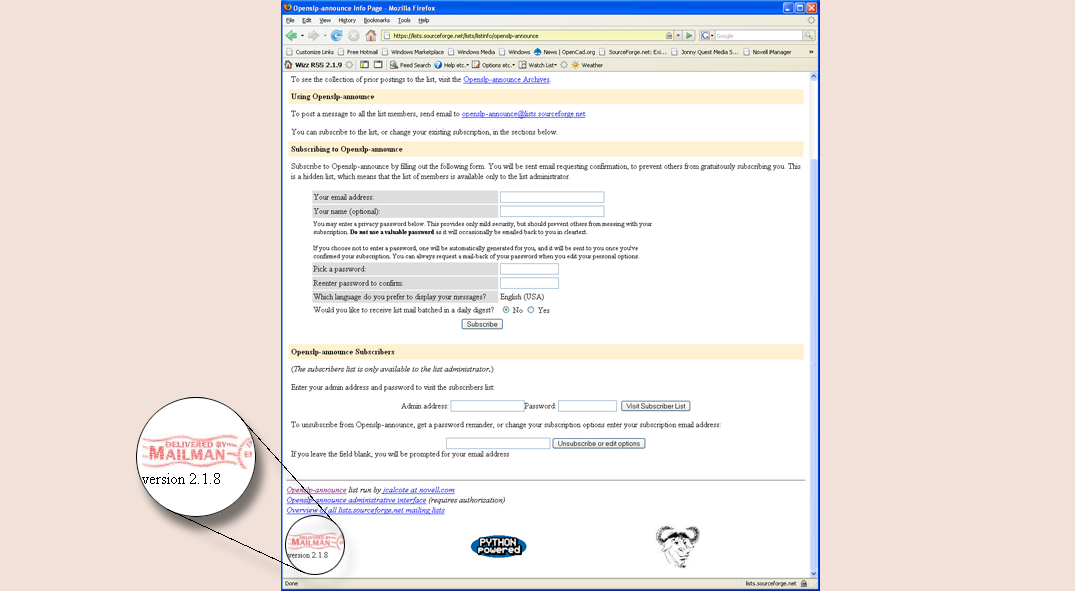
A mailing list is basically nothing more than an email account associated with an automatically managed distribution list. When you send a message to a mailing list, you are sending your message to everyone on the list automatically. People can (and do) include and exclude themselves from the list at will. People most closely associated with a project will often be members of the project mailing lists for long periods of time. Others may just monitor list traffic for a few weeks in order to get a feel for the activity level of a project, although this can often be discovered by simply glancing at the mailing list archives for the last few months. Mailing lists are managed by mailing list software, the most popular of which today is GNU Mailman (figure 2).
It’s best to configure at least two mailing lists for your project—a low-traffic announcement list, and a higher traffic discussion list. The announcement list is specifically for announcements related to your project. Often there will be many more subscribers to announcement lists than to discussion lists. This is because people want to know when something significant happens with your project, but they don’t care about the details of how you got there. The discussion list is where the real work takes place. You might think of your discussion list as the virtual work place for your project. This is where project developers can get together with ideas about new features, or the proper approach to fixing specific defects.
Sometimes project administrators like to make a distinction between developer discussions and questions from users. In this case, they will often configure a third mailing list for their project specifically for user questions. The user list is often self-managing for projects that have gained a following. That is, as a project developer, you often don’t need to answer too many questions on the user list because other user list subscribers will jump in and answer newbie questions for you. You see, there are quite often two types of people associated with free software projects—those who like to write code, and those who simply like to use the software, and have become quite proficient at it. The coders are interested in technical details of implementation, while the “power users” are more expert in proper and interesting uses for the project.
In summary, the three most common types of mailing lists associated with OSS projects are announcement, developer, and user lists. The announcement list is low-traffic, and only allows posting from the project administrators and key developers. The developer and user lists are higher traffic lists and are targeted for specific uses by the project, as implied by their names. Common names for these lists are:
- projectname-announce@lists.sourceforge.net
- projectname-devel@lists.sourceforge.net
- projectname-user@lists.sourceforge.net
The projectname portions of the addresses above should be replaced with your project’s short name (often called the project’s Unix name). It’s a good idea to stick to conventions like these because people who are members of multiple projects can then almost guess the proper name for your mailing lists.
Some mailing list etiquette
A few rules apply when interacting with others on project mailing lists: do your homework—don’t ask a question on a mailing list until you’ve done all you can to figure out a problem yourself. This etiquette extends to both the user and the developer level. Both users and developers are expected to be smart (although not necessarily on the same level or within the same domain). Users are expected to intelligently read any existing user documentation for answers before they make a query to the user list. Developers are expected to study the source a little and read existing development documentation before asking questions on the developer list.
Don’t ask a question on a mailing list until you’ve done all you can
Often the questions that could have been answered with a quick perusal of the documentation are answered curtly with the acronym, RTFM. I’ll tell you right now that ‘R’ stands for Read, and ‘M’ stands for Manual. You can guess the meaning of the rest, I’m sure. We should try to remember that free software projects are generally under-funded, and often even personally funded out of self-interest by project administrators themselves. That means project developers’ time is a very valuable resource. They don’t have time to answer questions that are easily answered by the documentation.
On the other hand, please try to be nice. Sending a spiteful or mean response to a query on a mailing list is sometimes referred to as “flaming”. Flaming is discouraged, but often ignored because it has the effect of weeding out the pests—those who are just trying to get others to do their leg work for them. The problem with flaming, of course, is that you can alienate your target audience. For this reason, flaming is an activity that is often seen only on the mailing lists of more important and widely recognized projects. (Ah, the intricacies of free market economics!)
Using internet relay chat rooms
Mailing lists used to be the only forum for discussion in the free software world. Lately, another more responsive channel has been employed by free software project administrators. Internet Relay Chat (IRC) is an instant message protocol that is specifically designed to perform well under heavy load. Most Instant Message (I/M) protocols such as AIM, Google Talk, Yahoo Messenger, Microsoft Messenger, and even proprietary I/M services such as Novell’s GroupWise Instant Messenger (GWIM) are designed to allow two or three people to chat effectively with each other in real time.
IRC, on the other hand is designed to allow dozens of people to effectively communicate in a chat room at the same time. Being in an IRC chat room is much like being at a party where everyone is standing around with drinks in hand talking about various topics. You can focus on a given conversation if you want, or you can start one yourself, but it’s all going on over the same channel.
Being in an IRC chat room is much like being at a party
To get started with IRC, you will need to download or otherwise obtain an IRC client. IRC clients connect to IRC servers that are hosted services run by people interested in IRC as a protocol. Popular IRC clients include ChatZilla, KVirc, Opera, Pidgin, savIRC, X-Chat, and PJIRC. There are many others, but the clients I’ve listed here are reported to run on all of the most common platforms. In addition to these clients which are specific to IRC, there are some I/M clients that support multiple I/M protocols, including GAIM and Trillian (Windows only).
IRC is actually a fairly old protocol invented in the late 1980s. While it’s been formalized by IETF working groups, the formal definition is not strictly adhered to. (This is often the case when an older protocol becomes widely adopted over a significant time period by the community before formalization.) You should try out a few of these clients before you settle on one that you like. IRC is essentially a command-line protocol. However, some IRC clients have gone a long way toward hiding this fact from the user. For example, the IRC interface presented by GAIM expects you to know many of the IRC command-line commands, and use them properly while establishing your chat sessions. The IRC interface built into the Opera web browser on the other hand, is highly automated, performing most tasks for you behind the scenes. It’s worth doing a bit of research to find one you really like.
Configuring an IRC client
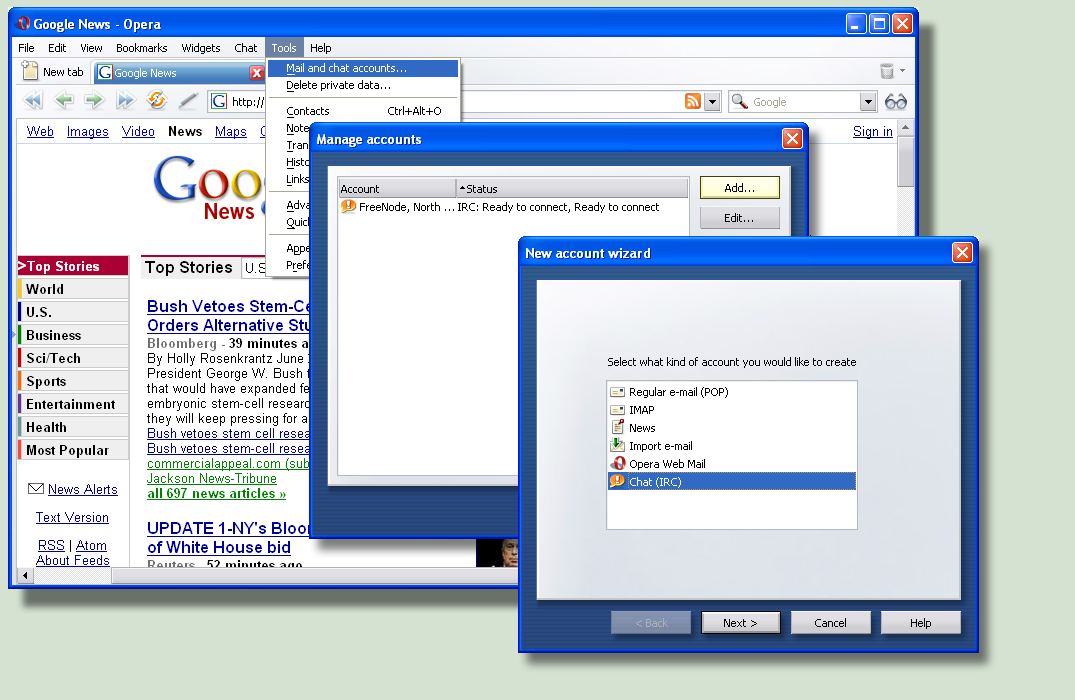
There are two phases to setting up most IRC clients: Initial setup, and joining a chat room. Initial setup is done only once per client. On the Opera client, for instance, (as shown in figure 3) you pull down the “Tools” menu and select “Mail and Chat accounts” option. Click the “Add” button to add a new chat account, and select the “Chat (IRC)” option in the list. Click “Next >” and enter your real name and email address. On the next screen choose your nickname. This is a short “handle” by which you will be known by the community. It should be short, and something you don’t care if everyone sees. Whatever you choose, others will be calling you this, so be sure it’s what you’d like to be called. Finally, on the last screen choose the IRC server you’d like to join using this “chat account”. You should choose a chat server based on several key details. If you’re joining an existing chat room, you need to choose a server that supports that room. Often, the documentation for an existing chat room will indicate which IRC server it’s using. For instance, freenode is a popular chat service. Within the service you should choose an appropriate locality. Many of the popular chat services have servers in most major areas of the world. Choosing a server in Europe will only slow down your communications if you happen to live in North America.
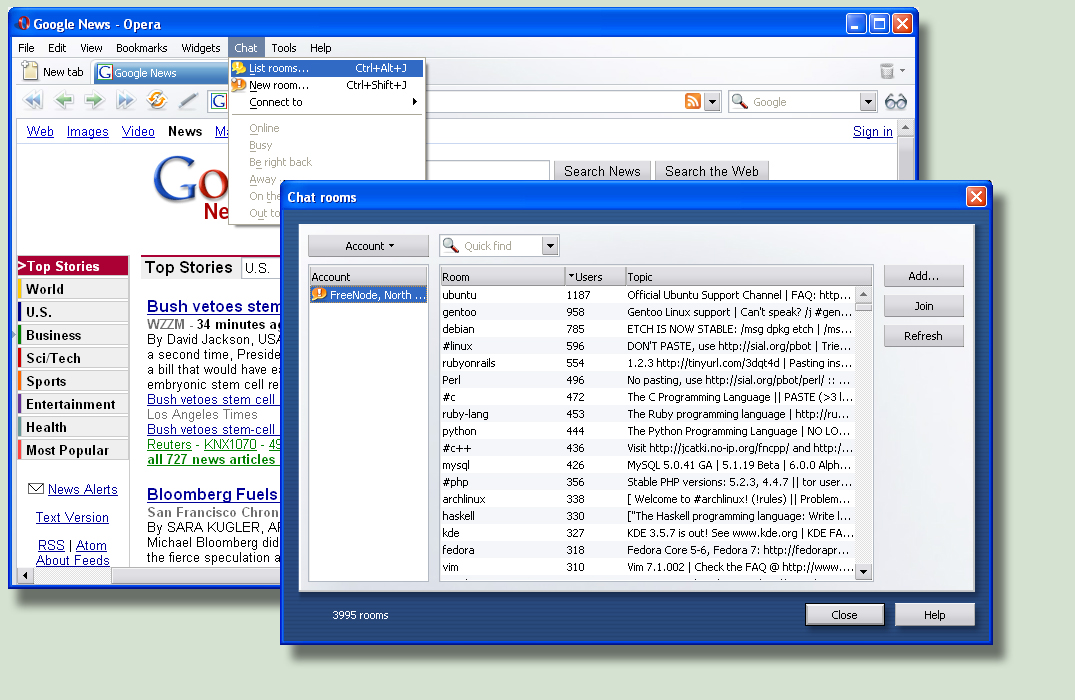
Once you have a local account set up with a chat service, you need to join a chat room or channel. This is done in Opera by pulling down the “Chat” menu item, and selecting the “List rooms” option, as shown in figure 4. Opera presents a “Chat rooms” dialog which takes a few seconds to initialize the first time, because it enumerates all existing chat rooms—most IRC services support thousands of chat rooms. You can do a quick search by typing all or a portion of the name of the room you’re looking for in the search box. The list will be iteratively narrowed down as you type each letter of the search key.
If you’re creating your own chat room, just click the “Add” button, and type in a unique name. A nice way of determining uniqueness is to enter your potential names into the search box. If the list comes up empty, then you’ve found a good candidate. You’ll get a new tab in the main Opera window for your chat room. As long as others join the room with the same name, then you’re all in the same chat room. It’s that simple. Because the chat service and room name are critical aspects of your IRC channel, you should advertise these bits of information on your project web site.
As the first person to join a chat room, you become the room operator. Operators have a few more rights than non-operators, but the trouble with this system is that when the last person leaves the room, the channel returns to its original state—non-existent. Ultimately, this is the nature of an IRC chat room. However, there are ways around this problem. You can register your chat room with the IRC service, which makes it more or less permanent, with you in control. To use these more advanced features, you will need to become familiar with the IRC command-line syntax, and the regulations established by your chosen IRC service. In this case, you will also need to switch to a more powerful, but less user-friendly IRC client than Opera. A good choice here might be ChatZilla, which is a Mozilla (FireFox) plug-in. ChatZilla tries to hide the details as much as possible, without removing access to features like chat room registration and authentication.
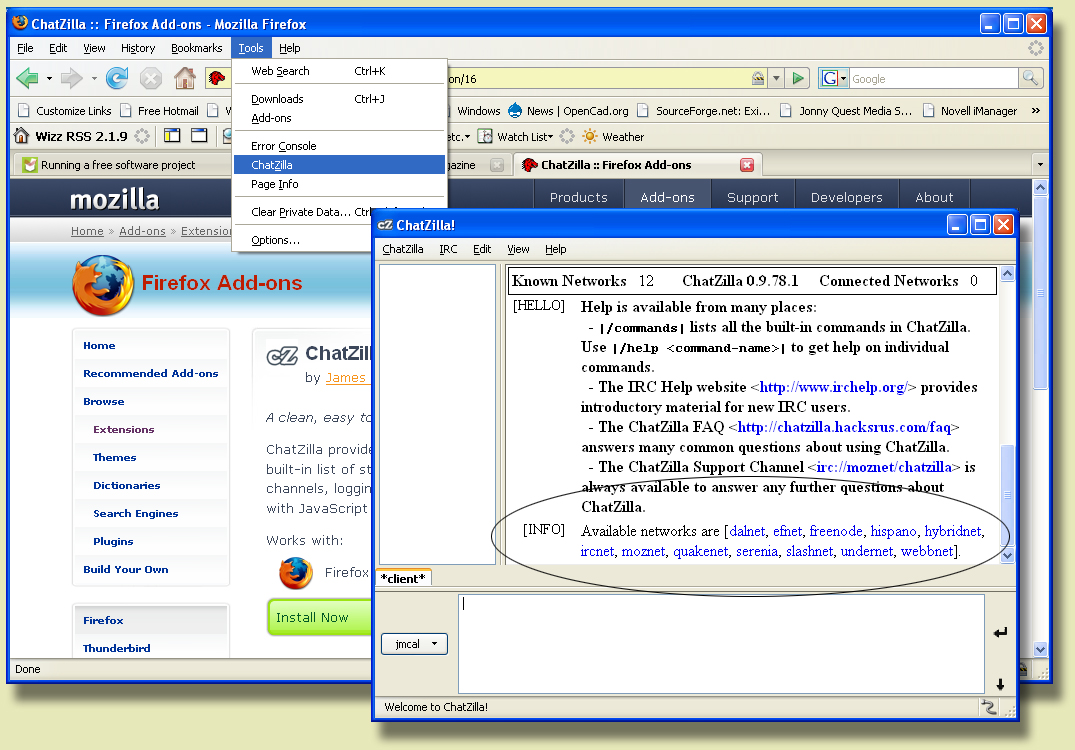
To use ChatZilla, you will have to install the ChatZilla FireFox extension as shown in figure 5. Go to the ChatZilla home page and click on the “install” link at the bottom of the main page (from within FireFox, of course), and follow the instructions. When you restart FireFox, pull down the “Tools” menu and select “ChatZilla”. A small dialog will appear, and the main edit box in the dialog will contain a set of tabbed windows with a single tab labeled “client” containing information about the ChatZilla client, including links at the bottom of the page for various IRC services known to exist by ChatZilla. Across the top of this window, you will see:
Known Networks xx ChatZilla w.x.y.z Connected Networks 0
At the bottom, under [INFO], you will see a list of available networks shown as links (circled in figure 5).
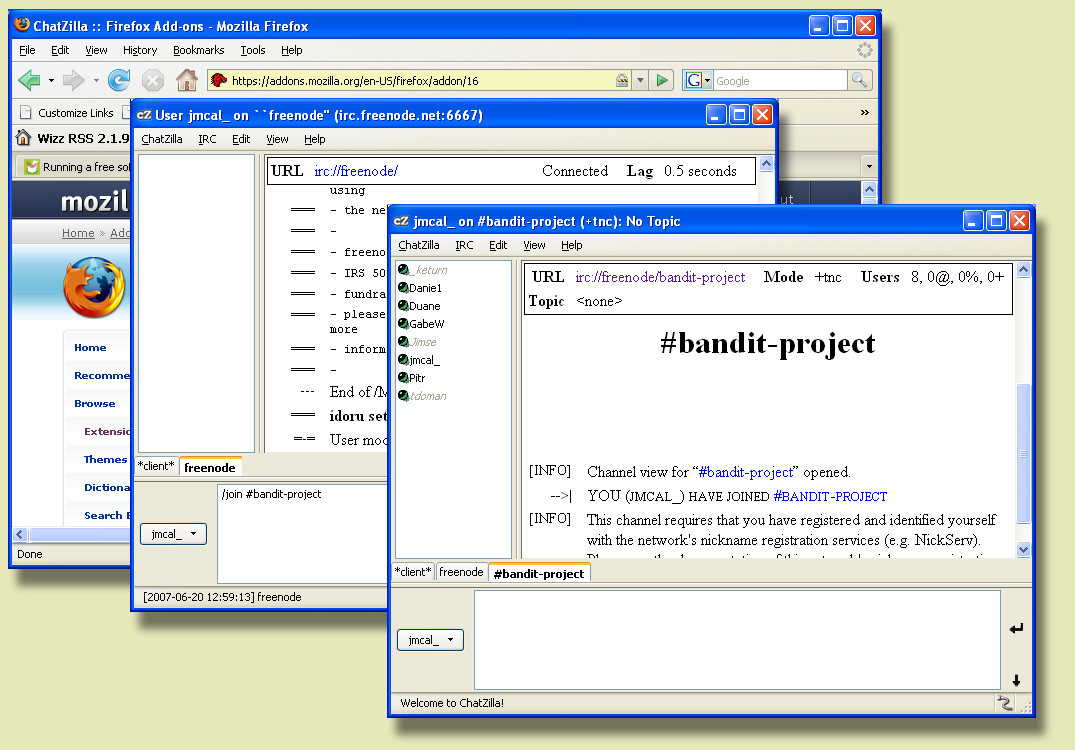
Select your desired network and you will open a new tab specifically for this IRC service, labeled according to the network name. For example, if you select freenode then you will get a new tab next to client, labeled freenode (see figure 6). You can always switch back to the client tab to select another network. Doing so will not close your freenode connection, it will only open a new connection. At the top of the connection tab, you will see the text:
URL irc://freenode/ Connected Lag x.xx seconds.
To join a channel on this service, you pull down the “IRC” menu and select “Join channel”. Then enter the name of your channel, or simply press the “Refresh Now” button to generate a list of currently available channels. This list is refreshed in the background every so often, so if you neglect to press the “Refresh Now” button, the window will eventually populate itself anyway. If you know the name of your desired channel, you may simply type its name. Otherwise, you may type a portion of the channel name in the “Quick Search:” edit box and allow the filter to reduce the selection list for you. (Warning: Opera’s quick search feature is much faster than ChatZilla’s.) Once your target channel shows up, just click on it and press “Join”. After a while, you may tire of this tedious process and wish to speed things up. You can simply enter the command /join #my-channel (shown in figure 6) in the text window at the bottom of the ChatZilla dialog. Do this while the channel tab (eg., freenode) is visible. Note that you must press Ctrl + Enter to actually send the command because the text entry window allows you to enter multiple lines of text before sending your message (you may also press the “<return/enter>” button directly to the right of the text entry window).
You may have noticed by now that the narrow window on the left side actually contains a list of what appear to be user names or nicknames when you have a channel tab selected. These are the nicknames of the users currently joined to this channel, and you can, in fact, communicate with them by directly addressing them by their nickname. For instance, you might type:
SiliconJoe, I can’t remember the command sequence you gave me yesterday on the load document feature of OpenSnorkleFork—can you run it past me again, please?
Hopefully, if SiliconJoe isn’t nodding off at his desk or out to lunch, he’ll notice your question, and answer you in a timely fashion. Incidentally, if you know you’re going to be leaving your desk for a while, it’s polite to indicate so to your fellow chatters by marking yourself absent. You can do this in ChatZilla by pressing the button labeled with your nickname on the left side of the text entry window, and selecting one of the “Away” options.
If you know you’re going to be using advanced IRC features such as room registration then you will probably want to start with a more complex client such as the FireFox ChatZilla plug-in, rather than the simplified client that is built into Opera. To learn more about IRC command-line syntax, go to the IRC Wikipedia pages—start with this one.
Providing RSS feeds
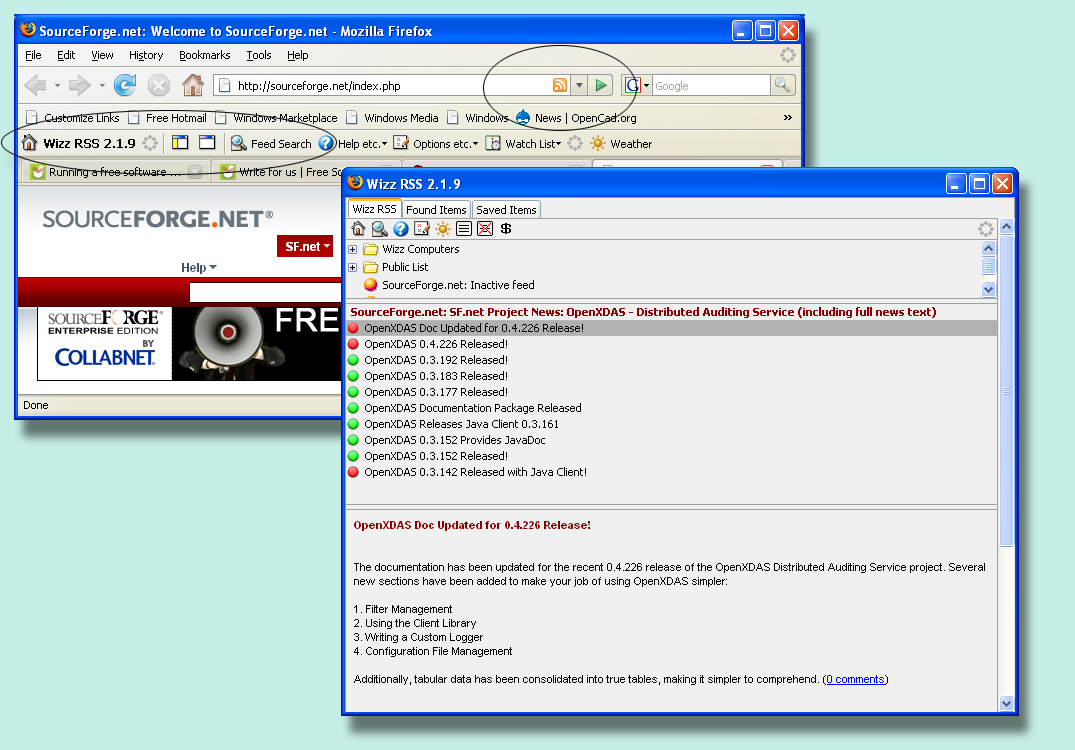
RSS stands for (are you ready for this?) “Really Simple Syndication”. RSS feeds are simply XML representations of news-like information. These XML pages are backed by specific URLs associated with the hosting site and with your project. Often you’ll see a small orange box with radio waves propagating out from the lower left to the upper right corners on the right end of the URL edit box in your browser (see figure 7), if the current page supports one or more RSS feeds. The RSS links on a page can be consumed by RSS readers. There are as many RSS readers to choose from as there are IRC clients. Google is your friend here—just search for “RSS reader", and take your pick. If you’re using ChatZilla, you might also be interested to know that there are several FireFox plug-ins that support RSS as extensions to the FireFox browser.
RSS feeds are often supported directly and automatically by free software hosting services. SourceForge, for instance, will update an RSS feed for your project when you’ve released a new version of your project, or released a news item about your project. Those who’ve registered with SourceForge to receive RSS feeds, will see news items under the associated news headline in their RSS readers.
Tracking defects
Defect tracking is done by most free software hosting sites using the de facto standard tracking tool, Bugzilla. Bugzilla was invented by the Mozilla team years ago to track defects in Mozilla, and it’s pretty much become the standard by which all other defect tracking tools are measured. Despite the widespread use of Bugzilla, SourceForge deviates here for business reasons and uses a tool called Tracker. Tracker is part of the SourceForge Collaborative Development System.
Learning to use either Bugzilla or Tracker effectively is almost trivial; rather than spend time on it in this article, I’ll just mention that excellent online documentation is available, although not really necessary—even for project administrators.
Software configuration management
When you’re working on something important—especially when multiple people are involved—you want to protect your intellectual property (IP). You protect your free software IP legally by using the right free software license. You protect your IP physically by using a Software Configuration Management (SCM) system of some sort. There are many SCM systems available. The most common systems in use by free software projects include the Concurrent Versioning System (CVS) and Subversion (SVN), but there are additional systems coming up all the time, such as GIT.
SCM systems are designed to save revisions of your software data files in such a manner as to allow you to retrieve any revision you want. Most often this is done by saving initial files entirely, and then saving the differences (also called deltas) between one version and the next, so as to avoid wasting storage space with complete copies of files that barely change from one revision to another.
For many years CVS was the SCM system of choice for free software projects—mainly because it was free and well understood. But it had flaws that everyone acknowledged and worked around, as a matter of course. More recently, a newer SCM system has begun to take the place of CVS. Subversion or SVN is touted by its developers as, “CVS done right!” Some people disagree that CVS could ever be done right, and thus there are other offerings such as GIT that promote an entirely different view of distributed SCM.
For many years CVS was the SCM system of choice
While I use SVN regularly, and have few complaints, I personally appreciate the philosophy and distributed nature of the GIT system. Unfortunately, most free software hosting sites provide CVS and/or SVN. If you want to use something other than the services offered by your free software hosting service, you’ll have to setup your own public repository, so that other people can access your project source code directly from the authoritative source.
Source code can be made available as tarballs—zip or tar.gz snapshots of your working directory—but this is cumbersome at best. You’re much better off in the long run making read-only access to your source code repository publicly available. This way, people can always get at the very latest code you have checked in. In fact, you may wish to grant check-in rights to major contributors to your project, so that they can check their fixes directly into the repository.
The best documentation for Subversion is the on-line O’Reilly book entitled, “Version Control with Subversion", found here. Once you understand the basic concepts presented in this book, the online documentation that accompanies Subversion on its website then becomes an excellent source of command reference material.
Project web services
Configuring a project web site is a full time job in and of itself. Most free software projects are either funded by commercial efforts, or self-run by individuals. Often you can tell where free software project funding is coming from with just a single glance at the project web site. Commercially funded projects often have very dynamic and management intensive web sites, while individually funded projects have rather static (and perhaps not so glamorous) web sites.
Configuring a project web site is a full time job in and of itself
Ultimately, the purpose of a web site is to document and sell your project to the public. So presenting the right combination of glitz and information in an easily accessible manner is critical to the success of your project. The project web site is like the front door of your business. Done right, your project will almost sell itself. If done wrong, the front door can be intimidating and unwelcoming to the degree that most people simply won’t come any farther into the shop. (Don’t be put off by the product/project analogy. You really are trying to sell something—even if it’s just an idea. If you aren’t, then why make your project available to the public at all?)
One of the key differentiating features of free software hosting services is often the web services provided. Some of these hosting services enforce a very rigid structure on project web pages. Some sites offer Wiki services for instance, others use online publishing systems. Some sites simply give you a form, allowing you to specify various options in order to tailor your site page or pages to your project’s needs. This has the effect of making all project web sites look and feel the same.
SourceForge offers fairly generic web hosting services. The default name of your approved project’s web site is projectname.sourceforge.net, but you can also configure your project to allow you to use your own domain name (e.g., projectname.org). SourceForge’s web hosting services allow you to FTP and SSH into the web hosting server. Each project is given a location in the web hosting server’s file system at the location “/home/groups/ p / pr / projectname ”, where the portion beginning with p / pr / projectname would be specific to your project’s short (Unix) name. Under this directory, you will find an htdocs directory, which is where your project’s main “index.html” page is expected to be found by the web server.
If you don’t have a full time web master working on your site, I highly recommend that you limit your site to mostly static information. However, the SourceForge web server does support PHP, so mixing in some dynamic content is still possible with little maintenance effort. Since organization is a critical aspect of a good free software project web site, it makes sense to use a CSS template. I’ve created project web sites in a few days using CSS templates that are freely available online from sources like OpenWebDesign.org. These CSS templates are all free, generally simple to use and modify, and are usually self-contained, which is a very nice feature.
Once you choose a design, then you can unpack the archive locally, modify the design to your needs and add all of the relevant information for your project. An additional page to consider using is a main menu link to the project page—on SourceForge, this web reference would be something like http://www.sourceforge.net/projects/projectname.
When your pages are configured to your satisfaction, you can upload them to the SourceForge web server using FTP, but my favorite mechanism for web site management is to actually store my web site in the project Subversion repository, and then use the web server’s Subversion client to simply create a work area of the site right inside my htdocs directory. I then setup a cron job to automatically execute an svn update command on the htdocs directory each morning at around 2:00AM (so I’m not likely to be working on it during the update). Using this system, I never have to update the shell server manually: I simply update my web site content in my local working copy, commit it to the repository when I’m finished, and then wait for the next cron job to start. The next day I come in and my site’s been updated automatically. Incidentally, keeping your project web site in your SCM repository is an excellent idea anyway. I usually set up my project SCM repository so that it contains one directory off the project root called projectname.web, and another called simply projectname, where I store my actual project source files.
Release management—tarballs, binaries and autotools
Question: who do you know that has 27 computers running 3 different versions of 9 different operating systems (and still has a social life)? Not many individual free software project administrators have access to this sort of build and test equipment. Companies sponsoring free software projects often provide such resources to their own project administrators, but if you’re an individual there are a few things you can do to maximize your access to such resources.
First, choose the right software tools. There are basically three platforms in the free software world—Win32, Mac, and Linux/Unix. For Win32 and Mac, there’s not much you can do except create separate, unrelated installation packages that work on these platforms, which is why many free software projects will support one but not the other. If you want to support Win32 or Mac, you will first have to determine which versions of these platforms you wish to support, and then find the desired hardware and system versions on which to test your project and build the installation packages. Packaging for Win32 and Mac requires highly domain-specific knowledge about the formats and processes involved. You’ll just have to become familiar with these things.
In the Linux/Unix world you get a bit more bang for your buck, so to speak. Using the right build tools, you can test, build and package for source distribution with a single command on most flavors of GNU/Linux and Unix.
I recommend using only GNU Autotools. Now, before you put this article down in disgust, you might want to read the rest of this section, to see why I feel this way. The most significant problem with Autotools is the almost complete lack of really good usable tutorial documentation. The fact is, the Autotools tool chain is difficult to learn. But once you’ve mastered the basics, and understood the flow of the build process in Autotools, it’s actually easy to pick up details from the documentation that does exist. However, I will grant you that it takes a fair amount of effort to “master the basics”—it’s a steep learning curve. An excellent place to start is the “goat book” (which can be found online here).
I recommend using only GNU Autotools
So why then do I say that Autotools is the best? Well, I have a friend and co-worker who used to believe that I was crazy to use Autotools. He too runs a free software project, and he simply writes and maintains his own GNU make files. Over the last couple of years, each time I showed him something I could do with my Autotools configuration files, he would run back to his desk, and spend an hour or two adding that functionality to his hand tailored make files. In the end, his make files were very complex, difficult to maintain, hard to read and understand, and ultimately less functional and more brittle than my Autotools configuration files. Today, he’s asking me to help him convert his projects to Autotools.
The simple fact is, once you discover all you can do with Autotools configuration files—and all that’s done for you automatically—you will have no desire to write your own build system. The people who designed the Autotools tool chain and maintain it today understand every detail of the most commonly used free software test, build and distribution processes. Autotools incorporates functionality for each of these processes, and often includes this functionality for free in the most basic of configuration scripts.
Some people have touted the benefits of using other high-level build tools (SCons, CMake, etc.). These tools are great, and they are evolving over time to include similar functionality to Autotools, but I’ve never seen them provide all of the functionality that Autotools provides automatically. Often, advocates of these other high-level tools will say that complete Autotools functionality can be added by the user willing to delve a little deeper. This is true, but the end result is often no better than using Autotools to begin with. The scripts are still very complex, difficult to maintain, and difficult to understand without a deep working knowledge of the tool that was used. How’s that different from Autotools? In the final analysis, everyone in the Linux/Unix world already understands the “configure; make” dance, and no additional tools need to be installed to perform this dance. I stand by my statement: Autotools is still the best there is—even if that’s not saying much. Probably the easiest way to get started with Autotools is to first read the goat book, and then take a look at existing projects that do almost the same thing you want your’s to do.
Releasing binary installation packages
Many projects don’t provide binary installation packages for GNU/Linux or Unix because most flavors of GNU/Linux or Unix use their own installation package systems. There are exceptions to this rule that are worth knowing about: SUSE and Red Hat Linux both use the Red Hat RPM packaging system, and Ubuntu Linux uses a derivation of the Debian packaging system. If you choose to provide binary installation packages for one or more Unix or GNU/Linux flavors, then you should have a good reason for doing so. Most free software projects only distribute releases in source form for GNU/Linux and Unix, because binary installation packages are often created and maintained by the administrators of a given distribution when your project is picked up by the distribution. Building and installing from a source distribution (tarball) is a process often just taken for granted on GNU/Linux or Unix.
With that said, there are benefits that come from creating one or more binary installation packages. First, you get to maintain the installation scripts yourself, which gives you the flexibility to do it your way. Creating a proper installation package build script can also uncover subtle project design flaws that would require some sort of software patch be written by a distribution packager for your project. By creating your own package, you find these flaws up front and can fix them in your main source line. Packagers will often not even tell you of such problems—they don’t have time to report every little issue they find to the originators of projects they consume in their distributions.
There are benefits that come from creating binary installation packages
If you wish to create your own binary installation packages, you might consider using an online compile and packaging service, such as the openSUSE build service. This relatively new (and, as yet, incomplete) service is like a super compile farm with a web interface. It provides the machines and versions, and allows you to define the target platforms, architectures, and output formats. You simply provide a tarball, a modified RPM specification file (spec file), and a little site configuration, and the build service builds binaries for you that can be downloaded right from the build service project page. When you make any changes to the source or spec file, the project is automatically rebuilt, and new links are created for you. Start by reading the opening documentation on the above link, and then just start experimenting. I’d also recommend joining the mailing list mentioned on that opening page.
Releasing a version
Release management is the process of packaging your products for consumption. Release management can be as simple as posting tarballs—zip or tar.gz archives of the source code—or as complicated as building and posting installation packages for multiple hardware platforms and configurations. The more work you do for your users, the more they will appreciate your project. In the early days of free software, projects were only ever distributed in source archive form. Today, however, the community consists of an audience with a much broader experience range. Some users will simply ignore your project if it doesn’t come with a Window MSI installer (others may ignore it because it does!)
In the end, however, except for the obligatory source code distribution, it’s completely up to you how you make your project available to your users. The only caveat to remember is this: it’s better to start out small, and grow gradually, than to start out too big, and have to back off. This is just simple marketing. If you offer a Win32 MSI, Red Hat/SUSE RPM and Debian and Ubuntu installation packages, and then take away the Debian and Ubuntu packages because you just can’t cover all the bases, people will be disgusted with you. If, on the other hand, you start out offering only source archives, and then later you add a Windows MSI installer and Red Hat/SUSE RPM packages, your users will be delighted. You have exactly the same outcome, but with different results—what’s the real difference here? No one likes to think they’re losing something, but everyone appreciates additional bits for free.
It’s better to start out small and grow gradually than to have to back off
On SourceForge, the process of releasing a new version is done by first uploading files to SourceForge’s FTP upload site at ftp://upload.sourceforge.net. Login as “anonymous”, and use your email address as your password. Then change into the “incoming” directory. If you’re using a command line client from a non-Unix platform, don’t forget to switch to binary mode, so the FTP protocol doesn’t mangle your binaries on the way up. Post your release files here, and then log out.
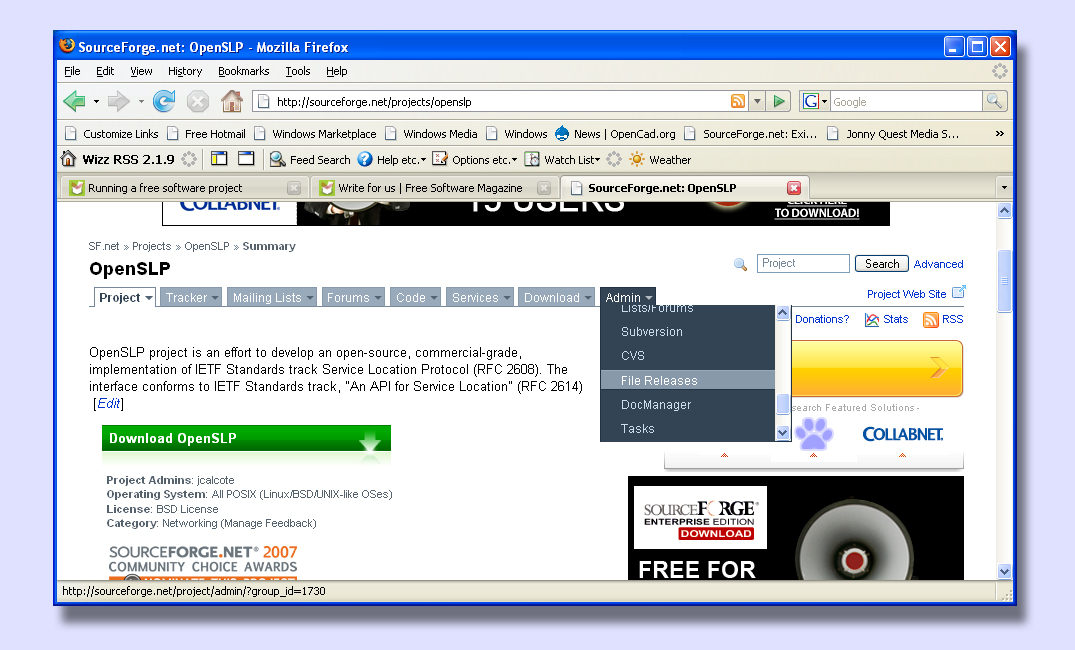
Now pull down the “Admin” menu on your SourceForge project page and select the “File Releases” option as shown in figure 8. SourceForge categorizes file releases in terms of “packages” and “releases”. These concepts are highlighted in figure 9. A package is a group of files that will always be released together. Often, free software projects only have a single package. It depends on how complex your products are, and how you want to release them. Within a package, you will specify a new release—often stated in terms of the current version number—each time you want to post a new release. For example, you may wish to provide a C version and a Java version of your project. In this case, if these sub-projects are separately maintained, you may wish to have a C package and a Java package. By separating these two sub-projects into two different packages, you have the option of releasing new versions of each on different schedules.

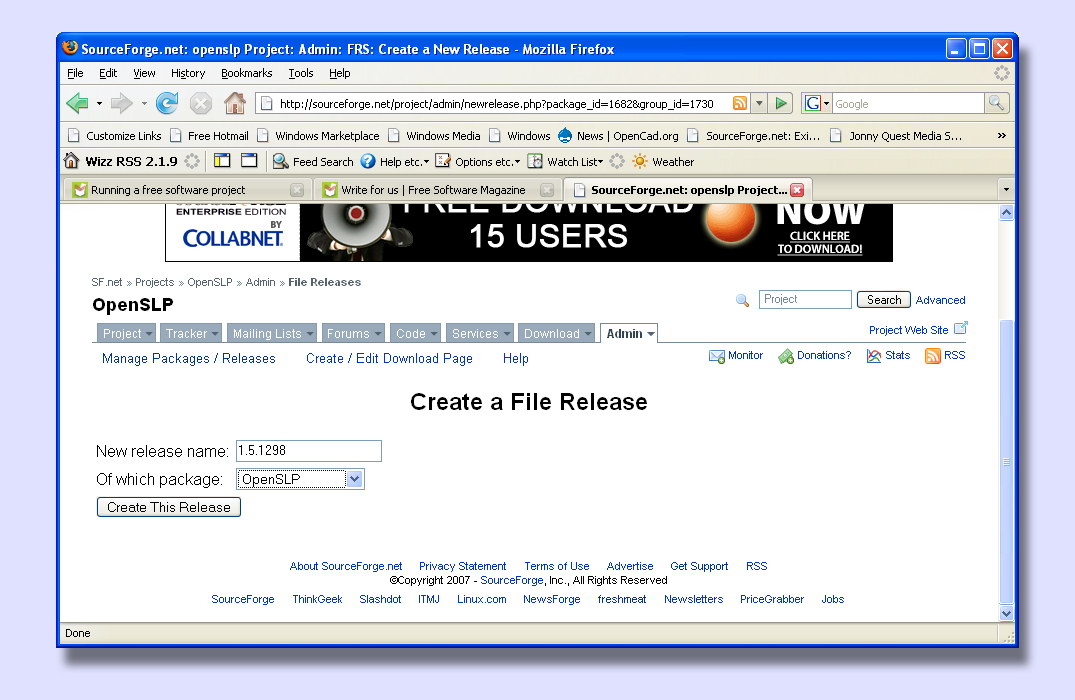
Once you’ve defined your packages, you then create a new release (see figure 10). The name you give your release will often reflect the version of the release. For instance, you might name a release “1.0.7”. This version number will then be presented as the name of the release on the download page. For examples, you might wish to check out the download pages of several projects on SourceForge.
On the release configuration page, under “Step One" (shown in figure 11), you can add notes and change log information. If you’ve formatted existing text to look nice in your project release notes and change log files, you can simply upload these files, and check the “Preserve my pre-formatted text” check box beneath these edit windows. If you’re entering this information for the first time here, simply leave this box unchecked and then upload or enter the text.

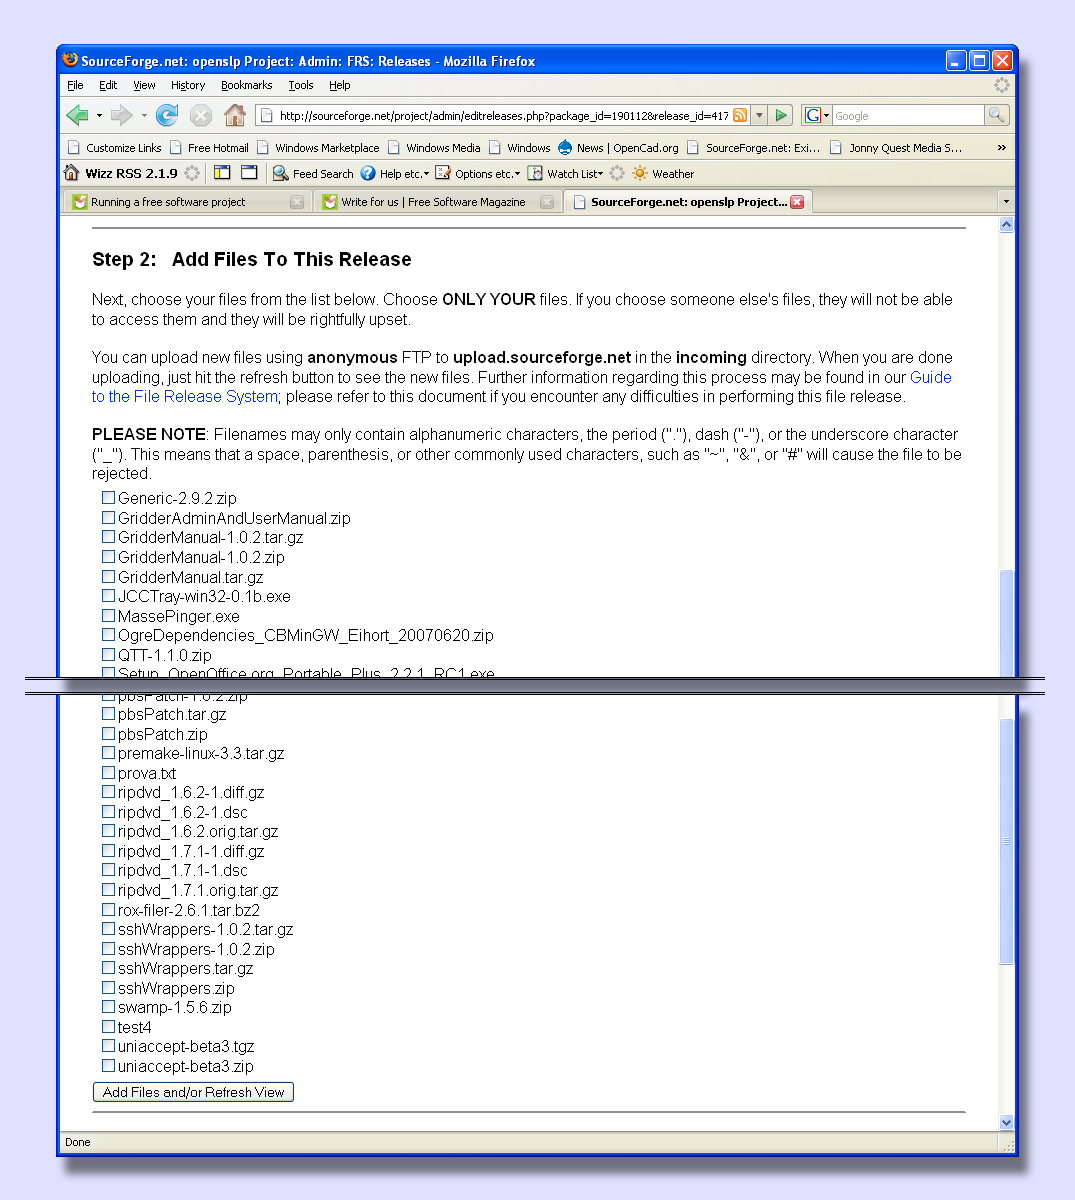
In “Step Two” (figure 12), you add the files to your release. As you scroll down this page, you’ll see the files that you uploaded earlier to the FTP site along with several dozen others. You have access in this screen to all of the files uploaded to the incoming directory by you or anyone else within a given 24 hour period. Please be kind and leave files that don’t belong to you alone . Select the files that you uploaded and click the “Add Files and/or Refresh View” button.
After the refresh is complete, in “Step Three”, you’ll see a list of entries corresponding to the files you selected in “Step Two”. This is depicted in figure 13 below. Here, you need to select the processor type and file type for each entry in the list. You must press the associated “Update/Refresh” button for each file, one at a time. (Admittedly, this interface is a bit clunky, but it does the job, and the SourceForge development team is constantly making interface improvements.) Just try to choose the processor and file types that are most closely associated with the file you’re adding. You may end up choosing “Other Source File” or “Other Binary Package”, but you must choose an option before the file will appear on your project’s download page.
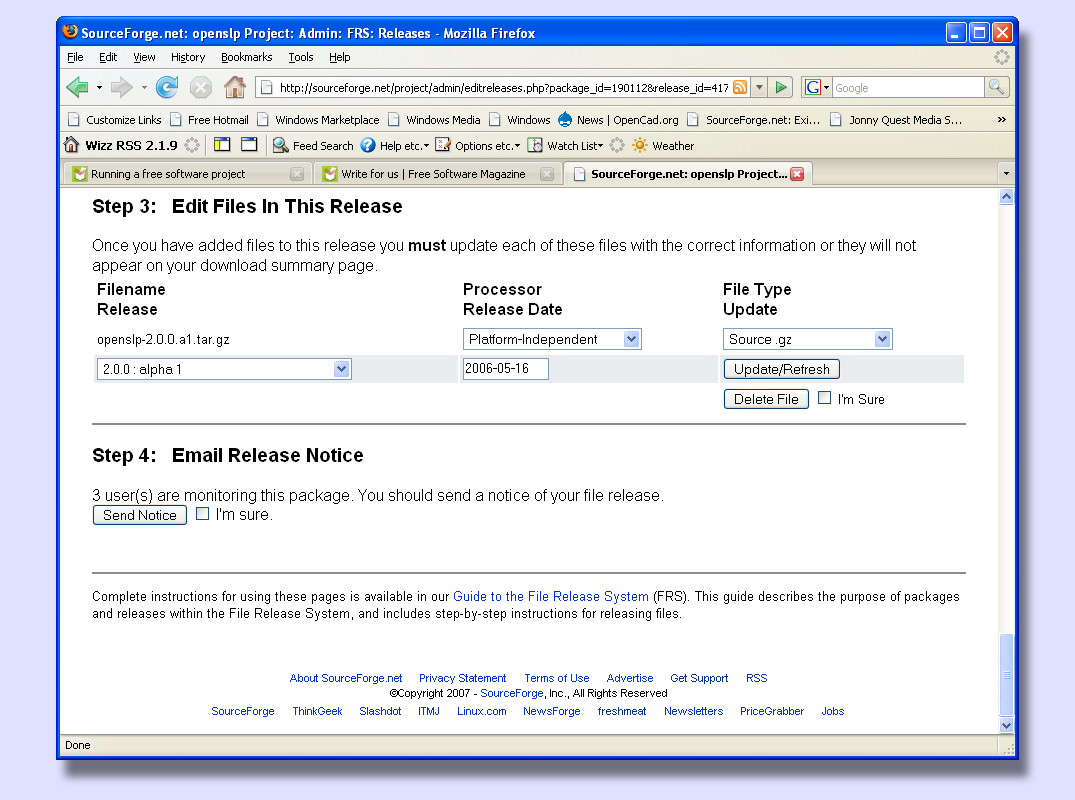
Finally, in “Step Four”, you can choose to send an email notification to everyone monitoring your package. If you notice from the informational text that no one is currently monitoring your package, then this step does nothing, so you can simply skip it.
I recommend that you shadow your user
I recommend at this point that you “shadow” your user by closing all browser windows, and reopening a browser to your project download page. Then download and install the package as you would expect your users to do. If anything seems unobvious, difficult or broken in the process you expect them to follow, now is the time to fix such problems.
Advertising—getting the word out
Once you’re satisfied that the download and installation process works properly for your new release, it might be a good idea to go over to the “Publicity” option under the “Admin” pull-down menu and read the information provided here by SourceForge. This information will give you a few important ways to let the world know about your project.
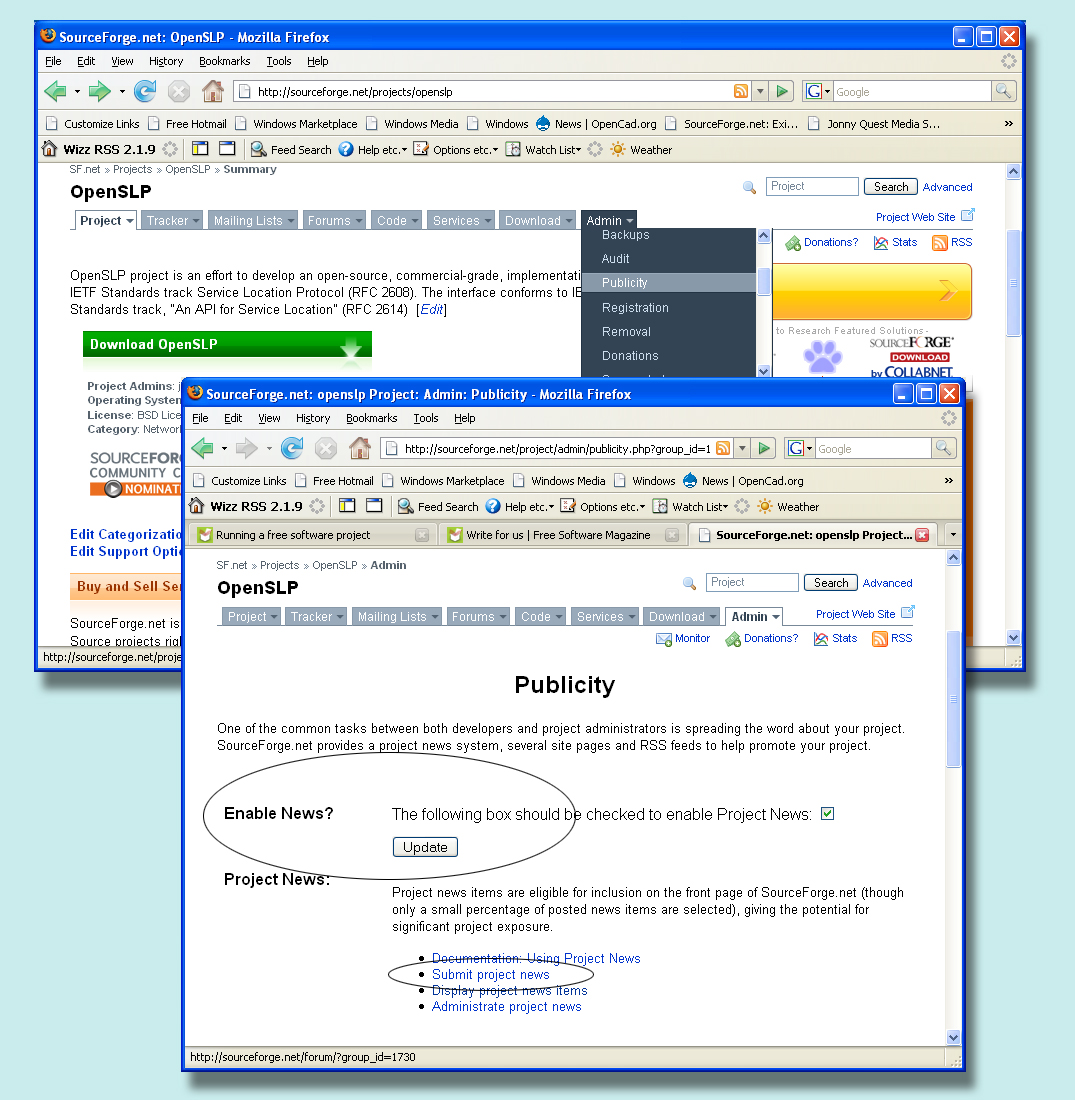
First, enable your project news as shown in figure 14. This allows you to effectively create press releases— granted the only source for this news is SourceForge, but a lot of people in the free software world monitor this site for free software project news. Second, submit a project news item for your project. Finding the location to submit project news can be a bit daunting because the button is buried pretty deep. I’ve circled it in figure 14 in order to help you find it. You’ve just released a new version of your project to the world. Tell them something about it. This news item will show up at the top of your project’s main SourceForge page. But it may also be selected by SourceForge to be run on the main SourceForge news page under “Project News” at the top of the page). If your project becomes popular, and your news items are well-written, then your item will almost surely be selected for the main news feed. This is good stuff—better than you might realize.
You can also elect to write articles about your project for journals such as Free Software Magazine, for example, or even more traditional hard-copy publications like Dr. Dobb’s Journal. SlashDot and other techie news services are also good ways to advertise, but you have to be careful how you word your articles for these services. They want information, not marketing. If your project is widely recognized, then a new release is news-worthy, but if you’re just starting out, you have to find an angle that makes your new project release news-worthy. For example, if your project solves a common problem in a unique way, then you’ve discovered a news-worthy item to report.
FreshMeat is also a source of free software release information, and a lot of people monitor FreshMeat for news about free software releases. You will have to create an account on FreshMeat and then add your project to your account. Then specify a new release for your project. This takes a day or two as your information will have to be verified by a human, but it’s worth the effort.
Conclusion
Running a free software project is not easy, but can be very rewarding. As your project gains in popularity and usefulness, you may even find it lucrative. One word of advice in closing—don’t try to go it alone. If you have offers of help from others, then do yourself a favor and allow them to help you in ways that you need help. Check out their skills first by allowing them to do some tasks for you, and then grant check-in rights if you approve of their skills. Some ways others can help include writing documentation, managing the project web site, running build and release management, and helping out with the code itself. The more skilled people you have collaborating with you, the more likely your project is to become successful.