FreeBSD—it’s the other white meat. Perhaps you are a long time GNU/Linux user and have been curious about experimenting with the other half of Open Source, the BSD class of operating systems. The 6.1 release is just around the corner, the first batch of RCs (release candidates) are already hitting the FreeBSD mirrors and by the time this article hits the press, 6.1 will probably have been released. The time has come for the adventurous to forgo their penguins and get down with the beastie.
Introduction
This article will cover the steps involved in setting up a highly secure email server using FreeBSD, Postfix, Cyrus-imap (SSL), Squirrelmail (webmail), ClamAV and Spamassain. The mail host will be able to host virtual domains, and virtual users backed by a MySQL database.
All required information will be covered from installing and hardening FreeBSD with ipfw, installing packages from the venerable ports system, understanding the role DNS plays in email to securing Postfix and configuring ClamAV and Spamassain for anti-virus and spam filtering.
This is the first part of a two part series. This first part will cover the history and origins of FreeBSD, installation and configuration of the base system, updating and installing packages from ports, and securing the system with ipfw2. The second part will cover configuring Postfix, MySQL, and Cyrus-imap over SSL, configuring ClamAV and Spamassain for anti-virus and spam filtering, and Squirrelmail over Apache SSL for secure web mail when you are away from your computer.
FreeBSD is used by Yahoo, Coyote Point, and countless others
Email server terminology
When diving into the world of managing your own email server, it’s easy to get lost on a sea of acronyms such as “MTA”, “MUA”, and “MX” record.
Mail Transfer Agent (MTA): this is the email “server”. Postfix (discussed in the second article) is an MTA, other (in)famous MTAs are Sendmail and qmail. The MTA works behind the scenes accepting mail for users it is in charge of, and forwarding mail to other MTAs.
Mail User Agent (MUA): this is the client that users typically interact with. Mozilla-Thunderbird and Microsoft Outlook are MUAs. Mail User Agents send emails to MTAs which then either deliver them to users, or another MTA.
Mail exchanger (MX): is the terminology used by DNS, the system that resolves IP numbers to human readable host names. In the DNS configuration there is a special entry for email servers that sets the priority of the email, which is used when there are multiple email servers and one stops responding, and the name of the email server itself.
The history of FreeBSD
The origins of FreeBSD go back to the University of California Berkeley during the late ’70s, and the suffix “BSD” is an acronym for “Berkeley Software Distribution”. Initially FreeBSD started as an outgrowth of the 386BSD project, also known as JOLIX. The 386BSD project itself was a patch set of the 4.3BSD, from which the University of California Berkeley had withheld a large amount of code as part of their agreement with Novell.
In the early ’90s Novell, which had purchased the IP rights to AT&T’s UNIX System, sued the University of California for patent infringement. It was around this time that Linus Torvalds released the initial Linux kernel, and the rest was history. Novell and The University of California eventually settled. It was agreed that certain parts of the code base, then called 4.4BSD, were encumbered. The University of California removed the tainted code and released the 4.4BSD-Lite operating system; however large parts of it were removed, and a bootable, working version for intel processors was not available.
In 1993, development of 386BSD seemed to have stagnated, and there was a growing back log of patches that Lynne and William Jolitz, the original creators of the project were not merging into the main code base. Eventually, a group of developers including Jordan Hubbard, decided that the project was worth continuing on its own, even without the support of Jolitz. In December of 1993 the FreeBSD project released its 1.0 version. The name “FreeBSD” was coined by David Greenman. This initial release was still based on the encumbered 4.4BSD-Net/2 distribution; it wasn’t until FreeBSD 2.0 that FreeBSD was free of patented intellectual property. The rest is history.
While Linux took the (free software) world by storm, FreeBSD was still recovering lost mindshare from the doubt and uncertainty cast by the Novell law suit
Bill Joy, BSD, vi, and Sun
An interesting side note is that Bill Joy, of Sun Microsystems fame, was one of the original creators of BSD software. During his time at the University of California Berkeley, he also wrote the original, “vi” editor. Sun Microsystems earlier offering “SunOS” was based on BSD code from the early ’80s until the early ’90s when Sun released SunOS 4.0 based on AT&T’s SysV code. Sun attempted to clarify the change by marketing “Solaris” instead of “SunOS” although “SunOS” referred to as the core operating system, while “Solaris” is considered an operating environment; thus Solaris 10 is SunOS 5.10.
FreeBSD sports a new multi-threaded file system that increases performance on systems such as email and database servers
What’s new
The 6.0 branch represents a mixture of stabilizing features introduced in the 5.x branch and some new features. The 5.x branch introduced a new scheduler called “ULE” around the same time the linux 2.6 kernel introduced the new anticipatory scheduler. A very new and exciting feature is a multi-threaded SMP safe file system layer, which offers greatly enhanced performance for I/O bound systems such as database and email servers. In this release the ULE scheduler has been marked as safe for SMP systems.
Installing FreeBSD 6.1
FreeBSD uses a text based installation tool called Sysinstall. Debian, and Slackware users will feel right at home, while long time Red Hat users might need to adjust. The majority of the installer has gone unchanged, although there have been some minor improvements and additions (which will be noted).
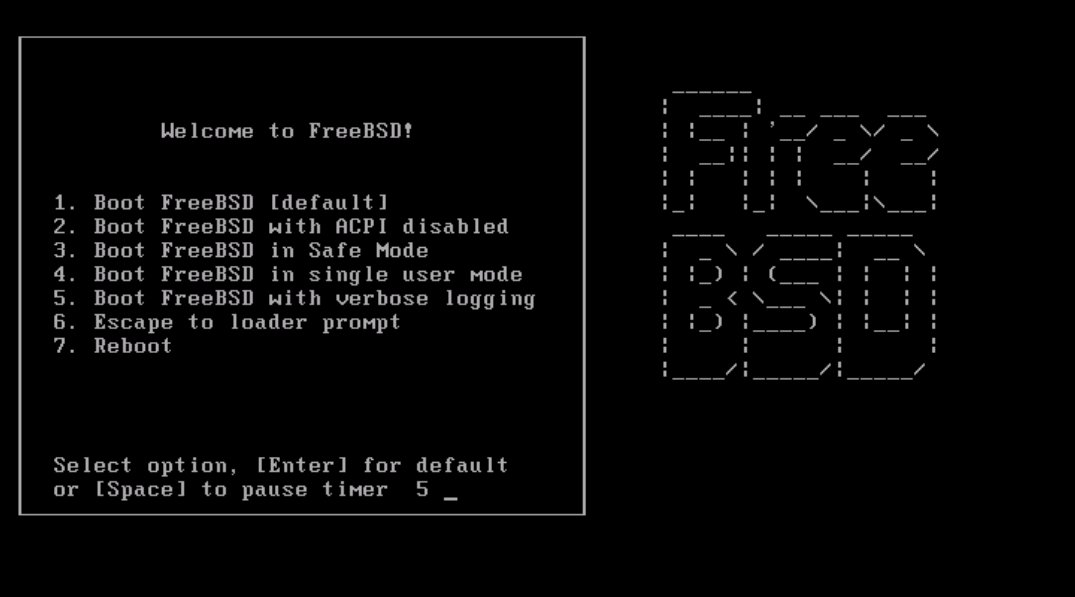
The installation is the same as in the previous 5.x branch; however, there was a bug resulting in USB peripherals becoming unresponsive after the kernel loads that wasn’t fixed in the 6.0 release. If you experience this do the following: select option 6, and enter this: set hint.atkbd.0.flags="0x1" [hit enter] boot [hit enter].
The same line should be entered in the /boot/loader.conf file (after the installation) to prevent the USB peripherals from not working after the install: hint.atkbd.0.flags="0x1".
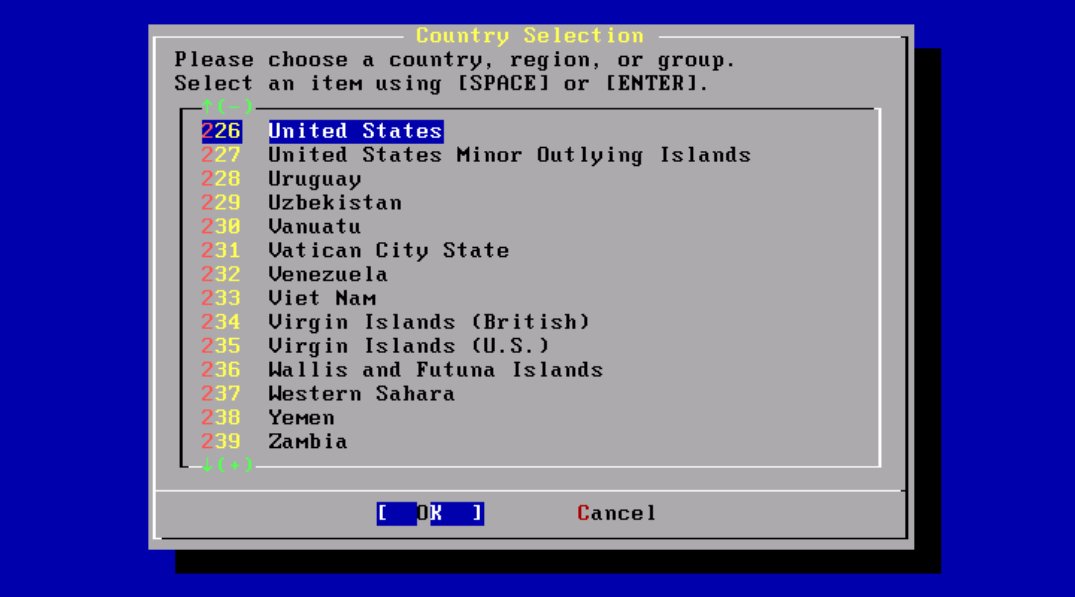
The 6.1 installer starts off with a new country selection screen (figure 2) which wasn’t present in previous versions.
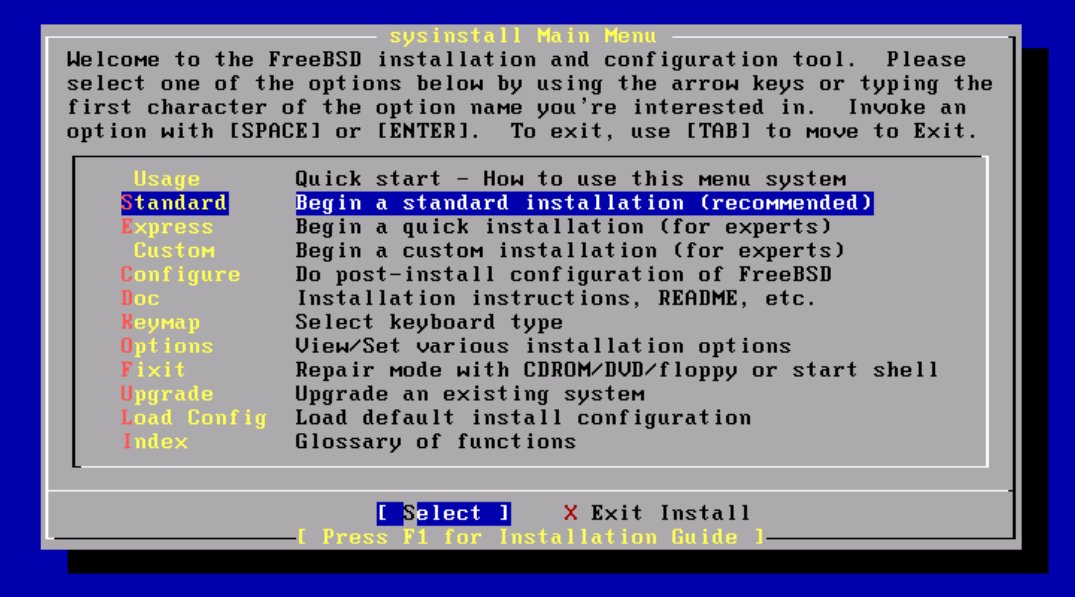
The next screen (figure 3) was the first screen in previous versions. From here you should select “Standard” to begin the normal installation process.
You will then be presented with an informational screen, simply stating that you need to setup a FreeBSD partition.
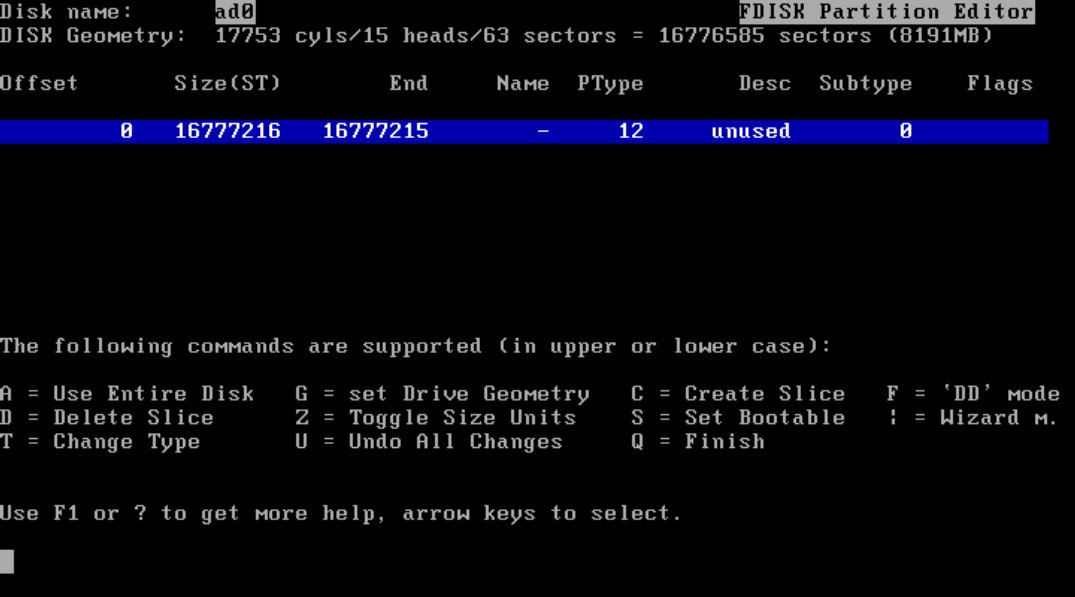
You will then be presented with the partition information; it is advisable to simply hit “a” and have the installer automatically create the FreeBSD partition for you, and then “q” to quit and move on to the next screen. If you have already created a partition and want to change its type, FreeBSD’s partition type is “165”.
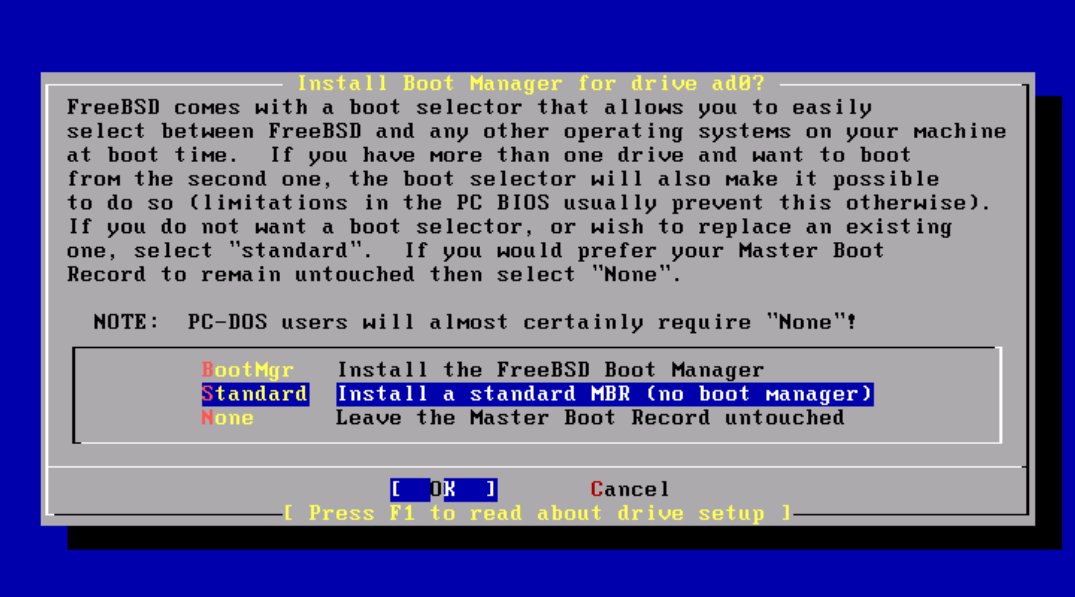
The next screen (figure 5) is the boot loader selection. FreeBSD has its own boot loader similar to Grub or Lilo. This is rarely needed on multi-boot systems as I find grub to be easier to use and manipulate. I recommend selecting “Standard” as this will give you the chance to manage booting FreeBSD via Grub if you have it installed.
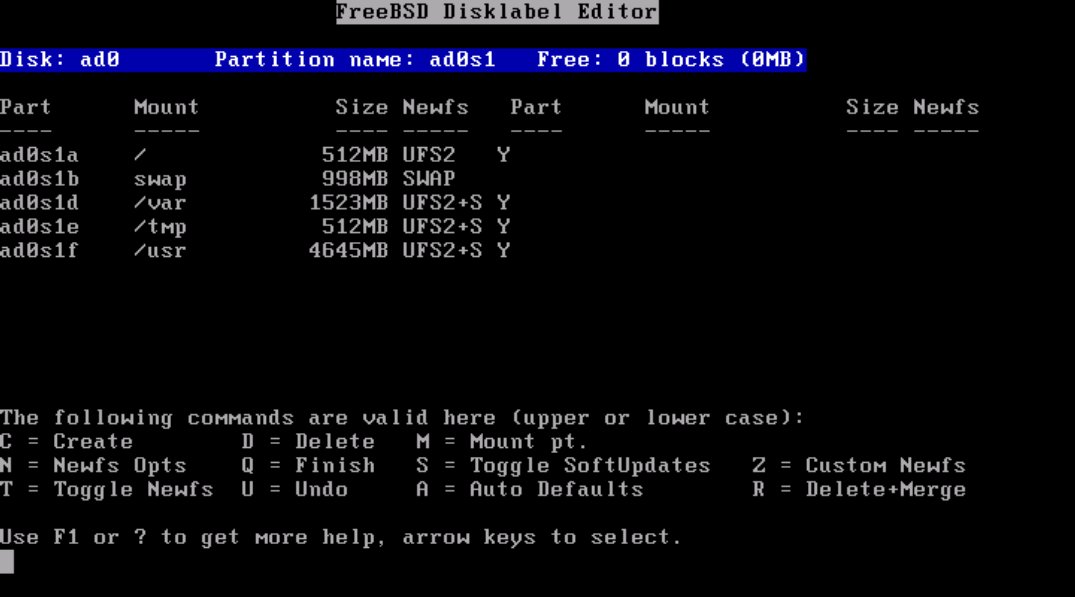
You will then be presented with another information screen, which leads to the partitioning utility. Again, “a” will automatically create the partitions, and “q” will save and move to the next step.
FreeBSD uses a more traditional UNIX-like partition layout than Linux does. The FreeBSD model favors many partitions, one each for /, swap, /tmp, /var, /usr, and optionally /usr/local and /home. The preferred partitioning scheme on GNU/Linux distributions consists of three partitions, one for /, one for swap and one for /boot. Both have their advantages; the GNU/Linux scheme is more flexible and doesn’t require prior knowledge of which directory is likely to grow the most and thus need the most space. The FreeBSD model is inherently more secure and granular, and is the model I prefer.
Partitions, partition types, slices and boot loaders
FreeBSD has a slightly different disk layout than that used in the GNU/Linux world when it comes to partitions. Standard IDE (or SATA) disks can have up to four primary partitions, or three partitions and one extended partition with 63 logical partitions in it. Most GNU/Linux installs span several partitions, one for /boot, swap and / (if not more). FreeBSD on the other hand installs entirely into one partition, which must be a primary partition; FreeBSD then creates multiple slices in that partition for the standard mount points such as /, /usr, which are each labeled in alphabetical order. Historically, some of letters have special meanings, the “c” slice represents the entire disk, and the “b” slice typically is the swap space.
Note: UFS2 was introduced during the 5.x cycle, and is still relatively new. As such it isn’t supported by Grub yet. If you wish to use Grub as your boot loader, select UFS1 (do this by using the arrows to navigate to the / partition) and hit “1”. UFS2 is an major upgrade to BSD’s standard “Unix File System”. UFS2 supports, among other things, 64 bit file pointers allowing the file system to grow past 1 Tera-Byte in size.
Although this article is about configuring an email server, for users interested in dual booting FreeBSD along with GNU/Linux simply use the following lines in grub.conf (or menu.lst) assuming the /root partition has been formatted with UFS1:
Title FreeBSD 6.1
root (hd0,2,a) (The partition where FreeBSD is installed, with a being
the
first slice inside the partition)
kernel /boot/loader
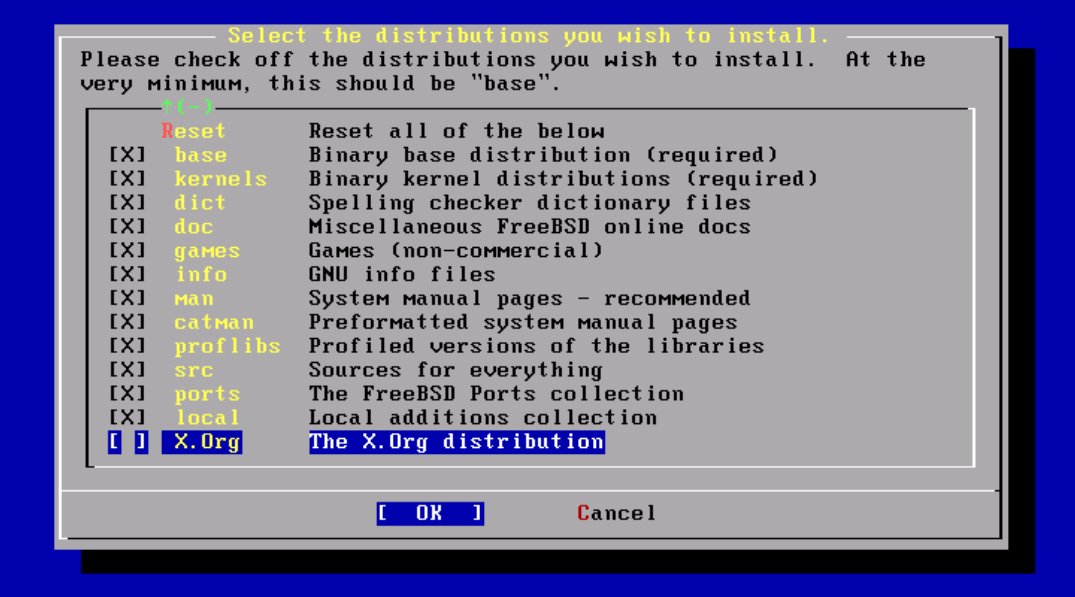
The next screen (figure 7) will be the “Distributions” screen. This is where you select what software you want to be installed. For our purposes I would recommend selecting all the distributions except “X.org”.
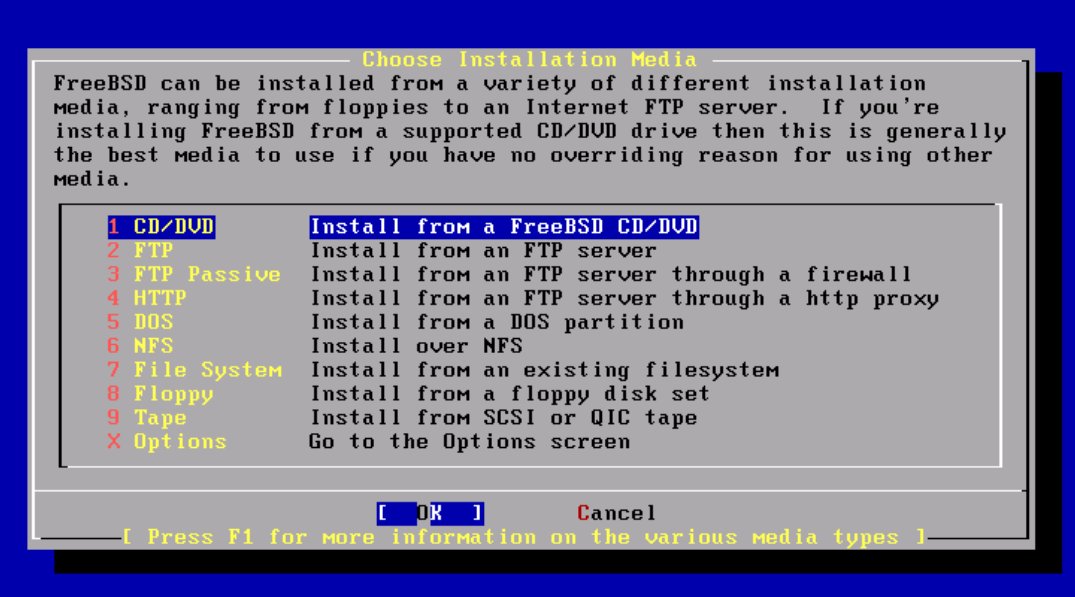
You will then be asked (figure 8) to provide the installation source; usually, this is CD/DVD. However, if you downloaded the boot-only iso you should select HTTP or FTP, and the FreeBSD server closest to you.
You will then be given the final chance to abort the installation before the disks are formatted and FreeBSD is installed. After the core installation is complete, you will be presented with an informational window informing you that the installation is complete; if necessary, you can re-enter the installation utility at any time by typing /usr/sbin/sysinstall. The installer will then guide you through the final configuration process to determining whether or not you will be using this system as a network gateway, SSH server, NFS server or client, and also whether or not you would like to add users and groups to the system.
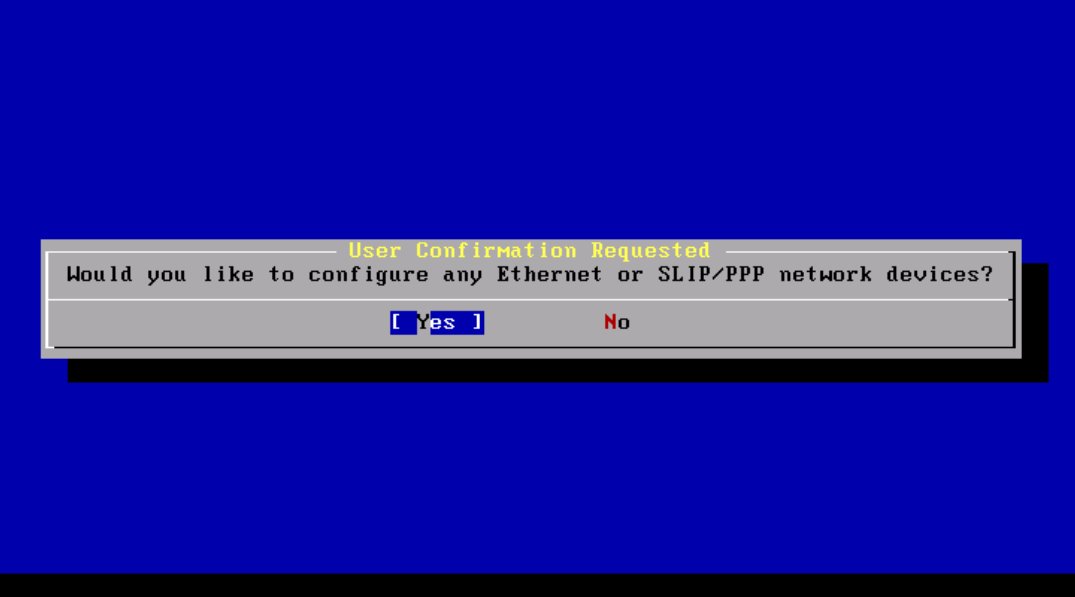
You will then be presented with a screen of possible devices to configure. In most cases, all you have to do is select the correct ethernet device and then select yes. You can distinguish ethernet devices from others because they have the word “ethernet” at the end of their description. After you make your selection, you will be asked if you want to configure the device using ipv6, which in most cases is no. After that you will be asked if you want to enable DHCP for automatic configuration of the device.
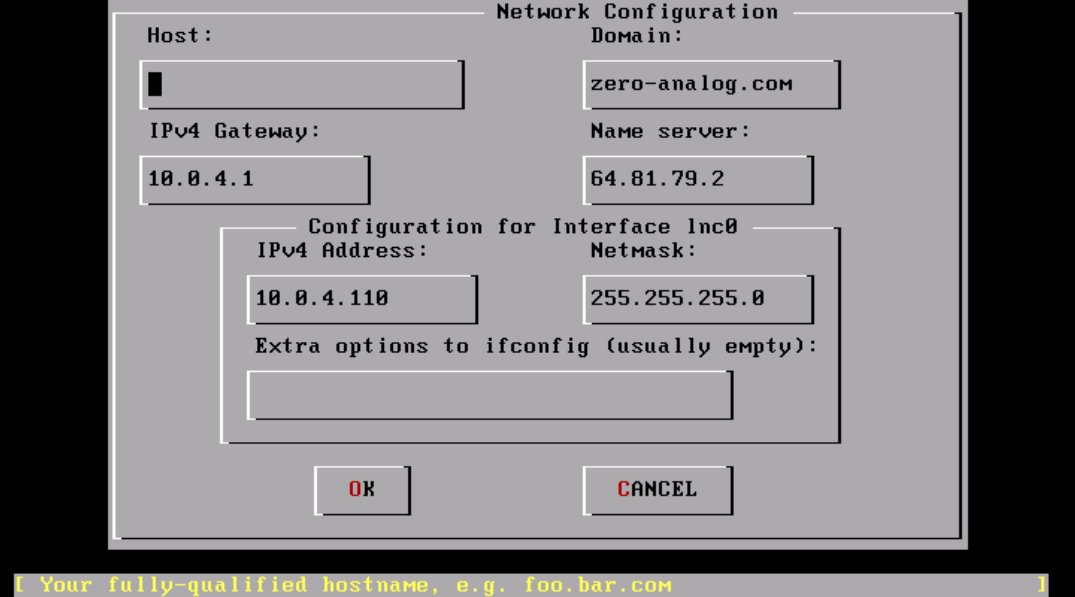
After all the required information is entered you will be asked if you want to bring up the interface right now. Select yes and continue. You will then be asked if you want the machine to act as a network gateway: unless you know what you are doing, select no. Next, you will be asked if you want to configure inetd, the so called super-server. Again, select no. You will then be asked if you wish to allow remote logins via SSH. This depends on whether or not this is a server or workstation—for servers I would recommend yes, for workstations probably not. After that, you will be asked if you want to configure the FTP server, to which I would almost always say no. Then you will be asked if you want to configure the machine as an NFS client or server: of course this depends on your needs, so answer accordingly. After that, you will be asked if you want to customize the console settings: the answer is almost always no.
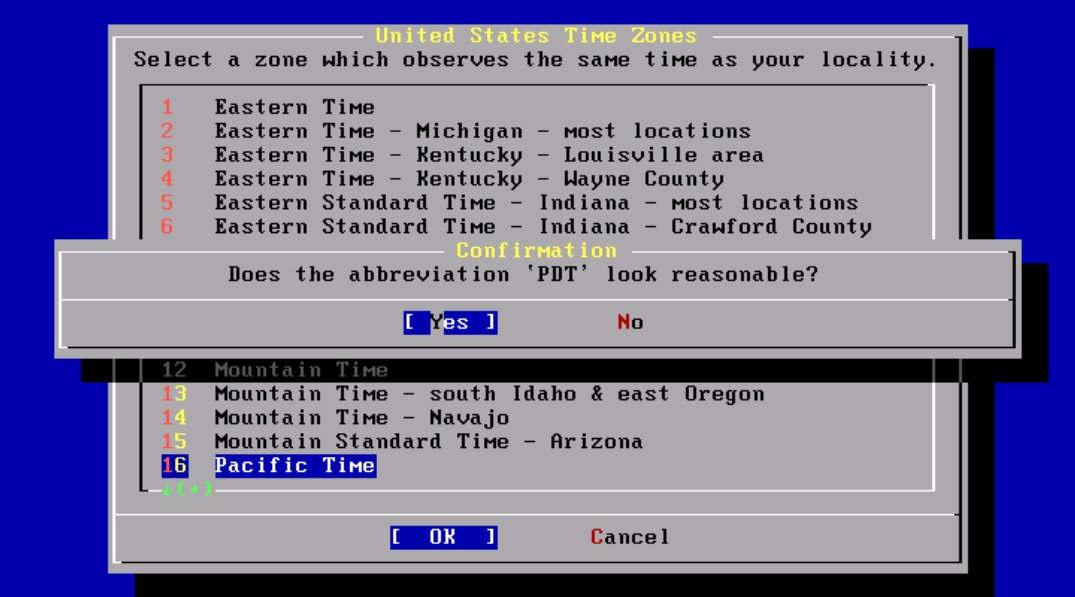
After all of that, the time zone configuration process begins; this is the last really involved configuration step. You should say yes to configuring the time zone, and then probably no when the installer asks if the machines time is based on UTC. Select your region, your country, and finally your time zone.
After that is complete, you will be asked if you want Linux compatibility on the system; again I would say no. If you do end up needing this, you can always install a more up-to-date version from ports (more on that later).
You will then be asked if the system has PS/2, serial or bus mouse. Answer according to your system, but chances are no will be fine for your configuration.
Next, the installer will ask you if you want to install any software from the ports system. Select no: the ports that come with install CD are out of date by the time you have downloaded them. We will update the ports system to reflect the latest and greatest later. You will then be asked if you want to setup users and groups, select no, it’s easier to have all the user-friendly shells, such as bash installed first and then use sysinstall to configure new users. Next, the installer will ask you to enter the root password; this should be secure, although it is easy enough to change the password later using the passwd utility. You will then be presented with your last chance to change any of the configuration options. Select no, and then exit the installer.
The system will then automatically reboot. The first time the system boots you will be prompted to enter some random text on the keyboard. This is to generate the entropy used to generate the systems SSH keys. It is important that you hit a wide number of keys, with varying cadence so that the entropy is appropriately random.
That’s it! You have successfully installed the FreeBSD operating system.
FreeBSD was used for Hotmail’s email service before the company was acquired by Microsoft
Installing and updating software
FreeBSD has a first rate package management system, giving users the option to install pre-compiled binaries or compile software from source. Packages, the pre-compiled binaries provided by the FreeBSD team, are managed with a series of commands that start with pkg_*; on the other hand the ports (software that is compiled locally) is managed via the make utility with commands such as make install, make deinstall and make clean.
FreeBSD’s ports and package management
Packages
FreeBSD packages are binary files recognizable by the extension .tbz. The most common command you will use when dealing with packages is pkg_add "packagename". Other useful commands are pkg_info, pkg_version and pkg_deinstall.
pkg_info with no arguments will show you the version of every package installed. pkg_info zip-2.31 will show the information of the zip program installed on your system. pkg_info diablo-jdk-freebsd6-1.5.0.06.00.tbz will show you the information for the FreeBSD native jdk waiting to be installed.
pkg_version will display the relative version of packages installed versus what’s available via ports.
pkg_deinstall takes the short name of the package, and will remove it. Here, the package name to be used is the one displayed by pkg_info or pkg_version.
Ports
FreeBSD ports are compiled from source into the binary packages mentioned above, and then installed. The ports tree, or location of ports files is /usr/ports, which contains a number of categorized subdirectories. Ports are basically make files with a little FreeBSD magic that contain the location of the files to download and their version. The Makefile in each directory includes a global make file /usr/ports/Mk/bsd.port.mk that contains the macros for downloading and unpacking files; so, installing ports is as easy as changing directories to the port and typing make install && make clean. FreeBSD ports are managed via CVS, but there are a variety of wrapper tools such as cvsupdate and portupgrade to automate routine tasks like updating ports and upgrade any packages.
When installing software from the ports tree you will often be presented with compile time options that affect the behavior of the package. One common way to specific options is with the -D option to make; for example to compile subversion without BDB support you would type make -DWITHOUT_BDB install && make clean.
Now that you have some background on FreeBSD’s package management options, it’s time to get started and install some useful software. The first thing you need to do is make sure our ports are current and update any outdated packages; the first two packages you will install are cvsupdate and portupgrade (in that order). cvsupdate is used to update the ports tree with the CVS repository stored on the FreeBSD servers, and portupgrade is an automated tool that upgrades packages.
Here are the steps to take:
cd /usr/ports/net/cvsup-without-guimake install&&make clean(this will installcvsupand clean up all the temporary files)- Create a directory for the
cvsupconfig file:mkdir /root/config/cvsup cp /usr/share/examples/cvsup/stable-supfile /root/config/cvsupedit /root/config/cvsup/stable-supfile(See text box)- From
/root/config/cvsuptypecvsup -g -L 2 stable-supfile cd /usr/ports/sysutils/portupgrademake install&&make cleanportsdb -uU(Will update version information in ports database)portversion | grep "<"(will list packages that are out of date)
Configuring cvsup and using sysinstall
cvsup
cvsup has a simple configuration file that must be passed as a parameter. The example files in /usr/share/examples are pretty self-explanatory; however, the key points of configuration are the update server, what to update, and the version to update to.
default host should be set to the nearest cvsup mirror. The FreeBSD handbook (Google: freebsd cvsup mirrors) has a list of mirrors in different countries.
default release=cvs tag=RELENG_6 this line should remain unchanged; it affects the version of source code to be synced and downloaded to /usr/src, not the ports that we will be installing.
The default file has a line that reads src-all: it instructs cvsup to synchronize all the source code packages; however, you also want to update the ports and documentation packages; so, you must add the following two lines:
ports-all tag=.
doc-all tag=.
Sysinstall
Now that you have a fully updated system, it would be a good time to add a new user. FreeBSD’s configuration utility, which is also used during the install process, is called sysinstall. To use it simply type /usr/sbin/sysinstall. You will then be presented with the text based interface: simply select configure and user management for guided user management.
You should now have a fully up to date system, with the tools to repeat the process at a later date. It’s now time to install some more software that will lay the ground work for configuring your email server
FAMP—FreeBSD-Apache-MySQL-PHP
The best aspect of installing via ports is that it resolves dependencies much like Debian’s apt. Installing the latest version of Apache is a breeze: simply change directories (cd) to /usr/local/www/apache22 and type make install && make clean.
Next install the MySQL database server: change directories to /usr/ports/databases/mysql50-server and type make install && make clean. This will also automatically install the mysql-client package.
Next install the php5 package from /usr/ports/lang/php5. After typing make install you will be prompted with an text based menu: you must select one of the options Apache Module and enable it by hitting the space bar
Schedulers and building kernels
ULE vs. 4BSD
The ULE scheduler was recently introduced and provides similar pre-emptiveness to that of the 2.6 Linux kernel. The ULE scheduler was initially rolled out during the 5.x series; however, due to system instability the default scheduler was reverted to the classic 4BSD scheduler. The ULE scheduler still isn’t enabled by default, as proven by the fact that its configuration line is commented out in the default kernel config file. The adventurous may choose to uncomment the ULE scheduler, and comment out the 4BSD scheduler and rebuild their kernels.
Compiling the kernel
Compiling FreeBSD’s kernel will be a little bit different for those used to compiling Linux kernels. There is no graphical, or semi-graphical text based interface to select the various parameters: as with many other things in FreeBSD a single, simple text file will do the trick. The default kernel configuration files are located in /usr/src/sys/{YOUR_ARCH} where arch will most likely be i386 or amd64. It is highly recommended to copy the GENERIC file to a safe location, like /root/config/kernel/MYKERNEL and then symlink it back to /usr/src/sys. This is to prevent the accidental deletion of your config if you decided to blow away /usr/src.
The name of the kernel config file is not enough to distinguish it from other kernel configuration files; instead the IDENT line must be changed to reflect the name you choose for your configuration, MYKERNEL in this particular case (for this article).
To build and install the kernel with your custom config, simply change directories to /usr/src and invoke make buildkernel KERNCONF=MYKERNEL. The command to install the newly built kernel is similar: make installkernel KERNCONF=MYKERNEL.
# Should be changed to the identifier of your custom config
ident    GENERIC
-- Becomes --
ident    MYKERNEL

# Scheduler Options
#options        SCHED_ULE               # ULE scheduler
options         SCHED_4BSD              # 4BSD scheduler (This is the classic scheduler)


cd /usr/src
make buildkernel KERNCONF="KERN_LABEL"
make installkernel KERNCONF="KERN_LABEL"
FreeBSD services
Now that you have some of the key software packages in place, let’s take a look at how FreeBSD manages daemons. FreeBSD uses a simple, single run-level system controlled by a handful of text files, with /etc/rc.conf at the center of it all. Unlike most GNU/Linux, which rely on the AT&T SysV startup system (which is a series of symlinks to various directories that relate to various runlevels), a single one line entry in /etc/rc.conf will determine if a daemon is started when the system boots up.
For example: apache22_enable="YES" will obviously enable Apache 2.2.x at system start-up. FreeBSD’s default firewall ipfw2 is also started via the /etc/rc.conf file. Here’s what your rc.conf file should look like:
cron_enable="YES"

firewall_enable="YES"
firewall_logging="YES"

# Note: firewall_type can also be open, or closed for default ipfw2
canned
rule sets
firewall_type="/etc/ipfw2.conf"


apache22_enable="YES"
apache22_flags=""

mysql_enable="YES"
mysql_dbdir="/var/db/mysql"
mysql_args="--user=mysql"


# Note: For email package we will configure in the next article.
courier_authdaemond_enable="YES"
courier_imap_imapd_enable="YES"
courier_imap_imapd_ssl_enable="YES"

clamav_clamd_enable="YES"
clamav_freshclam_enable="YES"
amavisd_enable="YES"
DNS and email
The role DNS plays in relaying email is small, yet vital. The most common DNS records are A, CNAME, and PTR for reverse DNS. However, the record type for email servers is the MX, or “Mail eXchanger” record. Each domain, such as “cnn.com” must have an MX record so that mail sent to user@cnn.com is routed to the proper MTA server. The MX record entry has two points of configuration: the priority of the mail host, and the name of the mail host. The priority of the MX host determines which server the client doing the lookup will send its mail to. Thus, if you define two MX records with priorities of 10 and 20, the mail exchange with priority 10 will receive the mail (assuming it’s up)
DNS and Email example
IN      MX 10  mx.mydomain.com
IN      MX 20  mxbackup.mydomain.com
FreeBSD’s firewall ipfw2
FreeBSD comes with a powerful, stateful software firewall package called ipfw2; while FreeBSD does have the ability to use other firewalls such as OpenBSD’s pf, this article will focus entirely on ipfw2.
ipfw2 has a rich feature set and a full discussion on its configuration is beyond the scope of this article. This is the quick and dirty, annotated configuration that is applicable to your setup in the context of an email/webmail server.
ipfw2 rule files always follow a very simple syntax: directive order type from HOST to HOST port_number via interface optional_state_setting.
# Yousef Ourabi, Zero-Analog 2006

#IPFW uses the following syntax
# CMD RULE_NUMBER ACTION LOGGING SELECTION STATEFUL

# Values from /etc/rc.firwall -- Setup loopback
add 100 pass all from any to any via lo0
add 200 deny all from any to 127.0.0.0/8
add 300 deny ip from 127.0.0.0/8 to any

# Allow inbound SSH and outbound icmp (for ping command)
add 400 allow all from any to mail.mydomain.com 22 via fxp1 keep-state
add 500 allow icmp from mail.mydomain.com to any via fxp1 keep-state

# Mail, Webmail, Secure Webmail (HTTPS), and IMAP-SSL
add 600 allow all from any to mail.mydomain.com 25 via fxp1 keep-state
add 700 allow all from any to mail.mydomain.com 80 via fxp1 keep-state
add 800 allow all from any to mail.mydomain.com 443 via fxp1 keep-state
add 900 allow all from any to mail.mydomain.comm 993 via fxp1
keep-state

# Block outbound SSH, and allow all other outbound connections.
add 1000 deny all from mail.mydomain.com to any 22
add 1100 allow all from mail.mydomain.com to any keep-state

# Block everything else.
add 65535 deny all from any to any
Conclusion
FreeBSD is an incredibly powerful and robust operating system worth giving serious consideration for projects that require a rock solid OS. So legendary is FreeBSD’s robustness that it was used by Hotmail in the early days before it was acquired by Microsoft. You should now have a fresh and updated FreeBSD install to continue your journey with. This article was all about taking the first steps with FreeBSD, and learning a little bit of the history along the way. The following article will focus on configuring the email, and web servers such as Postfix, Apache and Squirrelmail to handle multiple domains, users, giving users access to their email via the web and protecting ourselves against spam and viruses. Hope to see you soon!