Often, when modelling in 3D, it's necessary to create a "backdrop" panoramic image. Typically this shows sky and distant land which should appear behind the foreground action. One place we'll need this for the pilot to Lunatics is for the sky in Baikonur, Kazakhstan on launch day at the beginning of the story. I had some very particular ideas about how this should look, and I want to create just the right look. Here's how I constructed it.
Making Movies with Free Software
This article is part of an on-going series on the challenges I've faced in producing two free-licensed movies, Marya Morevna, through the Morevna Project and Lunatics, which we are working on as Anansi Spaceworks.
The main thing is that I had seen a photo of a launch which had a particularly beautiful palette of colors. I knew I wanted these colors. However, the image is not a terrific background plate – it's way too narrow for a panorama and there are some foreground objects. More importantly, though, the image is not under a "safe" license, so I didn't want to use it directly. However, I did use it as a guide in choosing colors.
I had seen a photo of a launch which had a particularly beautiful palette of colors
Basic sky gradient
I started by creating a Gimp gradient based on the color of the sky itself. I did this by selecting places in the image where the background sky shows clearly (i.e. avoiding clouds) and then using those colors to create a Gimp gradient (Figure 1).
To do this, I have to get into Gimp's gradient editor, which may be a little confusing. Select File->Dialogs->Gradients to launch the gradient selector. Then, right-clicking in the selector window, I choose New Gradient to start a new gradient.
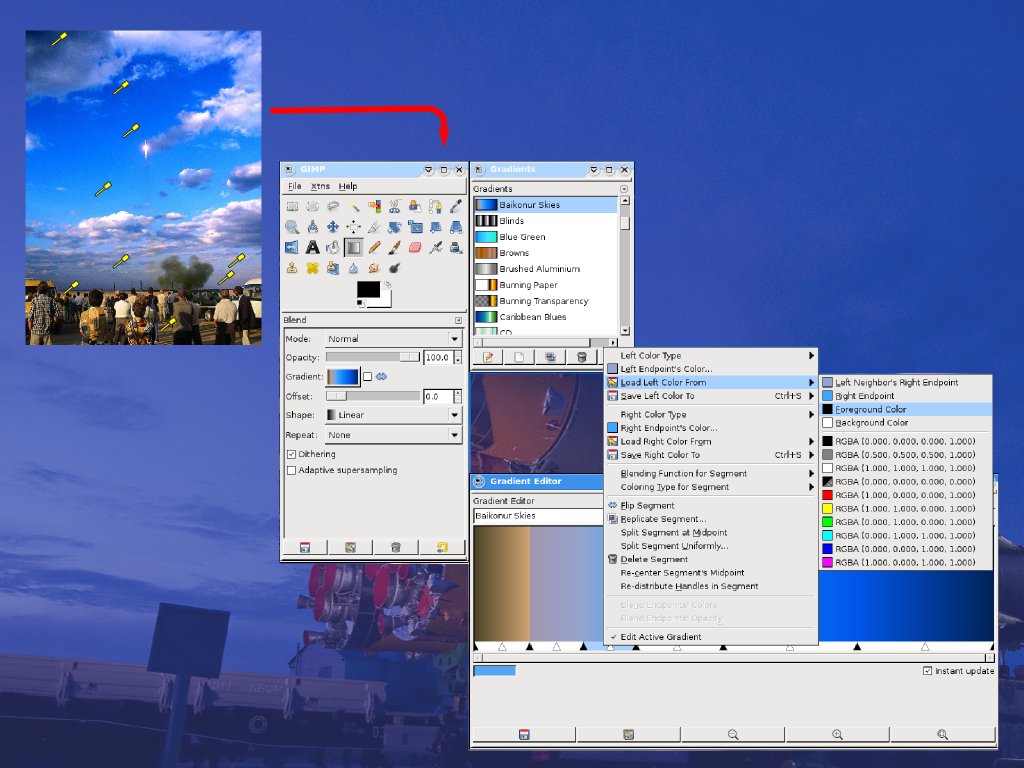
Initially, this will have a left limit color and a right limit color, both indicated by black triangular arrows. In between is a white triangular arrow. This adjusts the curvature of the gradient from left to right. This gradient is more complex, though, so I right-click on the gradient and select Split Segment at Midpoint to create subdivisions as needed.
I started by creating a Gimp gradient based on the color of the sky itself
I started at the top and used to color picker (the "eye dropper") to set each color from my color reference image successively to the "Foreground" color. Then, I right-click on the appropriate segment of the gradient and set the right or left color to the foreground color as needed. To keep the gradient smooth, I then select the adjacent segment and match colors with either Load Left Color From->Left Neighbor's Right Endpoint or Load Right Color From->Right Neighbor's Left Endpoint as appropriate. The only exception is the horizon line, where I want a sharp boundary.
Repainting a new cloud image
I searched Flickr for an image of clouds that was more appropriate to my need and under a compatible license. To do this, I simply used the "Advanced Search" option which includes a Creative Commons license filter (Figure 2).
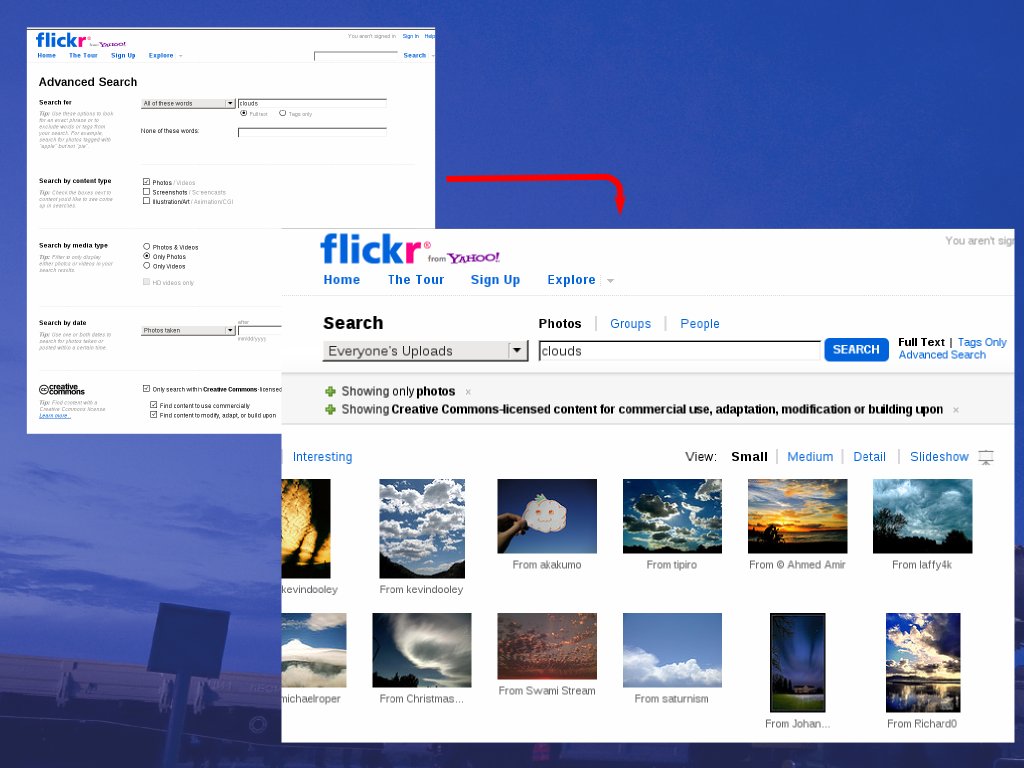
After a bit of browsing through this list, I settled on one wide-format high-resolution image which would do well as a backdrop for a 3D animation environment (This image is by "viZZZual.com@Flickr" under a Creative Commons Attribution license).
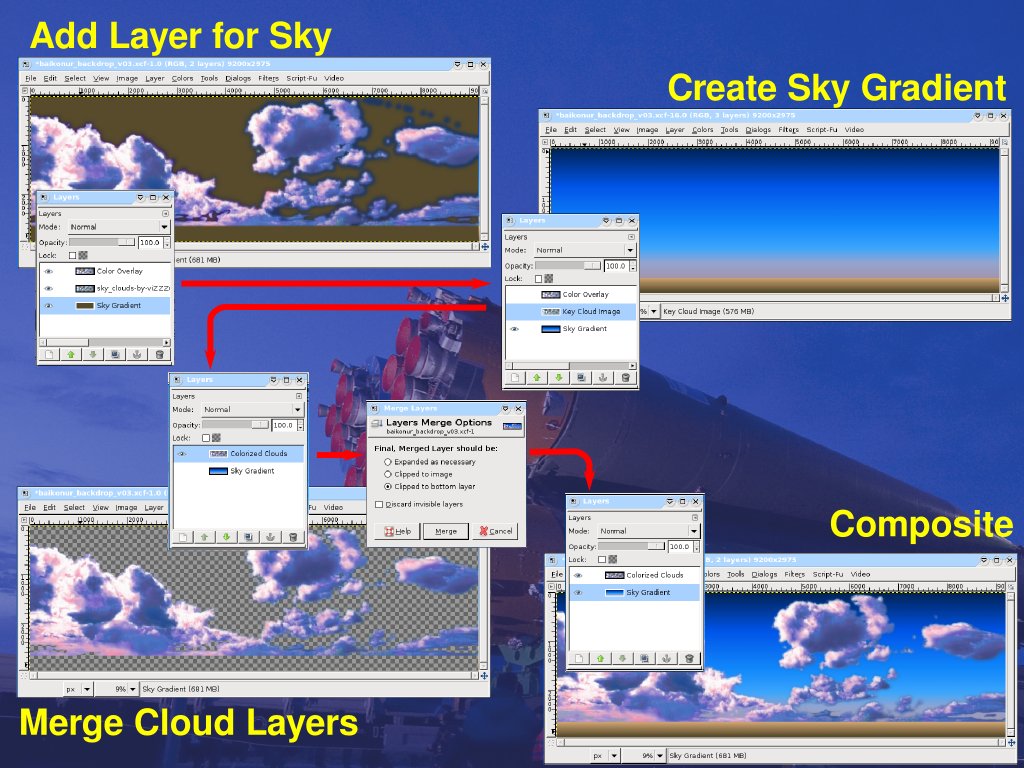
Using this new cloud image, I want to substitute coloring that matched my original image. To do this, I'm going to selectively paint a layer with color, then combine that with the value from the cloud image to complete a masked cloud layer. This will then be combined with the gradient sky image and the ground image to make the final backdrop.
I need to extract a masked version of the new cloud image, where all of the pure sky elements are transparent
First, of course, I need to extract a masked version of the new cloud image, where all of the pure sky elements are transparent. This is not so easy! The sky color changes over the image. I start by using the "magic select" tool to select swaths of similarly colored sky. The selector is a little too fine, but I daren't increase the tolerance too much since the clouds are similar in color. So instead, I create spatial groupings by selecting nearby regions with the "shift" key depressed (this adds the new regions to the selection rather than replacing it with them).
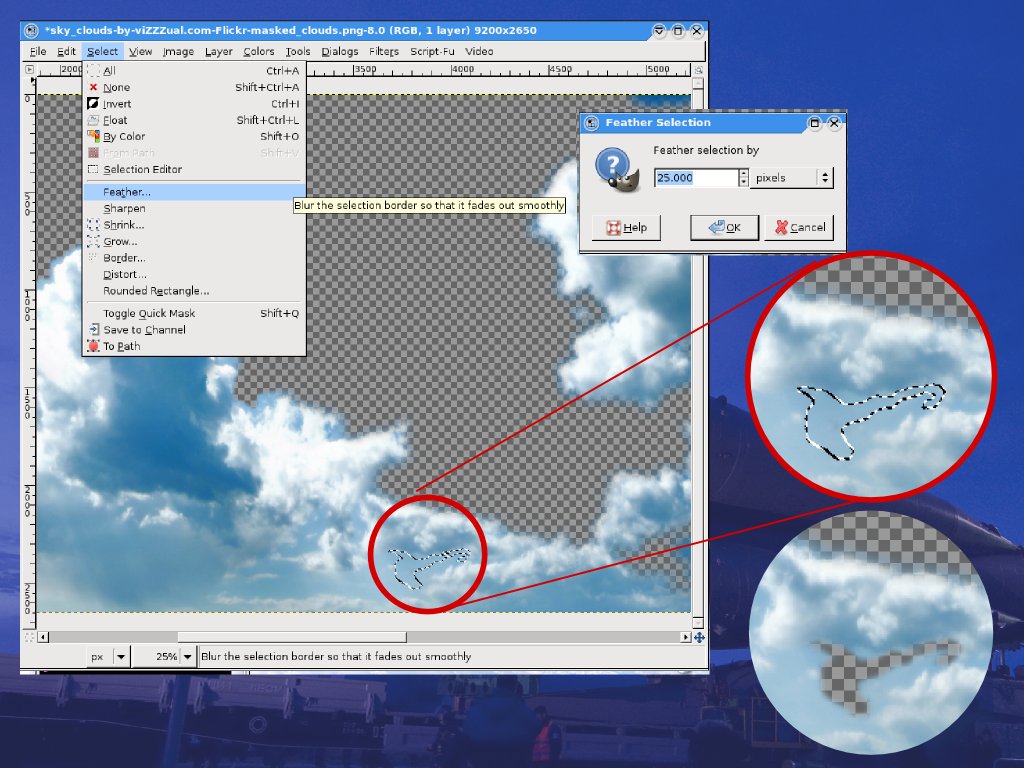
After I'm fairly satisfied, I then use Select->Grow followed by Select->Shrink. This is a trick to effectively smooth out the selection areas. The grow (of about 10 or 20 pixels in this case) eats up pixels that were overlooked because of aliasing effects. Then I shrink the area back to a better approximation of the area I want (about half as much as I grew the selection – also being sure to unselect the "shrink from edges" option). After I'm done with this step, I use Select->Feather and select a feathering radius of about 75 pixels. This makes the mask edges soft, gradually transitioning from opaque to transparent. This is very useful, especially with fuzzy things like clouds, to eliminate obvious matte lines. I then use Edit->Clear to apply transparency to the selected sky areas (later on, these will be filled with my sky gradient).
For now, though, I'm going to concentrate on re-coloring the clouds. The color balance is not what I want (this cloud picture was taken in another part of the world at another time of day and so the colors are rather different).
Now I have to be careful about this. I want to alter the color (the hue and saturation) of the clouds, but not their value. It is primarily the value of colors that is responsible for the appearance of a scene (this is why black-and-white images work – even though they only contain color value information).
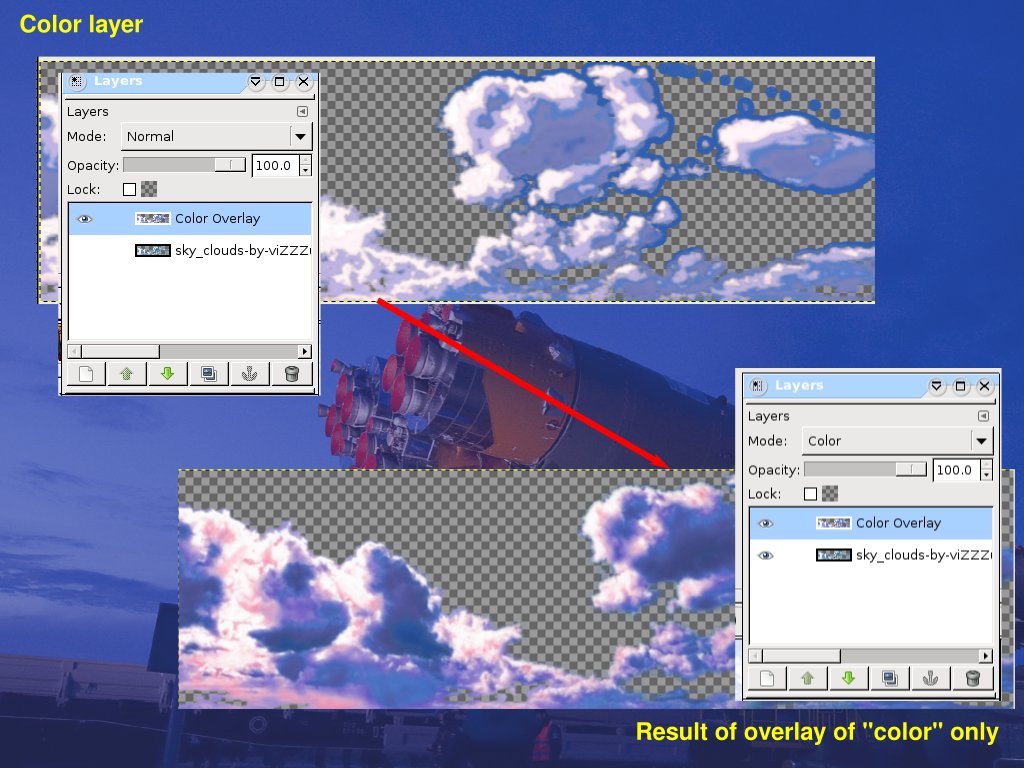
Gimp calls the combination of hue and saturation "color." So we can say that we only want to change the color of the clouds, while keeping their value. Even with the color, though, we have to be a little careful to blend things smoothly, or the result will still have a blocky and unnatural appearance.
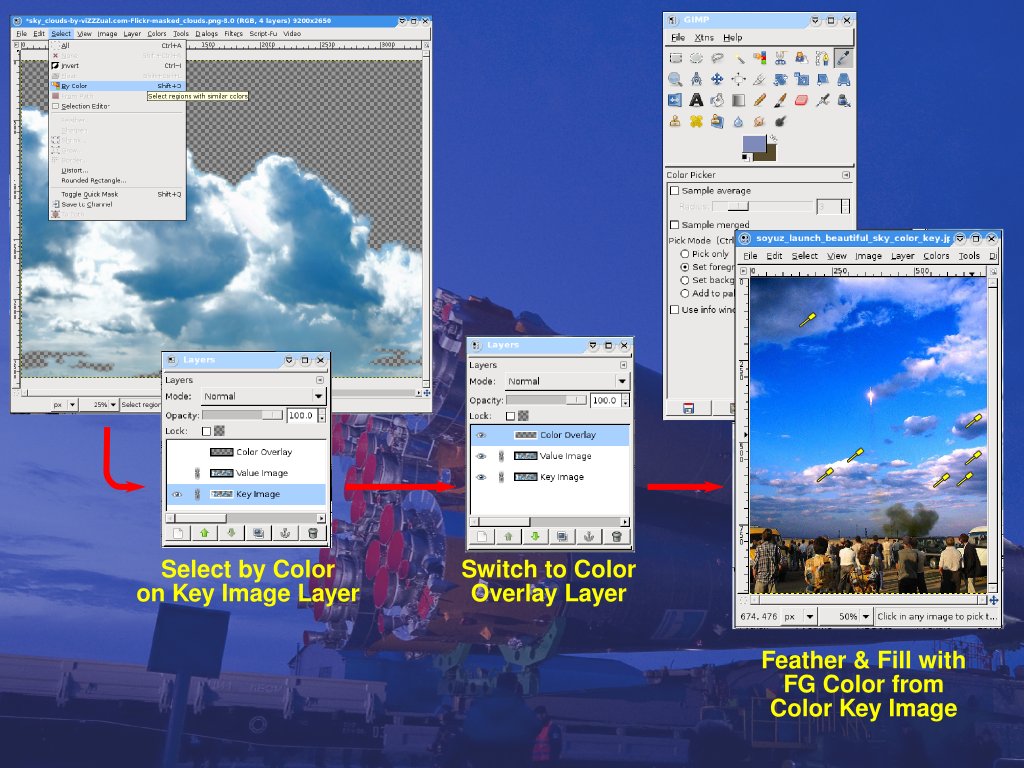
So, again, I select by color and create feathered selections. With each one, I set the color to a color from the color-key image. As I go, I build up colors on a separate image layer.
Note that I have to select the "Key Image" layer every time I do a "Select by color" – because I want to select by the colors in that image, not in the one I'm working to create. But, I need to select the "Color Overlay" layer every time I fill the selection with the foreground color. To avoid mistakes, I've locked the "Key Image" layer so the fill operation wouldn't work even if I tried it.
Of course, I go back to my "Color Key" image when I use the eye dropper to modify the foreground color.
I used a gaussian blur with radius 100 pixels to smooth out the color layer.
Then I set the layering rule to "Color" (rather than "Normal"). So now this layer simply controls the hue and saturation of the result, getting the value from the original key image of clouds.
A Quick Test
Just for fun, I tried compositing a flying Soyuz rocket from a NASA photo of a Soyuz launch into this image. This is something of a conceptual reconstruction of the image I started with, although I think this one is a little prettier.
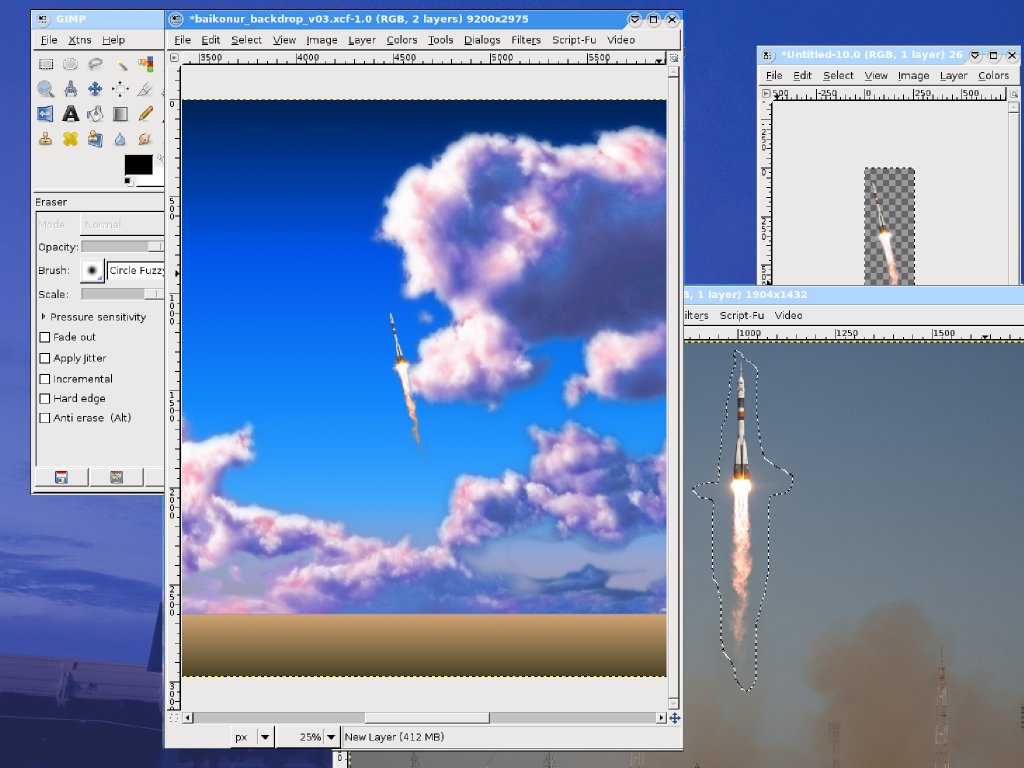
Later, of course, I'll be using this backdrop (and many others) for rendering scenes in Blender.
Licensing Notice
This work may be distributed under the terms of the Creative Commons Attribution-ShareAlike License, version 3.0, with attribution to "Terry Hancock, first published in Free Software Magazine". Illustrations and modifications to illustrations are under the same license and attribution, except as noted in their captions (all images in this article are CC By-SA 3.0 compatible).