If you’re an experienced administrator, you’ve probably used SSH to remotely access a troublesome box or your personal computer. For those who don’t know: SSH it’s a great way to fiddle with a computer from miles away as if you were sitting at its keyboard, but it’s also just about the simplest and most secure way to configure your computer to let you access its files from anywhere. You can use SSH on nearly every operating system to transfer files to and from your computer over the internet or a LAN.
Is SSH for more than commands?
SSH is traditionally used to give you remote access to a computer’s shell (command line terminal). Earlier protocols in this vein, such as telnet and rlogin, did not encrypt their traffic or take other security precautions that are necessary with untrusted networks like the internet. Depending upon the exact server, protocol, and configuration you use, SSH may be the most secure way to access a computer over a network.
If you’re a typical user, however, you may never need to access the command line—or even graphical applications—on a remote computer. Even so, SSH will still be useful in sending your latest batch of photos home from your hotel, retrieving the latest version of a report left sitting on your desktop, or for any other situation requiring a file transfer.
If you’d like to get more in depth, you can use it to load or edit a spreadsheet on another computer or keep documents synchronized between machines. If you’ve seen an experienced user work his magic with SSH, all of this may seem rather complicated. I assure you, though, that setting up an SSH server on GNU/Linux or another Unix-like operating system—and even Microsoft Windows—is as simple as installing any other software, and accessing your server from another machine running nearly any OS is even easier.
Setting up an SSH server is as simple as installing any other software, and accessing your server from another machine is even easier
Installing the server
The SSH protocol has been around for a while and several server packages have sprung up around it. The choice is a bit simpler than KDE vs GNOME, though, because almost everyone you meet will recommend OpenSSH. It’s tried, true, secure, free software developed by the OpenBSD project but made available for nearly every operating system under the sun.
If you’re using a Unix-like system such as GNU/Linux, installation really is as simple as for any other software. If your distribution has a package management utility, OpenSSH is undoubtedly available from it. In Debian and Ubuntu, it’s listed as “openssh-server”. If you normally have to install software from source, you can get the code from the OpenSSH website.
Unfortunately, things are a bit more complicated if you use Windows. You will need to use some software called Cygwin to emulate the GNU/Linux platform on your Windows box. If you are already familiar with Cygwin, you can install OpenSSH as a native package.
Wait, though! If you don’t use Cygwin already—wouldn’t you know it—someone has gone and made the whole process just as easy. The OpenSSH for Windows project has combined OpenSSH with only the absolutely necessary components of Cygwin, rolled it all up into a ball, and released it as free software on Sourceforge. Download and double click the “binary installer” as you would any other Windows setup package.
Some minor tweaking, if desired
Below, I will explore some of the configuration options of OpenSSH. Odds are your distribution has your server setup more or less like this by default, so you may safely skip this section and refer back later on if you experience problems.
OpenSSH for Windows users must also depart from the article here, as configuration on that platform works a little differently. You can refer to the README file, accessible from Start→All Programs→OpenSSH for Windows for configuration instructions. In particular, make sure to setup user passwords using the simple instructions in the readme.
For those continuing on, OpenSSH configuration can easily be done by editing a configuration file (never as scary as it sounds). On most systems, this file will be located at /etc/ssh/sshd_config. Open this file as the root user using your favorite text editor and you will find that your distribution has supplied a long template configuration file.
OpenSSH has a broad range of configuration options that can have serious effects on the security of your system. I will trust that the default settings provided by your distribution are sensible and focus on changing the configuration to serve the specific requirements of file transfer.
You could debate whether a password is more secure than other methods of authentication, but it is undeniably convenient
Password authentication
First, you can configure the SSH server to authenticate users with a password. You could debate whether a password is more secure than other methods of authentication, but it is very convenient when trying to access your machine from an arbitrary remote location where you might not have access to anything but your memory. Make sure the following line is set in your configuration file:
PasswordAuthentication yes
Remember that any line in the configuration file beginning with # is a comment, so delete the hash mark if you want to activate the line.
Allowed users
Next, you may want to assure that you are the only user who can access your computer through SSH. By default, anyone with an account on your computer may be configured to login with OpenSSH. By specifying your user, you can control which files can be accessed remotely, as only the files to which your user has permissions will be accessible. Put the following line in your configuration file:
AllowUsers [my user]
Now only [my user] will be able to log in, using his regular account password. You can do a lot with host and user restrictions with SSH, but this should be enough for our purposes.
Don’t forget to restart!
You will need to restart the SSH server before these changes to the configuration file take effect. The following command (as root) will work on most Unix-like systems:
/etc/init.d/ssh restart
The ssh in the above command may be replaced by, for instance, sshd, depending upon your distribution. You can use your shell’s tab-complete feature to guess at the right syntax. If you’re having a really hard time entering this command, you could just restart your computer—but that shouldn’t be necessary.
To access the server you have just configured, you will need to know the exact address of your system. If you don’t have a domain name configured, just use your IP address. Of course, depending upon your internet service provider, this address could change periodically and you may need to use a dynamic DNS service to make a stable URL.
If you are accessing the machine within a LAN, check your router’s configuration for the address of each machine. If you are dialing into a LAN, make sure the standard SSH port (22) is being forwarded to the machine.
Down to business: trading files
There are a lot of SSH clients out there available for nearly every platform imaginable. I’m going to take a wild guess and assume that the majority of you Free Software Magazine readers are using GNOME, KDE, or Windows at home or at work. Below, I’ll walk you through graphical clients that were made for each of these three platforms and a command-line client that will work almost everywhere else.
The old standby: scp
OpenSSH is distributed with scp, a command line tool for transferring files between computers with very simple syntax. Of course, unlike FTP, scp file transfers are tunneled through SSH encrypted, and are secure out of the box. The GUI programs discussed below are mostly front ends to scp and you should, by all means, use them if they are available. If you can’t get your hands on them though, or if you just want a better understanding of how the file transfers operate, read on about scp.
The syntax of a simple single file transfer with scp is very concise:
scp [source file location] [target file location]
You can make either the source or target location remote and the other local. The syntax for the remote location should include the user name to authenticate as on that machine, and should be formatted as follows:
[user]@[address]:[remote directory]
For example, examine the command used to transfer a file from the Documents directory of my local computer onto the desktop of my laptop over my LAN:
scp /home/nathan/Documents/Document.txt sanders@192.168.0.4:/home/sanders/Desktop/
When executing this command, you will be prompted for the password of the user on the remote machine. If it is the first time you are accessing the machine, you may be asked to verify its RSA host key—it is safe to respond in the affirmative.
The scp tool has many advanced features to limit bandwidth usage, specify particular SSH configurations, copy directories recursively, and more. For a concise listing of these features, consult the scp manual by entering the command man scp.
GNOME: using Nautilus with remote files
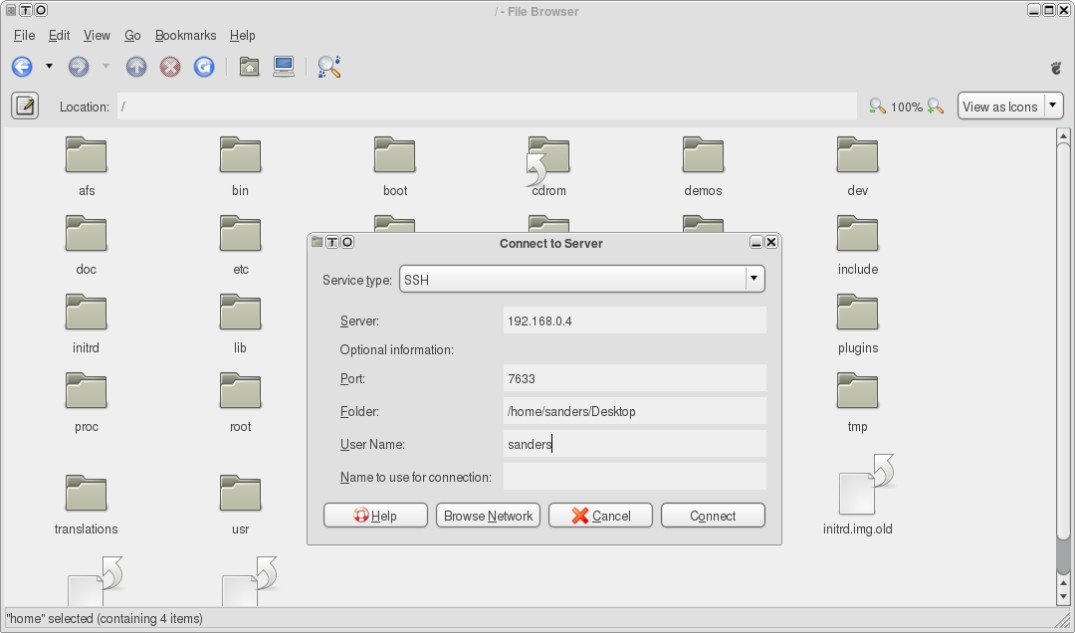
You may not have realized it, but GNOME’s default file manager Nautilus ships with capabilities for accessing remote hosts via several different protocols, including SSH, through an easy-to-use dialog.
Open the dialog in Nautilus from File→Connect to Server. Select SSH from the “Service Type” menu and fill in the Server field with the appropriate information. You will be prompted for a username and password. Once entered, a Nautilus window displaying the root directory of the remote machine will be presented.
Once you have an open Nautilus window to your remote PC, you can play with its files just as you would local ones. You can even open multiple remote servers through multiple protocols and drag & drop files between them.
Once you have an open Nautilus window to your remote PC, you can play with its files just as you would local ones
You may find that certain remote files will not open correctly when clicked in Nautilus. This is because only certain GNOME applications support accessing remote servers. In problematic cases, you may simply copy the file to a local directory before attempting to open it. You can, of course, copy the changed file back over to the remote server when you are done.
gedit is one application that does support remote servers, so if you click on a text file in Nautilus (and gedit is your default editor) you should be again prompted for the remote user name and password and then presented with the document. Changes made with gedit will be saved directly to the remote server.
KDE: learning how to fish
KDE users may access remote servers in a manner similar to Nautilus in GNOME. In Konqueror, open Go→Network Folders to be taken to the remote:/ URL. From there, you can add a remote SSH server with the “Add a Network Folder” link. You will be prompted to choose a protocol, name the remote location, and enter details about the server.
You may specify a specific directory on the remote server if you wish. The remote location will then be forever accessible as a shortcut from remote:/ and can be bookmarked or accessed from other KDE applications as normal. You will be prompted for a password each time you access the server.
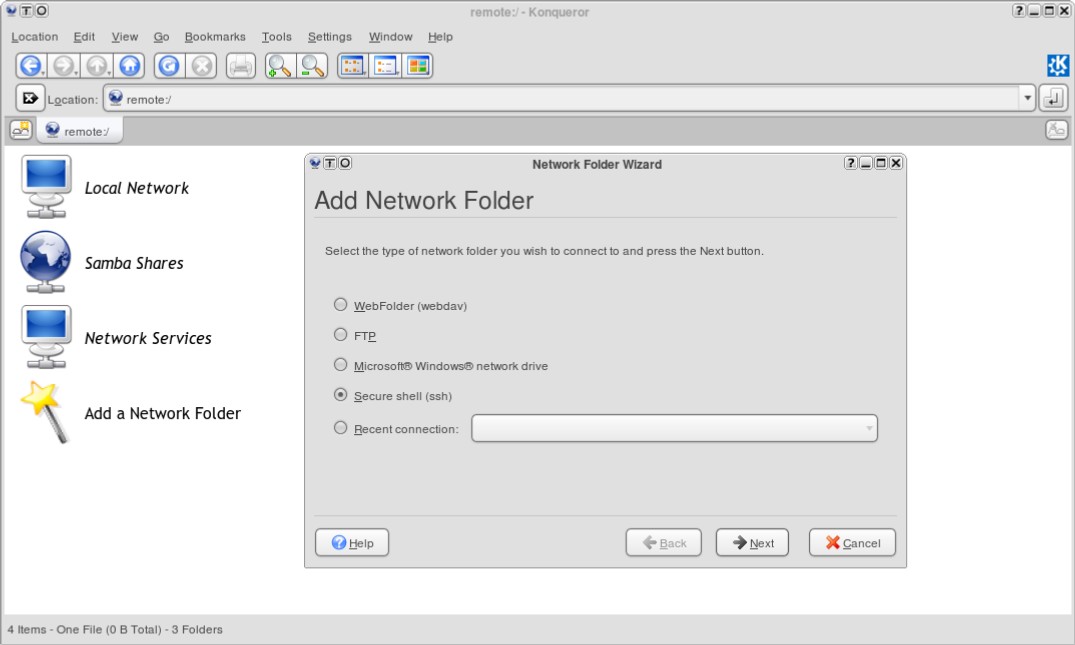
When you add a remote location this way, you are be guided through setting up a link using KDE’s fish KIO-slave. KIO lets you use simple URLs to access remote directories in KDE applications. Each “slave” supports a different protocol—fish works with SSH. As with GNOME, some programs will refuse to access remote servers, but most KDE 3.5 applications will play nicely.
You can skip the Add a Network Folder wizard and construct your fish URLs directly without too much difficulty. Use the following format:
fish://[server address]:[port]/[remote directory]
You will be prompted for a username and password upon accessing the URL. Although this prompt is important for security, there may be times when it is inconvenient. For instance, you may want to configure an application to load a remote file upon launch, in which case you wouldn’t want to be bothered with a password prompt. Use the following format to avoid having to input anything interactively:
fish://[user]:[password]@[server address]:[port]/[remote directory]
Of course, your password is now stored in that application’s configuration file. At the very least, you may want to make sure the file’s permissions are set to allow read access only to you.
You can do a lot of fun things with network transparency and fish. Right click on a file in Konqueror and select Actions→Print to directly print files from remote machines without having to set up a print server. Some KDE media players will allow you to play music and videos directly from a remote server, but limitations in the KDE 3 KIO system mean you may not be able to seek through the files (fast forward or rewind). Experiment with your own favorite KDE applications to see the extent of what you can do with fish.
Windows: less integration, but just as much fun with WinSCP
Microsoft has not embraced SSH to the extent that the major free software desktop environments have, but you can still perform typical file transferring tasks with SSH from a Windows box using third party clients. Several Windows scp clients exist, but I will focus on WinSCP, a popular, simple, and free tool. WinSCP 4.0 (currently in beta) includes support for FTP, but I will explore the 3.x series and its SSH functionality only. Download the standalone executable or installation file for WinSCP 3.8.2.
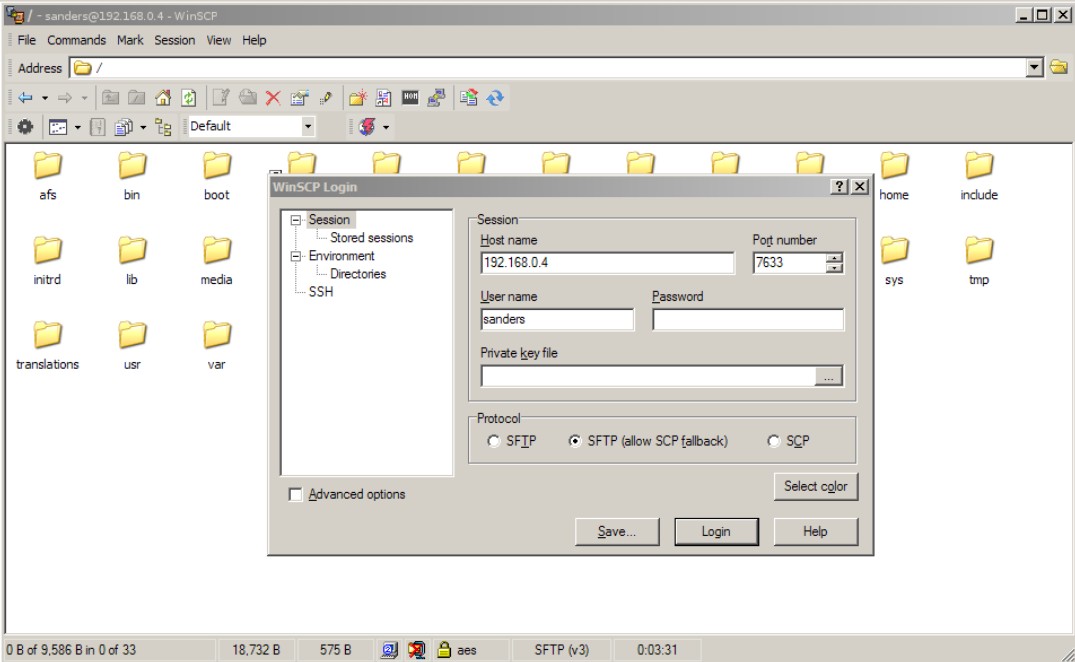
WinSCP’s GUI can look like either a complicated Windows Explorer window or the old Norton Commander two-pane interface, depending upon your preference. You may also select Icon, List, and Details views as you would in Explorer. Either way, navigating within directories works as in other file managers and you can drag & drop files around as you please.
WinSCP has some advanced features for synchronizing remote directories and managing remote server sessions that will not be addressed here. You may also execute commands on files on the remote server using the File→Custom Commands menu. WinSCP’s Preferences dialog is filled with dozens of settings to configure the way it uses the SSH protocol.
While WinSCP is definitely less integrated than the GNOME and KDE solutions discussed, the developers have made a valiant effort to establish their application’s functionality within Explorer. Upon installation, or from the Preferences dialog, you may register WinSCP to handle SSH protocol addresses and add WinSCP to Explorer’s context menus. There are also options for integrating WinSCP with the PuTTY Windows SSH client.
Don’t stop there!
You have just been introduced to a very limited set of features made possible by the SSH protocol. I think you will find that configuring an OpenSSH server for transferring files is easier than setting up an NFS, SAMBA, or FTP server—achieving a level of security comparable to what an encrypted SSH session can provide. If you find yourself in agreement and using SSH regularly, explore some of its other uses.
You will find that configuring an OpenSSH server for transferring files is easier than setting up an NFS, SAMBA, or FTP server
With just a little bit more reading, you could learn how to execute commands on your remote server or tunnel arbitrary network tasks through the secure piping of SSH. The web is filled with tutorials for these common SSH tasks.
Read Free Software Magazine issue 20 (the next issue!) to learn how to run GUI GNU/Linux applications remotely on a Microsoft Windows host.