We can’t all afford four-figure priced twelve megapixel digital cameras with wide angle lenses. We can, however, all use free software to embellish the photographs taken by our modest equipment and belie their resolution and viewing angle. Set the GIMP aside for a moment and launch Hugin, a powerful cross-platform GTK frontend that will help you quickly and easily stitch individual photographs into one, large, seamless panorama.
Panoramas from start to finish
Panoramas are created by stitching multiple images together. To do this, you must find spots where your images overlap and designate them as control points. Then you will optimize your collection by selecting the best way to rotate, distort, and align these images so that they come together seamlessly. Finally, you will stitch and blend them all together and do some postprocessing.
Taking good panoramic photographs
When composing photographs with the intention of combining them into panoramas, it is best to adhere as closely as possible to the following rules:
- Take all photographs from the same location, using a tripod if possible
- Aim for a 33% overlap between each frame
- Keep the camera’s metering equal between shots
- Keep the white balance equal between shots
You can take vertical panoramas as well as horizontal ones, or even multi-rowed ones
Remember, you can take vertical panoramas as well as horizontal ones, or even multi-rowed ones. Use as many images as you like, but bear in mind that larger and more complex panoramas will take longer to process. Erring in any of these guidelines will not prevent you from composing a brilliant panorama, however it will make it more difficult and may aggravate seams between the individual photographs. Such issues may be fixed with the GIMP or another image manipulation tool after the panorama is stitched, though white balance and color deviation issues should be fixed beforehand.
Introducing Hugin and associated tools
To combine your photographs you can use Hugin, a GPL-licensed frontend to Panorama Tools available for GNU/Linux, Mac OSX, and Windows in several languages. Hugin will let you design your panorama, but you’ll need additional tools to find control points and do the actual image processing. Try Autopano-SIFT for automatically finding control points, though you may also do this manually, and Enblend for blending the images together. Both these tools are also GPL and cross-platform.

Larger and more complex panoramas will take longer to process
You must first configure Hugin to work with the tools you have installed. Access the configuration dialog in File → Preferences. Ignore the first three tabs (“Panotools”, “Finetune”, and “Misc.”), they will most likely have the correct options predefined. In the fourth tab, “Autopano”, make sure Autopano-SIFT is selected, that it is pointing to the correct binary location, and that the Arguments are set to -o %0 %i. In the final tab, “Enblend”, make sure Hugin has found the proper executable and set its arguments to -v -m XYZ, where XYZ is equal to about half your physical RAM (this is how much image cache Enblend will use). You may want to enable the checkboxes in the “Enblend” tab to cut down on temporary file space usage. Make sure these settings are correct each time you launch Hugin.
Finding control points
I have selected six four-megapixel JPEGs that I want to stitch into a horizontal panorama. The images were taken handheld and not well composed. However, Hugin and its tools should have no problems combining them seamlessly.
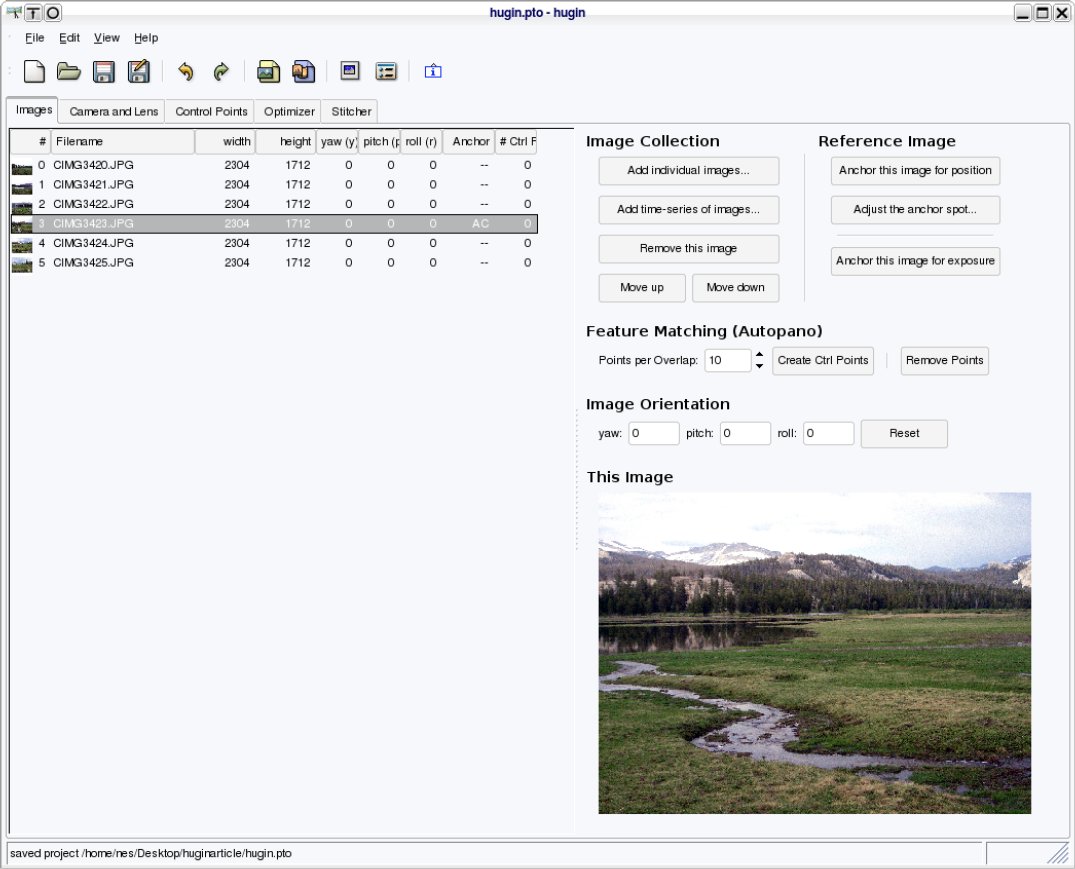
To begin composing your panorama, drag and drop your images into the “Images” tab or select them using the “Add Individual Images” button. Once your images are listed in the “Images” tab, select whichever photograph will represent the middle of your panorama and click “Anchor this image for position”. The “Camera and Lens” tab is used to correct images for camera error, ignore this since Hugin should have already filled in these variables based on your camera’s EXIF data.
There is a choice to be made now: do you want to trust Autopano-SIFT to choose control points, or would you rather do it yourself? Autopano-SIFT will generally do a good job, but having these complicated decisions made by complex algorithms can be be a very lengthy process, often taking several hours, regardless of your Desktop computer’s processing power. Manually selecting the control points may prove to be far quicker, but will take some experience and perhaps some frustration. Either way, you will probably need to do some manual adjustment to the selected control points based on the preview of your final panorama.
Autopano-SIFT will generally do a good job, but having these complicated decisions made by complex algorithms can be be a very lengthy process
If you choose to let Autopano-SIFT select your control points, click “Create Ctrl Points” on the “Images” tab and go out for some coffee. Read on to learn how to adjust Autopano-SIFT’s selections.
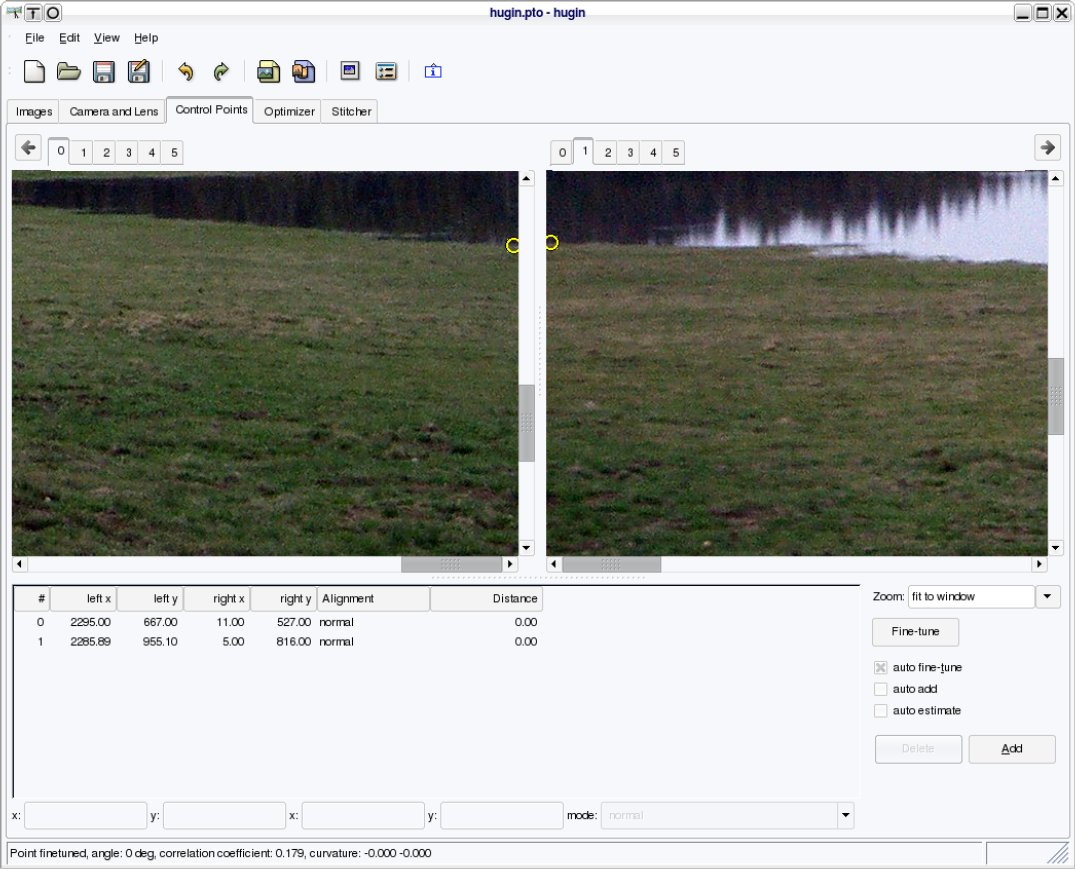
To manually select your control points, turn to the “Control Points” tab. You will see three panes, two from which you can select any of your source images and a third below where you can view the details of your control points. Start by selecting “0” in the left pane and “1” in the right. If these two images do not overlap, you can rearrange them in the “Image” tab or simply move to “2” and beyond. Once you have found an overlap, look for a small, distinct point which is common to both pictures. For instance, a car’s tire that is present in both images. Objects like tree tops, brown spots in grass, mountain peaks, or rocks may be easier targets for landscape images—but be careful that you do not confuse one tree for another.
Click on your first control point in each image. The pane will zoom in to let you select more precisely. Click the “Fine-tune” button to have Hugin adjust your selections to fit perfectly in each image, or check the “auto fine-tune” option to have this done when you first click. If your selections do not match closely enough for Hugin’s liking, it will spit back an error dialog displaying how far it deviated from an acceptable match. This may simply be caused by camera distortion, so you may wish to ignore the error. When you’ve found a control point you like, click “Add”. The new control point and its coordinates will appear in the lower pane’s list. Any control points in the list will be specific to the two images selected in the upper panes.
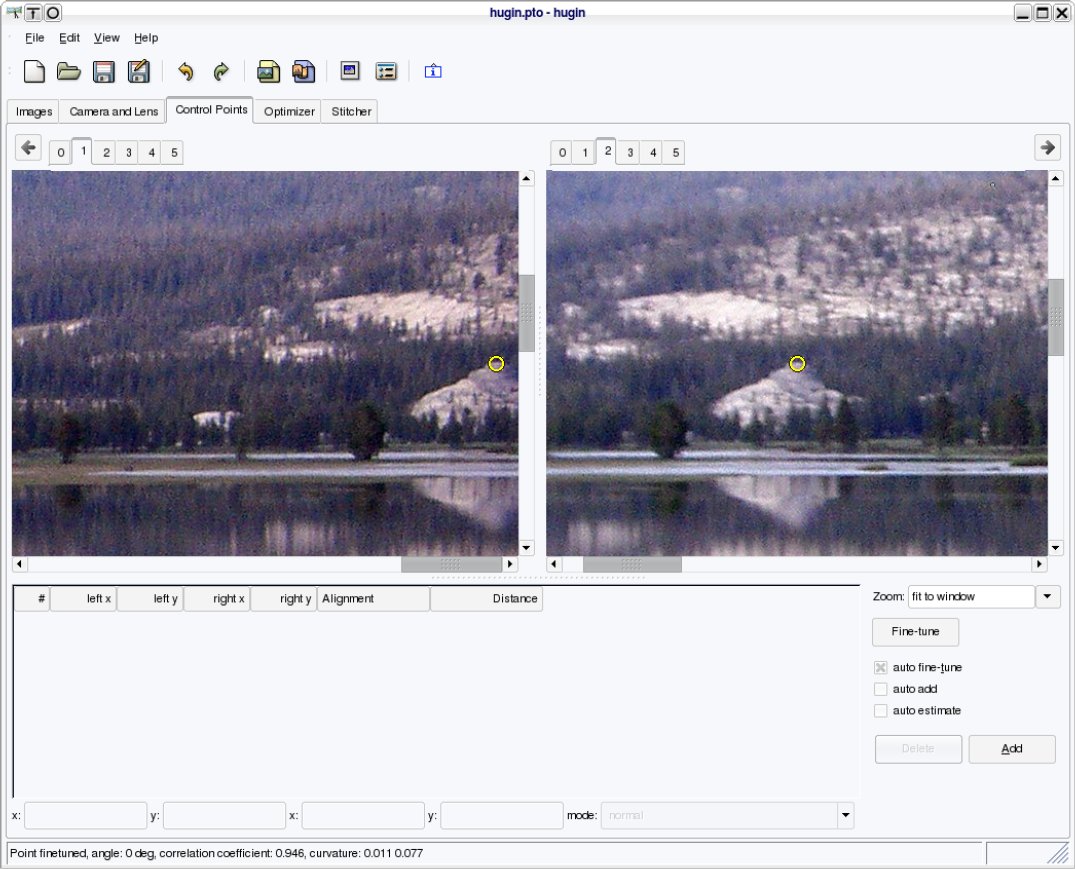
Select four or five more control points before you move on to your next set of images. You can add, subtract, or change these later, so don’t put too much effort into this. Continue on selecting five or so control points between each pair of images that overlap. If you have a pair of images that do not quite overlap, don’t be afraid to simply set control points on the edge of the images. If they come together nearly enough, Enblend will be able to do an acceptable job of merging them to look whole.
If you have a pair of images that do not quite overlap, don’t be afraid to simply set control points on the edge of the images
Arranging your images based on their control points
Now switch to the “Optimizer” tab to have Hugin arrange your photographs for you. If you haven’t been saving your Hugin workspace, now is a good time to do so (simply use File→Save). The optimizer tab consists of an “Optimize” listbox, an “Optimize Now!” button, and a multitude of figures. Select the “Everything” option from the list box and click “Optimize Now!”—this should only take a few seconds. If you have a very complex panorama with scores of control points and a somewhat slow computer, optimizing for “Everything” make take a few minutes. In this case, you may want to optimize for simply “Positions (y/p/r)”. Hugin will return some statistics about its optimization effort. Ed Halley’s “overview” tutorial recommends that:
“the average error should be less than 1 pixel for an excellent fit, and the maximum error should only be 5 pixels or less.”
If your results don’t satisfy these guidelines, continue reading to learn how to tweak your panorama. Now you can get a glimpse of what your panorama will look like for the first time! Click View→Preview window to take a look.

Depending upon how lucky you were in placing your control points, you may not be overly impressed. Fortunately, perfecting the panorama takes little knowledge beyond what you have already learned. If there are visible seams due to color disparity between your images, this will be smoothed out by Enblend during the stitching process and will only result in a noticeable seam in the case of strong differences in color between images. If this is the case, you should go back and preprocess your photos and adjust their color levels to an approximately equal level.
If there are visible seams due to color disparity between your images, this will be smoothed out by Enblend
Start adjusting by deciding whether or not your panorama is well centered. Click the “Fit” button in the preview window to see how much black space is being left to either side. If your anchor point needs to be repositioned, make a mental note of the middle of the panorama and return to the “Images” tab. Select the proper midpoint image and click “Anchor this image for position” again. Then click “Adjust this anchor spot...” to be presented with crosshairs that will let you select the exact feature in the image you wish to focus on. If you want to see what your changes have done, optimize for “Everything” again and then open the preview window. Once there, make sure you click either the “Update” or “Auto” button to view the new panorama.
Refining control points
Your image is well centered now, but there are probably other things wrong with it. If any two photographs are not lined up correctly, you may need to adjust the control points. Use the “difference” option in the preview window’s “Blend mode” listbox to help choose which images are not stitching properly. Ideally, all overlaps will appear as black boxes. If you find two poorly stitched images, isolate them by clicking off all the other image buttons in the “displayed images” frame of the preview window. Then click “Center” and “Fit” to zoom in on them.
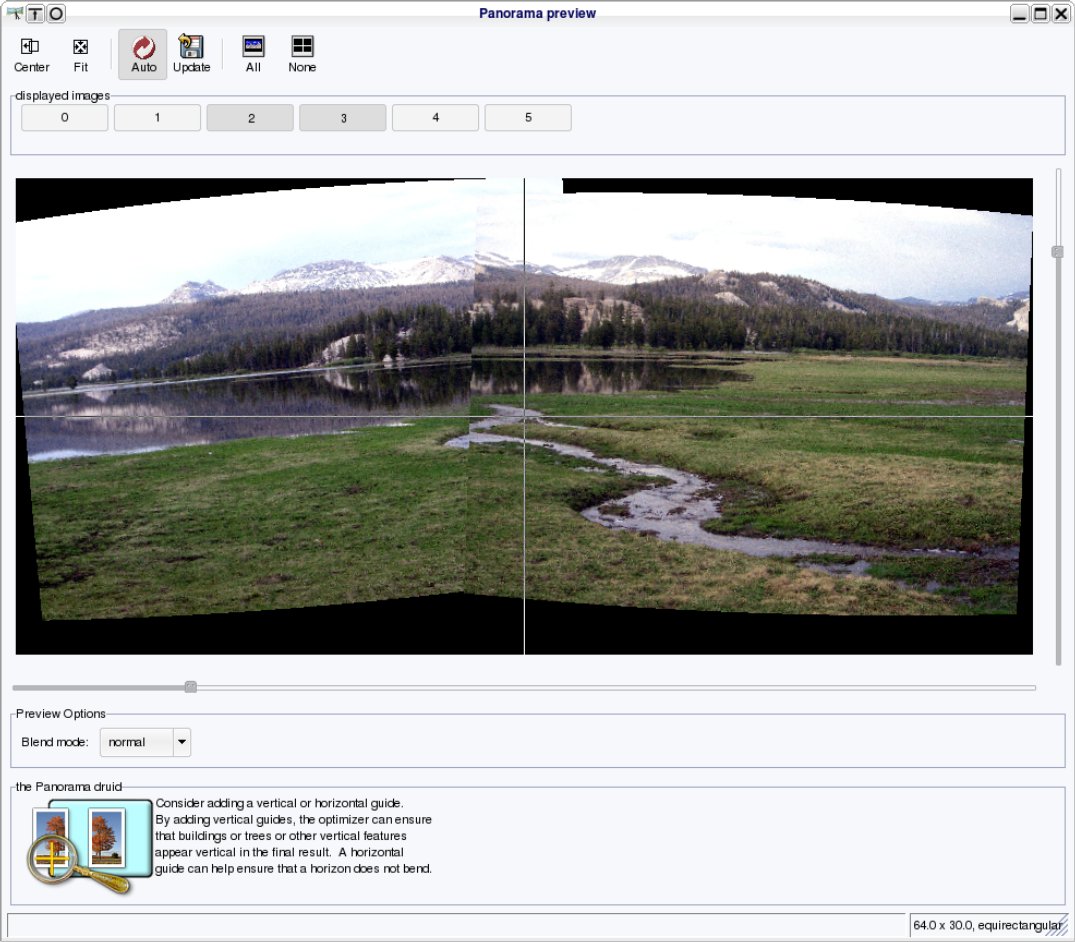
Take a look at figure 6 for an example of two images in need of control point revision. As you can see, the mountain peaks are somewhat askew and so is the stream’s bend. This image could probably be improved by setting control points at each side of the stream’s overlap, top and bottom, and at both the peak of the mountain and the treeline. Remember to take a look in “difference” mode to see how closely the images are being aligned. Optimize again with your new settings and have a look at the preview window. Repeat this process with different control points if you need to. Erase some if they look like they’re tilting the image.
If any two photographs are not lined up correctly, you may need to adjust the control points
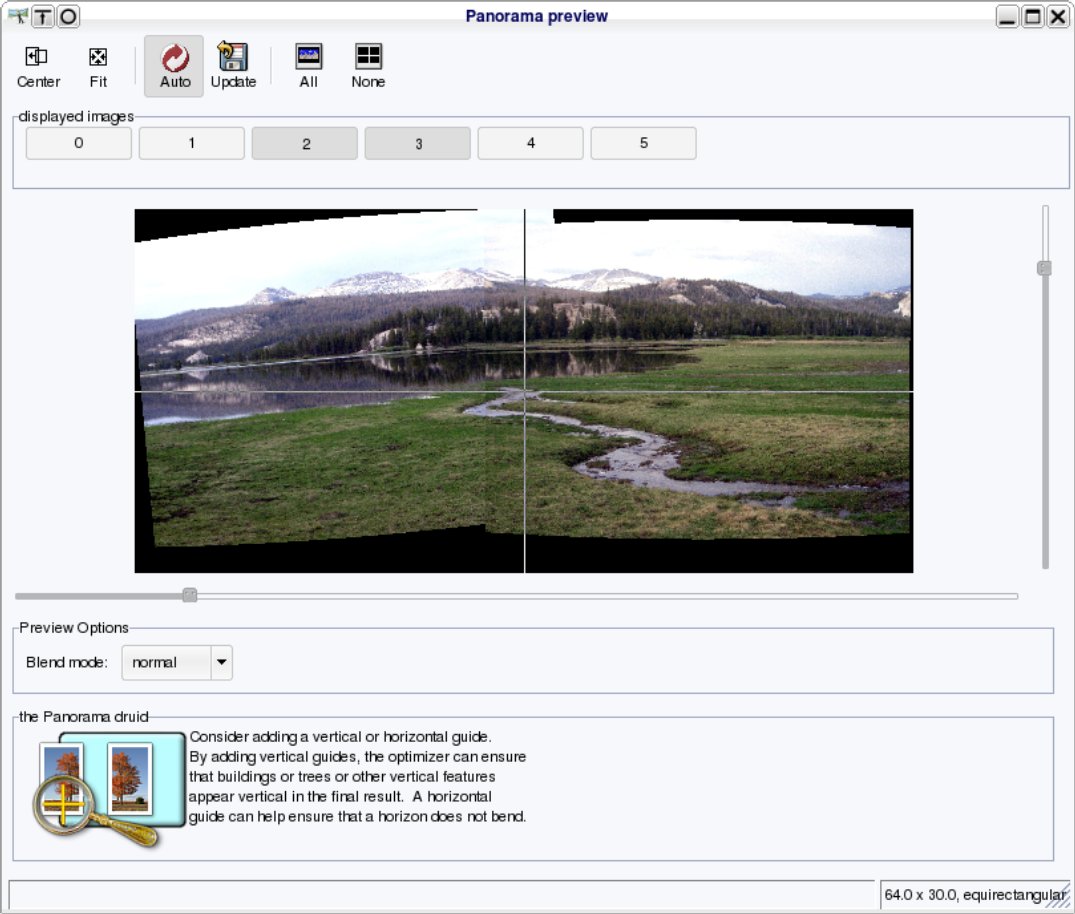
Straightening out the panorama with guides
Once you’ve corrected any stray stitching, turn on all the “displayed images” in the preview window again, “Center” and “Fit” the panorama, and look for other errors. You might find that your panorama is curved. Choose an image which is very out of balance and return to the “Control Points” tab. Select the chosen image in both upper panes. Now, look for any object in the picture which would appear straight either vertically or horizontally in reality. For instance, trees and buildings would be vertical and roads or horizons would be horizontal. Select either end of this object in each upper pane and use the zoomed preview to make sure you have positioned the control points exactly on the ends. Click “Add” to create a horizontal or vertical guide for this object. Hugin should automatically select which orientation is appropriate. If it has not, select the control point on the lower pane and adjust the “mode” list box to either “vertical line” or “horizontal line”.
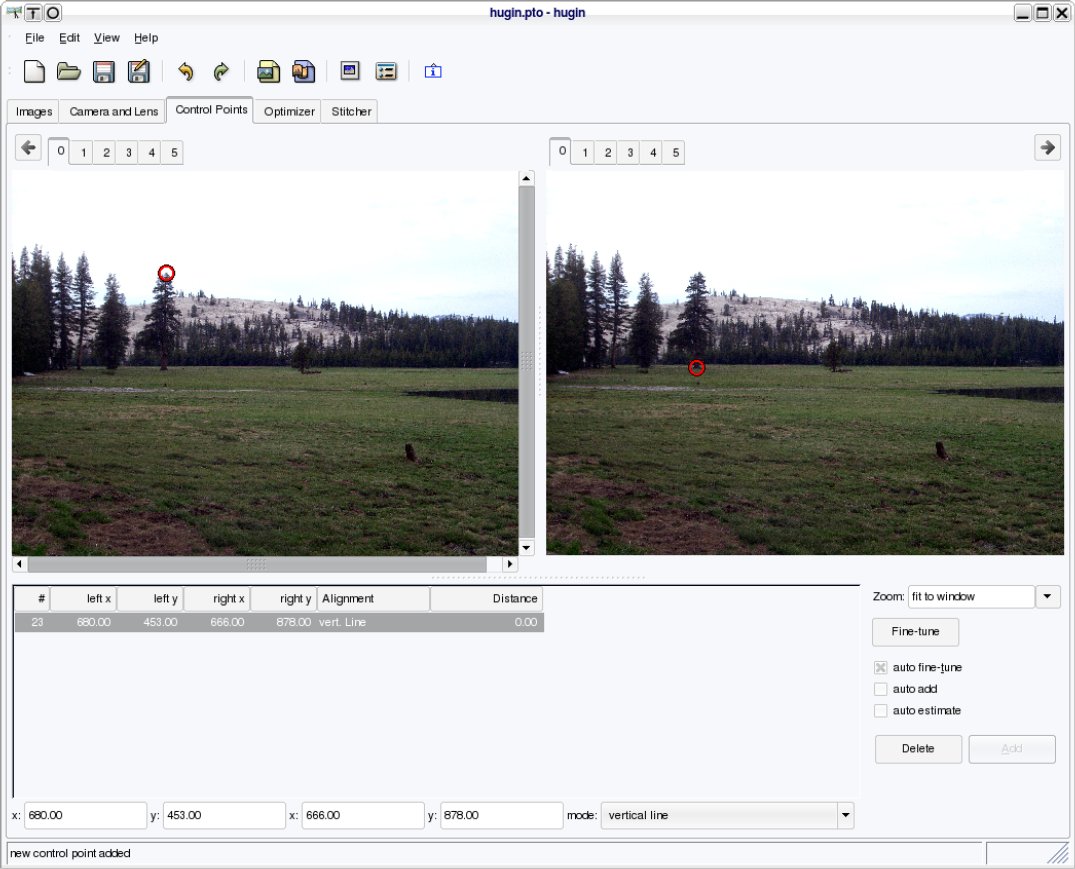
Optimize again and return to the preview pane to see if your guide straightened out the image enough. If it is still not perfect, add other guides. If you are not able to get a perfectly straight panorama, remember that you can crop off the curved parts when you’re done.
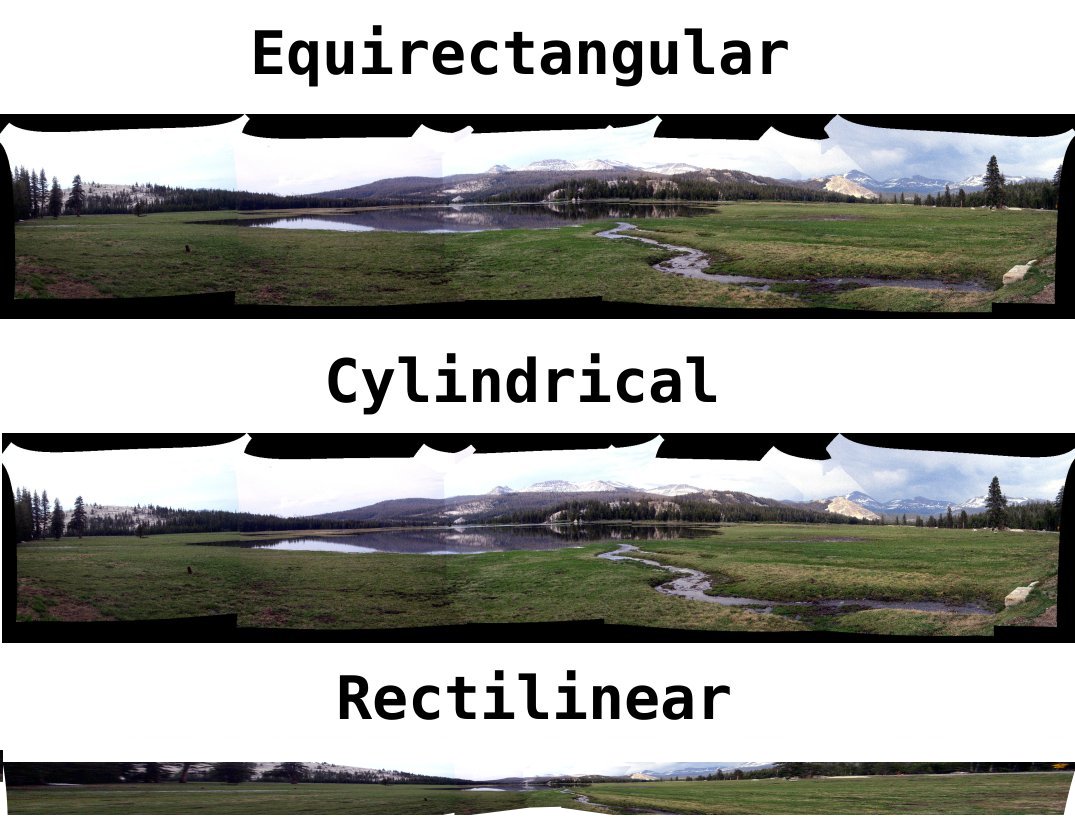
Stitching your panorama
All the hard work is over, now, it’s time to let nona and Enblend combine your images for you. Switch to the “Stitcher” tab and look at the “projection (f)” listbox. Within it are three slightly different methods for stitching your images. “Rectilinear” stitching will give you a very distorted and elongated image suitable for creating a true panorama, the type you might view with Quicktime VR. “Equirectangular” stitching will give you something similar to a very large photograph—you’ll probably want to do this. “Cylindrical” stitching will be somewhere in between.
Once you’ve selected a projection method, make sure the “Stitch the images” list box is set to “with custom settings below”, then click “Calculate Field of View” and “Calculate Optimal Size”. The field of view setting should be accurate, but feel free to change the size setting if you want a smaller and more manageable image. Keep in mind that the stitching process and final image may take up gigabytes of hard drive space, but the final, processed JPEG will probably be more like ten megabytes, depending upon its size and quality setting. Select “nona” as your stitching engine.
Besides making scenic panorama-format images, Hugin can be used to artificially increase the resolution or viewing angle of your camera
Next you must choose a method from the “interpolator” list box. There are explanations of the methods available, but you would do well to simply choose “Poly3 (Bicubic)”. This method is very quick and of acceptable quality. Set “Image format” to “TIFF” and enable “Soft Blending”, which will have Hugin use Enblend. When you’re satisfied, click “Stitch now!” and choose a filename. The process should take several minutes, depending again upon hardware speed and panorama complexity.
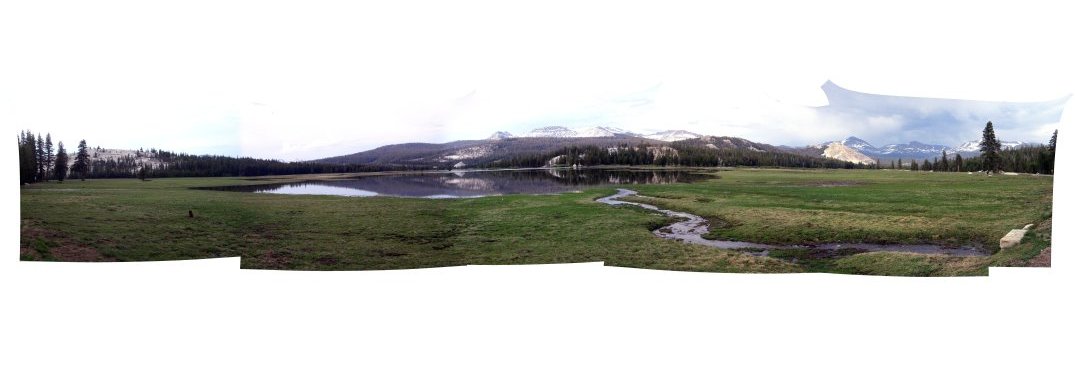
Take a look at the TIFF file Enblend has created for you, hopefully you will be presently surprised. Any seams visible in the preview window due to color disparities or poor control points should be more or less smoothed out. You can now open the TIFF in an image processing tool and crop, convert, resize, and make any other corrections to the image you wish.
Enjoying your masterpiece
You’ve just made your first panorama with Hugin, but don’t let it be your last! Using Hugin becomes second-nature after a few attempts. Remember that, besides making scenic panorama-format images, Hugin can be used to artificially increase the resolution or viewing angle of your camera. Try to make a few more with a few more sets of source photographs or experiment with using Hugin to stitch scanned images. Let Hugin, Autopano-SIFT, nona, and Enblend be a part of your fully-featured, professional-level graphics production free-software workshop.
